
How many times have you sowed a handful of teeny tiny seeds—onions, carrots, and basil for instance, or even worse, those little specks of lettuce—and wished you had a magnifying glass? Or sowed a row of teeny tiny seeds, only to end up thinning out over half the seedlings?
But it’s not just a matter of going cross-eyed when seed-starting time comes around. Sometimes the weather doesn’t cooperate, and the wind decides to pick up as you flick down a fingerful of seeds.
Sometimes all you want are a couple of seeds as you gently shake out the packet, and a whole year’s worth pours out. (Kinda like getting that last sip of iced tea in your glass, and you end up with a face full of ice.) More often than not, a few get stuck to your fingers or even under your fingernails.
I’ve been there. But now I have seed tape!
What is seed tape?
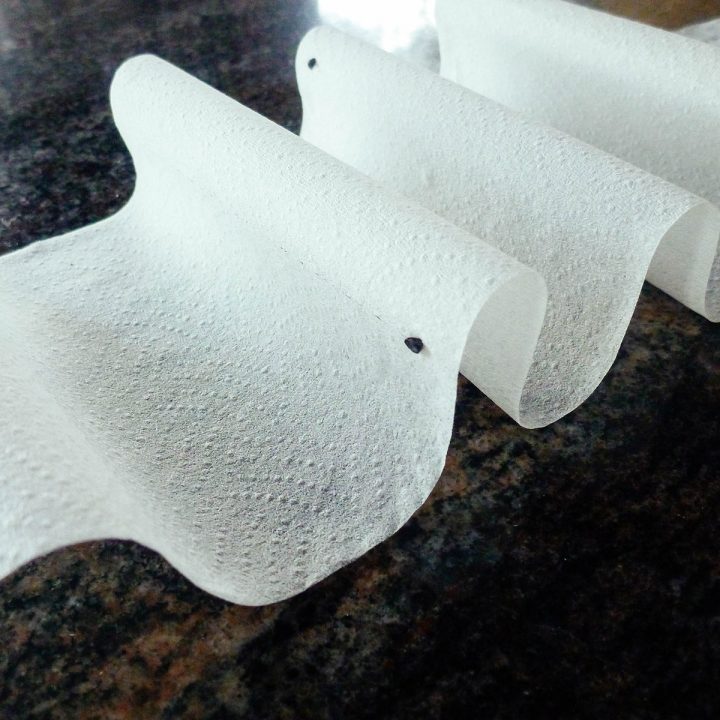
Seed tape—basically a strip of paper with seeds embedded in it for precision planting—is sold at many nurseries and garden centers, but you likely aren’t going to find seed tape in the variety you want.
It’s also expensive for what it is, especially since I’m all about affordable DIY. In fact, you can make your own seed tape at home with nothing more than toilet paper and school glue.

So how is this different from simply going outside and dropping a seed in the ground? Why take the extra step of making seed tape?
The advantage is that you don’t have to deal with the elements, especially if you want to conserve your seeds. You save time and can space your seeds more accurately without worrying about under-seeding or over-seeding.
If you need more seeds, you can buy them now before you run out (and not be in for a surprise later when that variety might be sold out). And since tiny seeds barely need to be covered, the paper makes it easy to see how much soil you’re adding on top.
Each seed strip only takes minutes to make, so you can knock out a few in an afternoon and store several varieties of seed tape to sow throughout the year. It’s also a good rainy day project to do on your own or with kids when you can’t work outside in the garden.
Related: How to Start Seeds in Eggshells, Save Money, and Have Fun
As soon as the sun comes out, you’ll be ready to sow!

DIY seed tape
Materials needed
- One-ply toilet paper
- Washable non-toxic glue (like Elmer’s)
- Seeds
- Paper seed envelopes or plastic zip-top bags
Tools needed
- Tweezers (optional)
Instructions
Step 1: Find a cheap roll of one-ply toilet paper.
Roll out a length to fit your garden bed. (You can also use two-ply toilet paper and just split the paper apart.) I usually don’t work with anything longer than 4 feet, just because it’s easier to manage several shorter lengths of seed tape than one extra long tape.

Step 2: Dab on some glue.
Place small dots of glue on the toilet paper according to how far apart you want your seeds spaced. For most plantings, 1 to 3 inches is a good start as some seeds may not germinate.
I like to stagger my plantings, so I place glue in a zig-zag pattern down the length of toilet paper.


Step 3: Add seeds.
Using your fingers or tweezers, place a seed onto each drop of glue.

If you’re gluing in a single straight row, you can glue your seeds to the bottom half of the paper, and fold the top half over to secure them while the glue dries. This keeps things neater and your seeds will still be able to sprout through the paper.


Step 4: Wait for your seed tape to dry.
Once you’ve glued on all your seeds, allow ample time for the glue to dry and make sure the seed tape is not sticking to your surface.

Step 5: Store your seed tape.
When those little glue dots have hardened, roll up your seed tape and stash it in an envelope or zip-top bag until you’re ready to use them. Be sure to label your seed tape!


How to use seed tape
At planting time, simply water your soil and smooth the surface. Unroll your seed tape, set it on top of the soil, and lightly cover with more soil.
It’s okay if the toilet paper shows through a bit. It’ll quickly disintegrate and decompose in the ground.


As with all teeny tiny seeds sown by seed tape or even the traditional way, gently mist the soil until the seeds have sprouted and established firm roots; you don’t want a strong blast of water to displace your meticulous work.
Within a week you should see perfectly spaced rows of little seedlings coming up!
Read next: This Is What Happens When a Seed Germinates
Make Your Own Seed Tape
Sowing tiny seeds like carrots, onions, basil, and lettuce can be a source of frustration for many gardeners. Make your own seed tape and you won't be at the mercy of wind (or heavy-handed seed sowing) again!
Materials
- One-ply toilet paper (or two-ply toilet paper split in half)
- Washable non-toxic glue (like Elmer's)
- Seeds
- Paper seed envelopes or plastic zip-top bags
Tools
- Tweezers (optional)
Instructions
- Roll out a length of toilet paper (no more than 4 feet).
- Place small dots of glue on the toilet paper according to how far apart you want your seeds spaced. For most plantings, 1 to 3 inches is a good start as some seeds may not germinate.
I like to stagger my plantings, so I placed glue in a zig-zag pattern down the length of paper. If you’re gluing in a single straight row, you can glue your seeds to the bottom half of the paper, and fold the top half over to secure them while the glue dries. This keeps things neater and your seeds will still be able to sprout through the paper. - Using your fingers or tweezers, drop a seed onto each dot of glue.
- Once you’ve glued on all your seeds, allow ample time for the glue to dry and make sure the seed tape is not sticking to your surface.
- When those little glue dots have hardened, roll up your seed tape and stash it in an envelope or zip-top bag until you’re ready to use. Be sure to label your seed tape!
Notes
At planting time, simply water your soil and smooth the surface. Unroll your seed tape, set it on top of the soil, and lightly cover with more soil. It’s okay if the toilet paper shows through a bit; it will quickly disintegrate and decompose in the ground.
Gently mist the soil until the seeds have sprouted and established firm roots; you don’t want a strong blast of water to displace your meticulous work. Within a week you should see perfectly spaced rows of little seedlings coming up!
This post updated from an article that originally appeared on March 22, 2012.
View the Web Story on DIY seed tape.


I know this is a late reply but was curious about how your seed tapes worked when you planted them in the ground? In particular did the glue cause any problems?
I have purchased fast dissolving paper made for seed tapes and I want to use Elmer’s glue but I’m a little nervous about it until I speak with someone who has used it.
Love the seed tape hack. Will try this spring.
I made seed tapes last year using flour paste and TP. My lettuce came up just fine but the carrots never germinated. Your thoughts?
Assuming your carrot seeds were new to start with (they’re typically only viable for about 3 years), the issue could be that they were sowed too deeply, or perhaps there was too much flour paste used (since the seeds are so tiny and delicate).
What effect does the glue have on the seeds? Also, can you use honey instead?
I use washable non-toxic school glue, so I don’t know of any effect it has on seeds. Unlike honey, the glue will dry so you can store your tape without getting everything sticky.
I’ve read you can use a 1:1 ratio of flour and water as a natural glue too.
I’ve started with seed tape this year and tend to mix seeds on the same tape.
Radish helps identify the row, before other seeds with long germination times (eg parsnip) are still not showing.
I also mix carrot and spring onion seeds. the onion smell prevents carrot fly smelling the carrots …. and the carrots prevent the onion fly smelling the onion.
No doubt other combinations would work too.
Mixing the seeds is a great idea! You could also interplant your vegetables with beneficial flowers like marigolds and yarrow.
Hi Betty,
Thank you for this excellent idea! I have been gardening for 45 years, and am no longer able to kneel on the ground, to plant my veggie seeds. We will be renting a 20X20 foot community garden plot this year, so that means a LOT of seeds. Being able to plant seed tape, will make that much easier. My husband and I are taking it one step further. I have been making 1″ wide strips of single layer TP and planting those in planting trays that a filled with dirt, to get a head start on some of the cool weather plants.
We have made a seed starting rack with five shelves and a grow light hanging from each shelf. We can put the trays under grow lights and will have healthy seedlings, as soon as we have our last frost.
I have MCS (Multiple Chemical Sensitivity), and can’t tolerate the chemicals in the glue, so made my own glue by cooking down 1/2 cup of sugar, in 1/2 cup water, to make a syrup. Then, I added 1/2 cup. flour to 1-1/4 cup water, in a pan on the stove, and heated until thickened. I then combined the sugar syrup and flour mixture and put in a squeeze bottle. I have been putting the seeds 1″ apart and laying them out to dry. By the time it is time to transplant into the garden, I can plant the seedlings the correct planting distance.
We planted our first seed tape (Spanish Onions) the other day. I pressed the dirt, in the row, about 1/4″ deep and laid the seed tape in the depression. We sprayed the seed tape with water, and were pleased to see it mold to the dirt. We then covered with 1/4″ seed starting mix (per your recommendation) and watered well. We got five rows in the planting tray, with 20 in each row (for 100 onion sets), and are looking forward to our seeds coming up in 10-14 days.
I always use seed tape outside, but great idea to use it for your indoor seed starting trays too!
When we were kids, we just mixed water and flour and that was glue. We stirred up just enough to do the job. Like all kids, once the project was finished we’d leave the mess there uuntil mother got after us to clean it up, including the bowl with the now dried up glue in it. Yuck.
Dear Devonviolet,
Check out the book, “A more excellent way” by Dr. Henry H. Wright. He has seen healing of many incurable things in about 40,000 people and convinced even skeptical doctors. He mentions MCS alot.
I hope it benefits you and pray for your complete healing!
love,
Amy
I am doing seed tapes this year for two reasons: 1. I have a bad back. This I can do at my kitchen table, and the planting part is much quicker, so I’m hoping it helps. 2. I always seem to be short on time in planting season due to our really short growing season, so I make the seed tape in the winter, plant quickly in the spring.
Both excellent reasons!
I’ll bet this would also help us dwellers with inner city squirrels who like to move everything around right after it gets planted. Will give this one a shot to see.
I sometimes have that problem too! Squirrels are not my friends in the garden.
Genius! 🙂
Incredible!
I need this! I just had rows of radishes (spaced “1/2 inch apart”) come up in rows that were alllllll over the place. I am going to be eating LOTS of radish thinnings, sadly.
1/2-inch spacing?! I’d go blind! 😉
I am not an all-caps person but this is ONE OF THE MOST CLEVER things I have ever seen. I am the queen of dropping teeny tiny seeds in beds I don’t mean them to be in and only realizing it when a tower of lettuce bolts out of no where in July. I am trying this this weekend!!!! Thank you!
I used this method for sowing carrots last year! It works great!