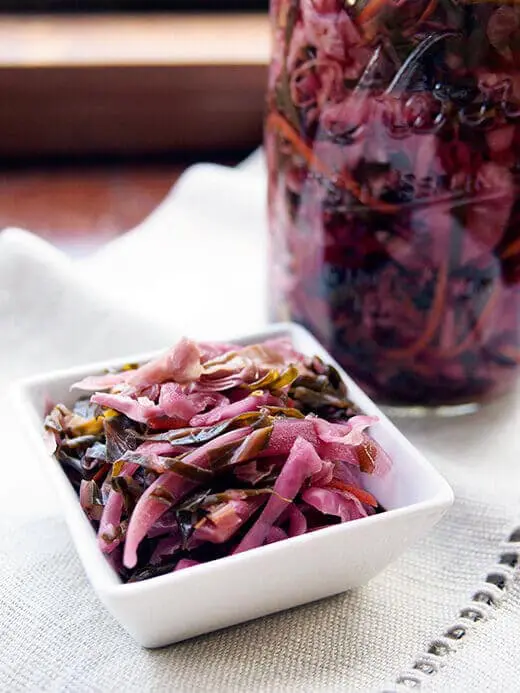
Ruby red kraut has sass. It’s like the sexier, sleeker, red lipstick-wearing sister of sauerkraut. And Ms. Ruby packs a healthful punch into one little jar.
The secret is in the red cabbage: The compounds that give the vegetable its distinctive dark color, anthocyanins, also act as antioxidants and are believed to have analgesic and anti-inflammatory properties.
(Pigment-rich and anthocyanin-filled vegetables and fruits like black carrots, purple beans, blueberries, and Concord grapes have these same health benefits… as in most things “green,” the darker it is, the better it is for you.)
Combine all that antioxidant power with the immunity boost of lacto-fermentation, and you could live forever on red cabbage sauerkraut. (Okay, maybe not, but keep reading…)
Why is red cabbage sauerkraut so good for you, anyway?
Sauerkraut is one of the most common examples of lacto-fermentation, a process of preserving cabbage with lactic acid bacteria (also known as the “good bacteria”).
Lactic acid bacteria is already present in the air and on the vegetable; under the right conditions, it will flourish and create an acidic environment that’s unsuitable for bad bacteria.
When this happens, the resulting ferment is full of highly beneficial Lactobacillus, Leuconostoc, and Pediococcus bacteria that work to improve your gut flora and balance your digestive system.
Why is gut flora so important?
At any given time, about 100 trillion (!) teeny tiny creatures (a network of microorganisms also known as your gut bacteria, gut flora, microflora, microbiota, or microbiome) live in your intestines and work diligently to absorb, digest, and synthesize all the enzymes, vitamins, and minerals in the food you eat.
To put it in perspective, we have 100 trillion of these little guys in our intestines alone, while the entire body comprises just 10 to 50 trillion human cells.
So in a way, we are more them than they are us… make sense?
This is why the mantra “You are what you eat” is 100 percent true and so very important to our health, if not the foundation of our whole health and well-being.
The gastrointestinal tract makes up a large part of our immune system—up to 80 percent!
There’s a whole bunch of metabolic processes that occur in our digestive tracts on a daily basis, and most of us take it for granted.
Our gut flora work overtime to keep us healthy and strong, so long as we provide them with the appropriate energy and nutrient sources. Quite simply, our bodies are built around our digestive systems.
Once in a while, the gut flora gets a little wonky and that’s why we get sick. What’s happening—in a nutshell—is the good bacteria isn’t able to fight off the bad bacteria that enters our system.
Enter lacto-fermentation.
Lacto-fermented foods (like sauerkraut) are high-acid foods full of probiotics that battle bad bacteria in our guts.
Probiotics (such as Lactobacilli and other beneficial bacteria and yeasts) supplement the existing good bacteria and, in effect, overwhelm the bad bacteria by lowering the pH of your digestive tract and creating an unfriendly environment for the bad guys.
Best of all, lacto-fermentation is easy when you’re only making small batches. You can ferment any of your favorite fruits or vegetables, with the most common being cabbage, carrots, cucumbers, squash, tomatoes… the sky’s the limit.
But today we’re doing red cabbage, because I grew a beautiful crop of Mammoth Red Rock cabbage this spring and I finally harvested the heads a couple weeks ago!


(As an aside, growing red cabbage in your garden can help you ballpark the pH value of your soil without a soil tester. Because of the anthocyanins, red cabbage tends to develop deep red leaves in acidic soil, dull purple leaves in neutral soil, and greenish-yellow leaves in alkaline soil.)
What to know before you make this recipe
My red cabbage sauerkraut is rather simple—just cabbage, carrots, and a handful of spices—but you can add anything else from the garden.
Apples, onions, and ginger are classic additions, and you’ll want to use the highest quality foods you can find (think farmers’ market, organic, or homegrown) for the most benefit.
You can do up the spices differently too—try juniper berries and caraway seeds for traditional flavor, or even cumin, coriander, or fennel seeds for added depth.
However you mix it up, try to keep a ratio of 5 pounds of vegetables to 3 tablespoons of pickling salt.
(Too much salt, and your kraut may take a long time to ferment—though this might be useful for people who live in the tropics and need to slow down fermentation.)
You can also use unrefined sea salt or kosher salt in place of the pickling salt; just none of that iodized stuff, which interferes with the bacteria.
Ruby Red Sauerkraut
Makes 4 quarts
Ingredients
For the Vegetables
4 pounds red cabbage
1 pound carrots
3 tablespoons pickling salt
For the Spices
2 teaspoons celery seeds, divided
2 teaspoons dill seeds, divided
2 teaspoons black peppercorns, divided
2 bay leaves
For the Brine (Optional)
4 cups water
2 tablespoons pickling salt
How to make red cabbage sauerkraut
Shred, slice, or grate your cabbage using a food processor, knife, or grater… whatever works for you.
I cut my cabbage in half lengthwise, remove the cores first, then slice the cores to add to the kraut. Then I thinly slice the rest of the cabbage by hand for a cole-slaw-like consistency.


If you harvested the outer leaves from your cabbage crop (the huge ones that look like elephant ears), you can shred some of those up too.
Remove the tough stems, then slice thinly as the outer leaves tend to be thicker (but are just as delicious and even more nutritious than the head).

Do the same for the carrots. I take a julienne peeler to mine to get those skinny slivers.

Now, you should know that 5 pounds is a lot of veggies… at first. I put all of my slices and slivers into a huge soup pot because even my biggest mixing bowl wasn’t big enough to hold everything.

Once you’ve broken down all the cabbage and carrots, add the pickling salt and toss to combine. At this time I let the veggies sit while I do some clean-up in the kitchen. The salt will start to draw out moisture and make your cabbage nice and limp.

About 20, 30 or however many minutes later, go back to your pot and knead those veggies into submission with your hands. Be sure to press down on them to expel as much water as possible.
By the time you’re done, the volume of veggies should be reduced to at least half. You’ll see some water pooling at the bottom of the pot; this is good!


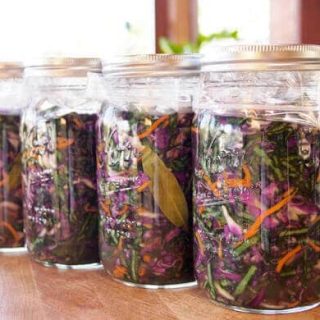
This recipe makes two jars of celery and dill-spiced kraut, and two jars of peppercorn and bay-spiced kraut. Divide your spices equally among the jars.
I like to fill my jar in layers: half a teaspoon of spices, some cabbage and carrot mix, another half a teaspoon of spices, more cabbage and carrot mix, and so on.
While you do this, tamp the layers down with the back of a spoon to squeeze more liquid out of the vegetables.
Pour any remaining liquid from the mixing pot into your jars. Leave at least an inch or two of headspace after filling, since the kraut will continue to expand and release liquid while it’s fermenting.


Run a chopstick or the end of a long spoon around the perimeter of the jar to release any trapped air pockets. It’s important that all the veggies are completely covered in liquid.

To keep the kraut fully submerged during fermentation, I like to fill a zip-top bag with some water and place that right on top of the vegetables, filling all the empty space in the jar. The water acts as a weight to push them down into the brine.
Or, you can use an empty half-pint jar or fermentation weight to weigh down the vegetables.


Loosely seal your jars with lids and store them at room temperature out of direct sunlight.
The kraut may “bubble over” as it ferments, so it’s a good idea to place the jars in a shallow baking dish to catch any overflowing liquid.
If the veggies haven’t released enough liquid by the second day to stay submerged, you’ll want to top them off with brine.
Bring water and salt to a boil, stir until the salt is completely dissolved, then let cool and add to the veggies. Don’t forget to leave an inch or two of headspace in the jars.
Push down on the veggies, add the baggie liners with some weight, and reseal with lids.

You will see bubbling over the next few days; those bubbles are the off-gassing of carbon dioxide from lactic acid bacteria at work.
Once a day or every other day, loosen the lids to let the fermentation gases escape.
Pay attention to any stray cabbage or carrot pieces that may have worked their way in between the rim and baggie; you’ll want to push them back into the brine so they don’t become moldy.
As the lactic acid bacteria proliferate, your cabbage will turn into sauerkraut—or “sour cabbage” in German. The sourness comes from all the lactic acid created during lacto-fermentation.
Theoretically, your kraut is “alive” with probiotics by day four and can be eaten, but for the best flavor, you’ll want to wait anywhere from one to three weeks, depending on how warm or cool it is in your house.
Warmer temperatures speed up fermentation, while cooler temps slow the process.
Check your jars each day to ensure the veggies are still submerged in liquid, and resist the temptation to fiddle with your ferment too frequently; oxygen is the enemy and will produce mold on the surface.
You can begin to taste your kraut after a few days until it has soured enough to your liking.
For me, the right amount of time to perfect sauerkraut was exactly 12 days. (The temperature in my house hovers between 68°F and 70°F.)
Once the kraut has achieved a nice flavor, remove the baggies, reseal with lids, and keep the kraut in your fridge to prevent over-fermentation.
Your kraut should smell pleasantly sour and salty—like pickles. If it smells rotten or yeasty, chuck it and start over.
Fermented foods don’t necessarily go “bad” if properly sealed and submerged in liquid, but they will eventually reach a point of becoming too sour to be edible. Refrigeration slows down fermentation so you can enjoy your kraut at its peak flavor!

Ruby Red Sauerkraut
With a flavor and texture that's just as tangy and crisp as fermented green cabbage, ruby red kraut is packed with antioxidants as well as all the good stuff for your gut.
Ingredients
For the Vegetables
- 4 pounds red cabbage
- 1 pound carrots
- 3 tablespoons pickling salt
For the Spices
- 2 teaspoons celery seeds, divided
- 2 teaspoons dill seeds, divided
- 2 teaspoons black peppercorns, divided
- 2 bay leaves
For the Brine (Optional)
- 4 cups water
- 2 tablespoons pickling salt
Instructions
- Shred, slice or grate your cabbage using a food processor, knife, or grater… whatever works for you.
- If you harvested the outer leaves from your cabbage crop (the huge ones that look like elephant ears), you can shred some of those up too. Remove the tough stems, then slice thinly as the outer leaves tend to be thicker (but are just as delicious and even more nutritious than the head).
- Do the same for the carrots. I take a julienne peeler to mine to get those skinny slivers.
- Once you’ve broken down all the cabbage and carrots, add the pickling salt and toss to combine.
- At this time I let the veggies sit while I do some clean-up in the kitchen. The salt will start to draw out moisture and make your cabbage nice and limp.
- About 20, 30 or however many minutes later, go back to your pot and knead those veggies into submission with your hans.
- Be sure to press down on them to expel as much water as possible. By the time you’re done, the volume of veggies should be reduced to at least half. You’ll see some water pooling at the bottom of the pot; this is good!
- This recipe makes two jars of celery and dill-spiced kraut, and two jars of peppercorn and bay-spiced kraut. Divide your spices equally among the jars.
- I like to fill my jar in layers: half a teaspoon of spices, some cabbage and carrot mix, another half a teaspoon of spices, more cabbage and carrot mix, and so on. While you do this, tamp the layers down with the back of a spoon to squeeze more liquid out of the vegetables.
- Pour any remaining liquid from the mixing pot into your jars. Leave at least an inch or two of headspace after filling, since the kraut will continue to expand and release liquid while it’s fermenting.
- Run a chopstick or the end of a long spoon around the perimeter of the jar to release any trapped air pockets. It’s important that all the veggies are completely covered in liquid.
- Loosely seal your jars with lids and store them at room temperature out of direct sunlight. The kraut may “bubble over” as it ferments, so it’s a good idea to place the jars in a shallow baking dish to catch any overflowing liquid.
- If the veggies haven’t released enough liquid by the second day to stay submerged, you’ll want to top them off with brine. Bring water and salt to a boil, stir until the salt is completely dissolved, then let cool and add to the veggies. Don’t forget to leave an inch or two of headspace in the jars. Push down on the veggies, add the baggie liners with some weight, and reseal with lids.
- You will see bubbling over the next few days; those bubbles are the off-gassing of carbon dioxide from lactic acid bacteria at work. Once a day or every other day, loosen the lids to let the fermentation gases escape.
- Check your jars each day to ensure the veggies are still submerged in liquid, and resist the temptation to fiddle with your ferment too frequently; oxygen is the enemy and will produce mold on the surface. You can begin to taste your kraut after a few days until it has soured enough to your liking.
Notes
To keep the kraut fully submerged during fermentation, I like to fill a zip-top bag with some water and place that right on top of the vegetables, filling all the empty space in the jar. The water acts as a weight to push them down into the brine.
Or, you can use an empty half-pint jar or fermentation weight to weigh down the vegetables.
Recommended Products
As an Amazon Associate and member of other affiliate programs, I earn from qualifying purchases.
-
 Ball Mason 32 oz Wide Mouth Jars with Lids and Bands, Set of 12 Jars.
 -
 Organic Bamboo Cutting Board Set of 3 with Lifetime Replacements - Wood Cutting Board Set with Juice Groove - Wooden Chopping board Set for Kitchen, Meat and Cheese - Wooden Cutting Boards for Kitchen
 -
 Mandoline Slicer for Kitchen -VEKAYA Stainless Steel Vegetable Slicer for Potato, tomato and Onion, Carrot Julienne and Chopper for Vegetables with Gloves (BlacK)
 -
 ZWILLING Pro 7-inch Rocking Santoku Knife, 7'', Black/Stainless Steel
View the Web Story for red sauerkraut recipe.


I have a large red cabbage and the outside got a little moldy. I peeled off all the bad leaves and cut the core out that was also moldy that was on the bottom of the cabbage. Is it ok to use this cabbage for kraut. I purchased the cabbage at a farmers market.
To reduce the saltiness, could you borrow a step from the kimchi making process and rinse the cabbage before you had the spices? And, thanks for the excellent, detailed article – very helpful.
I don’t find the sauerkraut salty at all. If you’re particularly sensitive to it, you might want to try a different type of salt that contains less sodium chloride, like a fine-grained Himalayan pink salt.
If you reduce your salt you run the risk of mould forming.
As a rule of thumb I use 2% by weight of salt. That is 1kg shredded vegetables requires 20gm salt. This should be considered a minimum imo.
Two tips;
1. Do not use iodised salt
2. Any left over brine also contains good bacteria and can be drunk. Have a tablespoon at breakfast to top-up your gut flora.
Whilst I use caraway seed sometimes and also add fennel, I never thought to use pepper corns. Thanks for the great ideas Linda.
BTW dazheb, if you rinse the cabbage leaves you could wash away the good bacteria on the leaf surface. I’d only wash the outer leaves in case there are slug and snail trails and dust.
Instead of a rock, make a brine, place a ziplock bag in the jar, and pour the brine in the bag. This will keep everything submerged. If it leaks, the brine makes it so it doesn’t matter. I made your Vietnamese Pickled Mustard Greens yesterday, I’m going to make this tomorrow. Thanks.
Good tip. 🙂 Enjoy the pickled mustard greens and kraut!
Can we use pink Himalayan salt instead of kosher or sea salt?
Yes, but you may have to adjust the amount of salt used, depending on the coarseness of your Himalayan salt.
Thank you! It’s a little challenging using Himalayan salt. I’ll look at the coarseness.
This recipe is for sauerkraut. If you are asking for advice on canning tomatoes, I recommend that you follow a recipe from a trusted source and direct your question to that source.
Thanks for that. I kind of knew that was a recipe for sauerkraut.
After you have fermented the kraut to your desired sour-ness can it be pressure canned to be shelf safe and stop the fermentation process??
Yes, you can process your sauerkraut to be shelf stable. (Keep in mind that processing the kraut will affect its texture.) However, I can’t give instructions for pressure canning as I’ve never done it.
Pressure canning would kill the good bacteria, though, right? Which would essentially take away the health benefits.
Correct, you would lose all the probiotic benefits because of the high heat. I don’t know how much good bacteria would actually remain since pressure canning is meant to kill all bacteria, good or bad.
Very nice instructions. I just ordered a small fermentation kit and am going to follow your instructions for my first fermentation. I have a friend who makes and eats lots of fermented foods to help with skin and allergy problems and she feels so much better. She said she has a number of jars on her counter and they are like her little “pets” that she takes care of and they in turn take care of her.
LOL about the “pets”… so true!
This sounds delicious – I’m making it right now! Just chopped up my cabbage. At what point do you add the ginger and/or apples? Just before serving, or do they go in the ferment? Thanks!
They’re fermented with the cabbage, so go ahead and mix them in!
Hi, I don’t like the idea of the plastic bag leeching chemicals into the salted liquid , Would you consider using a handful of glass marbles to weigh down the cabbage? I use the marbles i also put a latex glove over the rim of the jar in place of the lid , The glove will slowly inflate removing the need to expose the contents to the air, Put an elastic band around the rim of the jar to hold the glove securely. You grow some healthy and delicious looking cabbage.
You can use whatever weights you have on hand. Even a cabbage leaf over the top of the vegetables works. (Though the latex glove with rubberband sounds like more work than needed, a loosely sealed lid is much quicker and easier.)
Totally wrong ! The stuff you see bubbling up is co2 , co2 is heavier then air it is also a preservative , The last thing you want while making sauerkraut is items floating plus oxygen entering the sealed jar, To make safe sauerkraut you need to seal in the co2 but to do this you risk explosion, This is where the glove proves its worth you never have to break the seal to remove the protective co2. The glove will expand like a balloon.
The information I provided in this post is correct, so I’m not sure what you’re referring to as wrong. Sauerkraut is made through a process of lacto-fermentation, and the preservative is lactic acid. Lactic acid does not “escape” from a jar, it remains in the food and gives that tangy flavor.
If you want a truly airtight seal, I suggest investing in airlocks for your jars. Airlocks eliminate the need to use weights (which traditional fermentation crocks employ). Otherwise, you can simply keep your vegetables submerged in their liquid to prevent exposure to air. A lid (as I suggested in my post) merely keeps flies and dust out of your fermentation.
You just need one or the other: a weight of some sort, or a proper airlock.
Thank you! I never thought of using a food grade latex glove. That opens up a drawerful of mason jars for my micro-ferments. Brilliant.
I will add a link when i can locate it which explains the importance of containing the co2 and how any sludge or slime on the top of the kraut is dangerous .
Just find a smaller glass jar that will fit inside your ferment jar. Fill it with water and before you screw the lid on wrap a string or fishing line around the neck to make it easier to remove.
I keep an outer cabbage leaf separate so that it can be torn to a shape that forms a “lid” covering the shredded cabbage. This is important as you do not want bits of shredded cabbage floating to the surface of your brine where they could go mouldy.
I just started a fresh batch of sauerkraut this week and used one of my most popular recipes on the blog. (This… https://t.co/TKID9mqPVx
Dan Bolton liked this on Facebook.
Lydia Ann liked this on Facebook.
Jodi Anderson liked this on Facebook.
Marissa Grady liked this on Facebook.
Mona May Russell Mayer liked this on Facebook.
Cindy Riecke liked this on Facebook.
Jun Iguchi liked this on Facebook.
Daniel Chavez liked this on Facebook.
Sharon Obrien liked this on Facebook.
Will Taylor liked this on Facebook.
Larry Peitersen liked this on Facebook.
William Rutlege liked this on Facebook.
For simple ferments that only need to sit for a week or two (which are all the ones I make), I do not use a starter culture. I’ve really found no need for one.
I made this Ruby Kraut and it was delicious!!! I just made up another batch. I can’t wait until it is ready. This is Sue and I am commenting using my husband’s Facebook!!
Gosh, you have the patience of a saint! The amount of imbeciles who have asked questions that were already covered by your exemplary and informative post beggars belief.
Do people just look at the pictures or what? I literally have no questions after reading your above guide. I specifically searched for red cabbage kraut and yours is by far the easiest.
“Do you put the pooled water into the jar?” Criminy! What a question… When did people become so infantile and lacking in the most basic common sense?
Anyway, I just wanted to say thanks and to express my admiration for your patience. I wouldn’t have been able to cope personally.
Fielding questions from all my commenters makes me realize there are people of all ages and ability levels reading this blog… so, that can only be a good thing?!
Hope the kraut turns out wonderful for you!
Chill out Christo…..not everyone is as astute as you, but I assure you many have more patience, and probably less stress as a result. Take that energy you spend trying to “cope” with others ” infantilism ” and focus on yourself…..you will continually set a better example of common sense and maturity that will benefit others, and make you less annoyed as well.
Hi….. great post but I have a question: You say ‘seal your jars…’ If you tighten lids on the jar it is likely to explode due to pressure od gasses produced. I did that once with pineapple … very messy
Yes, I specify to seal the jars (the baggies prevent them from having an airtight seal) and also to loosen the lids to let gases escape when you check on your ferment.
Hello I am housesitting for a farmer who grew some beautiful red cabbages. I am happy to be trying out your recipe, and enjoy the idea of using all parts of the vegetable. I also milk a goat and make yogurt, so thought of using the whey. But i can’t seem to understand how much whey is enough and how much i should reduce the salt. .. is there a fixed proportion? recipes and measurements seem to vary alot from one person to another. I wonder if you would have a better understanding of it and demystify it a little. ..
I think i might use two tbsp of salt, and about 1/4 cup of whey. .. but it would be great to have a second opinion about it!
p.s. your website is a good inspiration! I have been freely using nasturtium pods (i already loved the leaves and flowers) in everything, from dilly beans, to tomato preserve.
Keep the ratio of 5 pounds vegetables to 3 tablespoons salt. The salt helps draw the moisture out of the vegs so they can ferment in their own brine. To give your fermentation a boost, you can add 1/4 cup whey to each quart-sized jar. This will speed things along by several days.
Thanks for following the blog; I’m glad you’ve been finding many uses for your nasturtium pods. 🙂
I PUT THIS TOGETHER 8/1 AND HAVE BEEN CHECKING EVERY FEW DAYS, THE FIRST WEEK, THERE WAS QUITE A BIT OF BUBBLING. IT HAS BEEN WARM HERE SO I MADE SURE I CHECKED ON THE 12TH DAY. A LOT OF BRINE WAS GONE SO I TASTED, NOT READY. I ADDED MORE BRINE AND WAITED THREE DAYS. STILL NOT AT ALL SOUR. IT HAS NOT GONE BAD, BUT COULD THE FERMENTATION STOPPED?
Fermentation does not stop until you refrigerate the kraut (and even then, it only slows down). If you used too much salt (which helps preserve), that could inhibit proper fermentation. Does your kraut taste salty? Cabbage-y? In a warm environment, cabbage starts to taste tangy after several days and continues to sour the longer you let it sit. As long as your kraut doesn’t smell rotten or grow black mold (and as long as it stays submerged in brine), there’s no harm in waiting a bit longer for it to sour to your liking.
Hi GB, Do I see Kale in your photographs??? Your ferment seems full of something green and leafy all shredded up, but it’s not listed! Do you think this might be a way to work in some of this supremely nutritious green into the mix? Or do you think it might just turn black and slimy and ruin the whole batch? (For that matter, would the combination of tastes even work in your opinion?) Thanks.
Questions, questions, questions…
PS I’ve always wondered why other people didn’t use the cabbage cores.
The green leaves are actually the large outer leaves of my cabbage plant. (You can see a picture of them in the post.) Kale would be delicious in a kraut. I usually mix it with other things, like cabbage, carrots, pears, apples, etc.
Do I have to refrigerate the kraut after fermentation?
Yes. Refrigeration slows down fermentation so that your kraut doesn’t turn too sour.
So, today is day 4 of this grand experiment and I have three quarts of beautiful kraut bubbling away in the pantry. Your method worked very well. I used one huge green cabbage and one pretty large red from my garden, plus a bunch of carrots and one gorgeous, nubile, juicy head of garlic, and it filled my large sauce pot. Still, I wonder if the salt is too much? I did the 3 Tbs., used sea salt (tho’ Kosher is supposed to be less, er, salty??). For two quarts, I used a dill/mustard/hot pepper/fennel mixture and for the 3rd quart a nice mild curry plus some ginger. Today I tasted for the first time and I really liked the curry one the best. I also cleaned up the rims (lots of overflow!) and replaced the baggies with fresh. Looks great! Thanks so much for the idea and the ease of execution!
–jbird
Your krauts sound delicious!
No kidding Cabbage will expand! I’m glad I had my jars sitting on a lipped baking tray. Cabbage expanded all the way to the lid! Have you tried the mason jar re-cap lids? I bought a few- and fitted them with a #6 bung and airlock (home-brew equip.) they make perfect vegetable fermentors. Its not my idea, I found it on another blog. Can’t wait for my kraut!
LOL, I once had a kraut volcano in my kitchen, but luckily that hasn’t happened again. Airlocks are a great idea if you ferment frequently, but I personally don’t use them because I ferment in a variety of jars with different diameter rims (most of them recycled).
After noting you just use lids, I had to wonder if your system doesn’t benefit from greater pressurization with CO2, which should help prevent mold in the head space over the non-pressurized air-lock set up. FIDO jars would also seem to offer this benefit. 🙂 Sometimes simplicity wins.
Fermentation is an anaerobic process Bruce. As long as air is excluded it will ferment without going mouldy, so there is no benefit from pressurising. If you are experiencing mould it is possible some shredded cabbage has drifted to the surface of your mix.
Excuse my non-American spelling. I’m from Downunder.