For a while I was lucky with my raised bed garden, and had few problems with pests and diseases. But one summer, a vicious case of wilt (I’m guessing Fusarium wilt) weakened or stunted several of my plants (mostly peppers) and a hungry colony of flea beetles had taken up residence in my tomatillo crop.
Combined with a severe drought in California, a particularly hot season, and a month-long vacation looming, I decided to put all those problems to bed—under a sheet of plastic for the remainder of the summer, through a safe, inexpensive, and mostly hands-off process called soil solarization.
What is soil solarization?
Soil solarization is a highly effective, non-chemical method for controlling soilborne diseases that spread in the top 6 inches of soil.
While it’s commonly used on commercial farms, it’s not as prevalent in home gardens because it does require part or all of the soil to lay fallow during peak summer. In a home garden where space is often limited, it’s hard to give up a raised bed for the four to six weeks it takes to treat the soil.
But if you plan ahead (or, like me, you know you’ll be away from the garden for an extended period), soil solarization is an ideal solution for killing weed seeds, controlling nematodes and pests, eliminating soilborne plant pathogens, and improving tilth and soil biology.
Think of it as a solar oven in the garden, baking everything underneath it—and what comes out is sterile soil, free of the problems that used to plague your plants.
Benefits of solarizing your soil
Simply by using the power of the sun, solarization can rid the soil of most weed seeds, especially those from annual weeds. (Some perennial weeds, like Johnson grass, may have deep roots or rhizomes that heat won’t reach.)
The intense heat also speeds up the decomposition of organic material in the soil, thereby releasing soluble nutrients such as nitrogen, potassium, calcium, and magnesium and making them more available to plants.
Solarization disinfests the soil of the fungal and bacterial pathogens that cause Fusarium wilt, Verticillium wilt, potato scab, Southern blight, early blight, tomato canker, club root, crown gall, and damping off. (However, it does not work on airborne diseases, like garlic rust or late blight.)
The method is especially effective for certain fungi, such as the spores that cause Fusarium wilt, which can live for many years in the soil and even in the soil clinging to your garden tools.
In these types of cases where crop rotation can’t control plant diseases, solarization is the easiest way to start over with a clean slate, so to speak.
Solarizing your soil also reduces populations of pest nematodes (like root knot and dagger) and destroys the eggs, larvae, and pupae of destructive pests (like cucumber beetles and squash vine borers).
But what happens to the good bugs?
So you’re reading that soil solarization can get rid of all the bad bugs and microbes, but what about all the beneficial organisms that make up the soil food web?
Not to worry: It’s believed that earthworms simply burrow deeper into the soil to escape the heat, and come back to the surface when conditions are ideal. As for beneficial soil organisms, many of them are able to survive solarization (such as mycorrhizal fungi, which are highly heat tolerant).
Yes, you will probably lose some arthropods and other topsoil dwellers as collateral damage, but once the process is complete, many organisms start to rapidly recolonize the soil (such as the bacteria and fungi that parasitize plant pathogens and stimulate plant growth).
In fact, the increased numbers of beneficial microbes can make the soil more resistant to pathogens after solarization (versus non-solarized or fumigated soil).
As a result, plants grow faster, get stronger, and stay healthier.
How soil solarization works: timing is everything
Soil solarization works by trapping radiant energy from the sun under a thin plastic tarp to heat the soil at temperatures high enough to kill soil organisms.
Soil temperatures of at least 110°F to 125°F, held steady for at least four weeks in the top 6 inches of soil, will prevent the emergence of many annual weeds and mesophilic fungi, which are the majority of common plant pathogens.
That means soil solarization works best in the hottest month of the year when days are long and skies are clear, which for many zones is the few weeks before and after the summer solstice in June or July.
In Central Oregon (where I live now), our hottest period is mid-July to mid-August when daytime highs can exceed 90°F and nighttime lows are around 45°F.
But in Southern California (where I first solarized my garden), the hottest months are September and October, when strong Santa Ana winds blow in from the high desert and usher in sweltering Indian summers (as well as notorious wildfires).
As you can see, temperatures vary widely so it’s best to look at historical weather averages if you’re not sure when the hottest part of the year is in your area.
Soil solarization is less effective in the spring, even if your garden is bathed in sunshine all day. The mild weather does little to control soilborne diseases, so it’s not worth the effort to try early in the year before you start your planting.
But, you can start a little earlier if you have a short window of hot weather.
What I’ve found from experience is that even with a relatively mild high of 75°F, the first 3 inches of soil in my raised bed (that got full sun for most of the day) heated up to 116°F. As the temperature of the air increased over the next few weeks, the temperature under the plastic also increased and heated the soil more deeply.
So for best results, determine the hottest four- to six-week window in your climate, for your garden, and plan to solarize your soil in that time.
How to solarize your garden
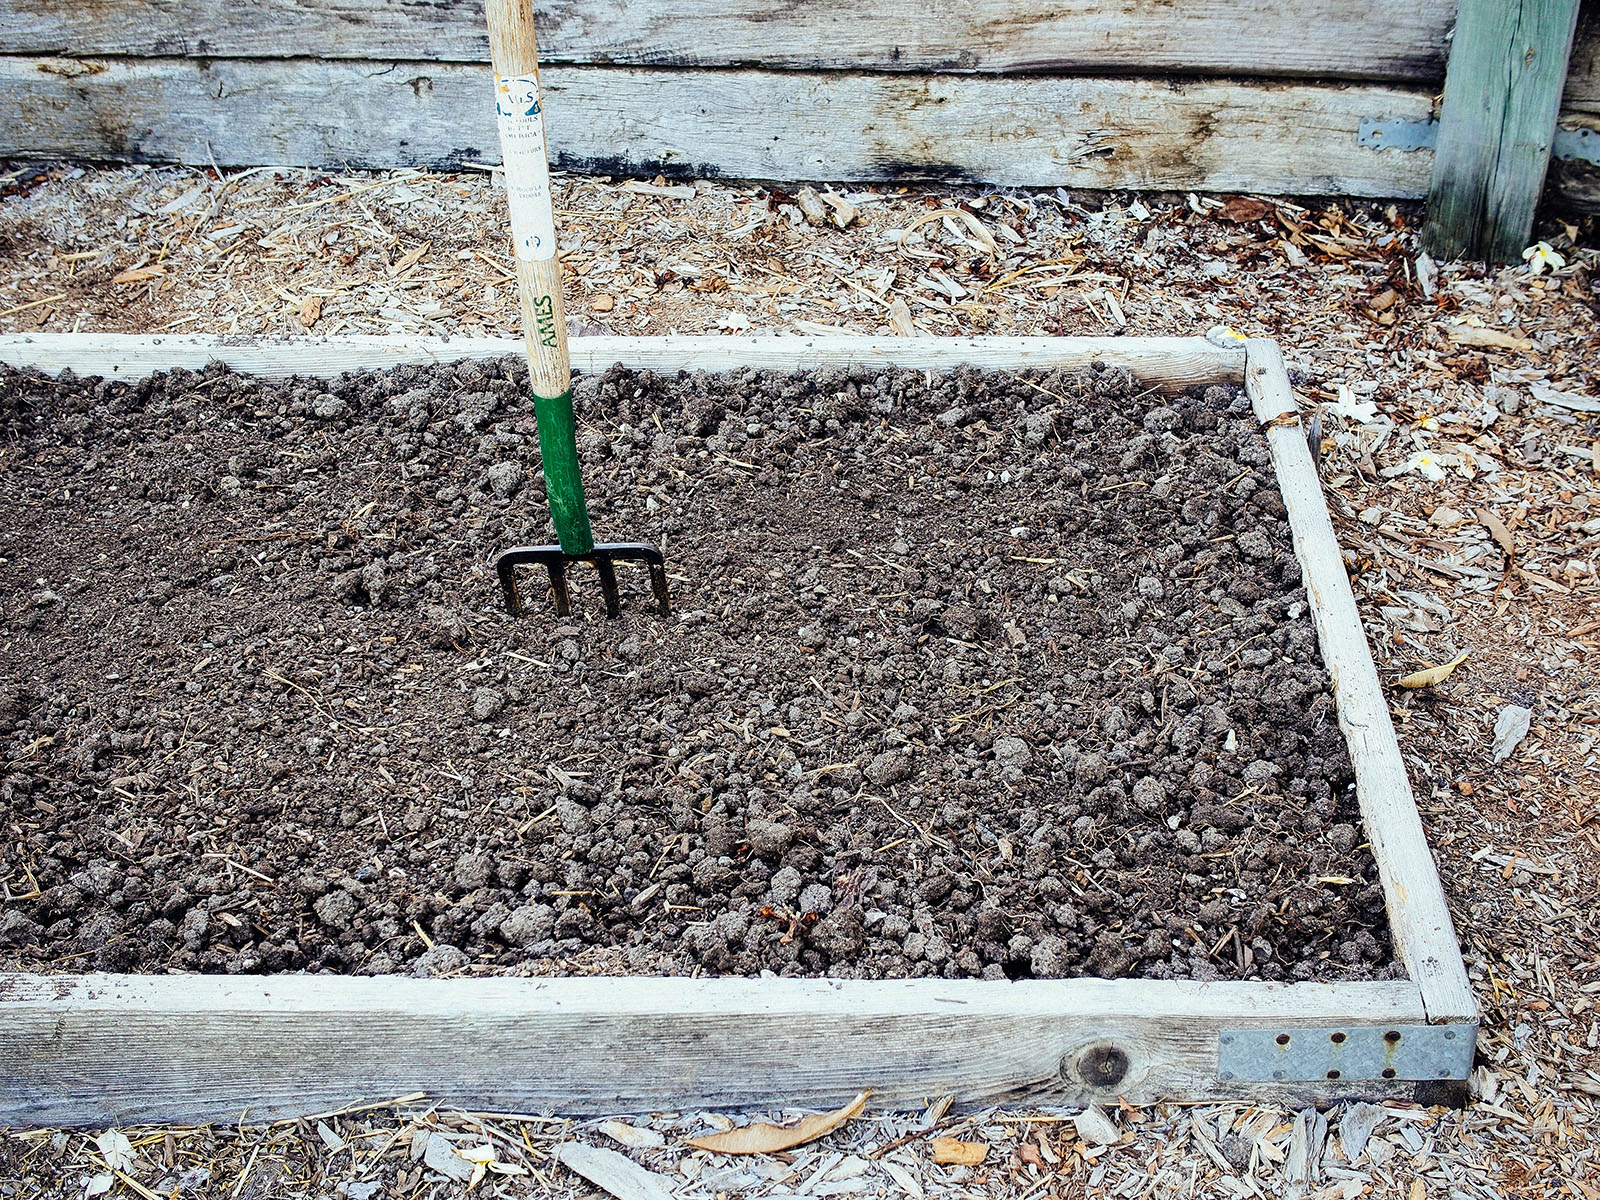
1. Prepare the soil.
Before you begin, remove all the plants and mulch from the garden bed. If they were affected by disease, bag and trash them.
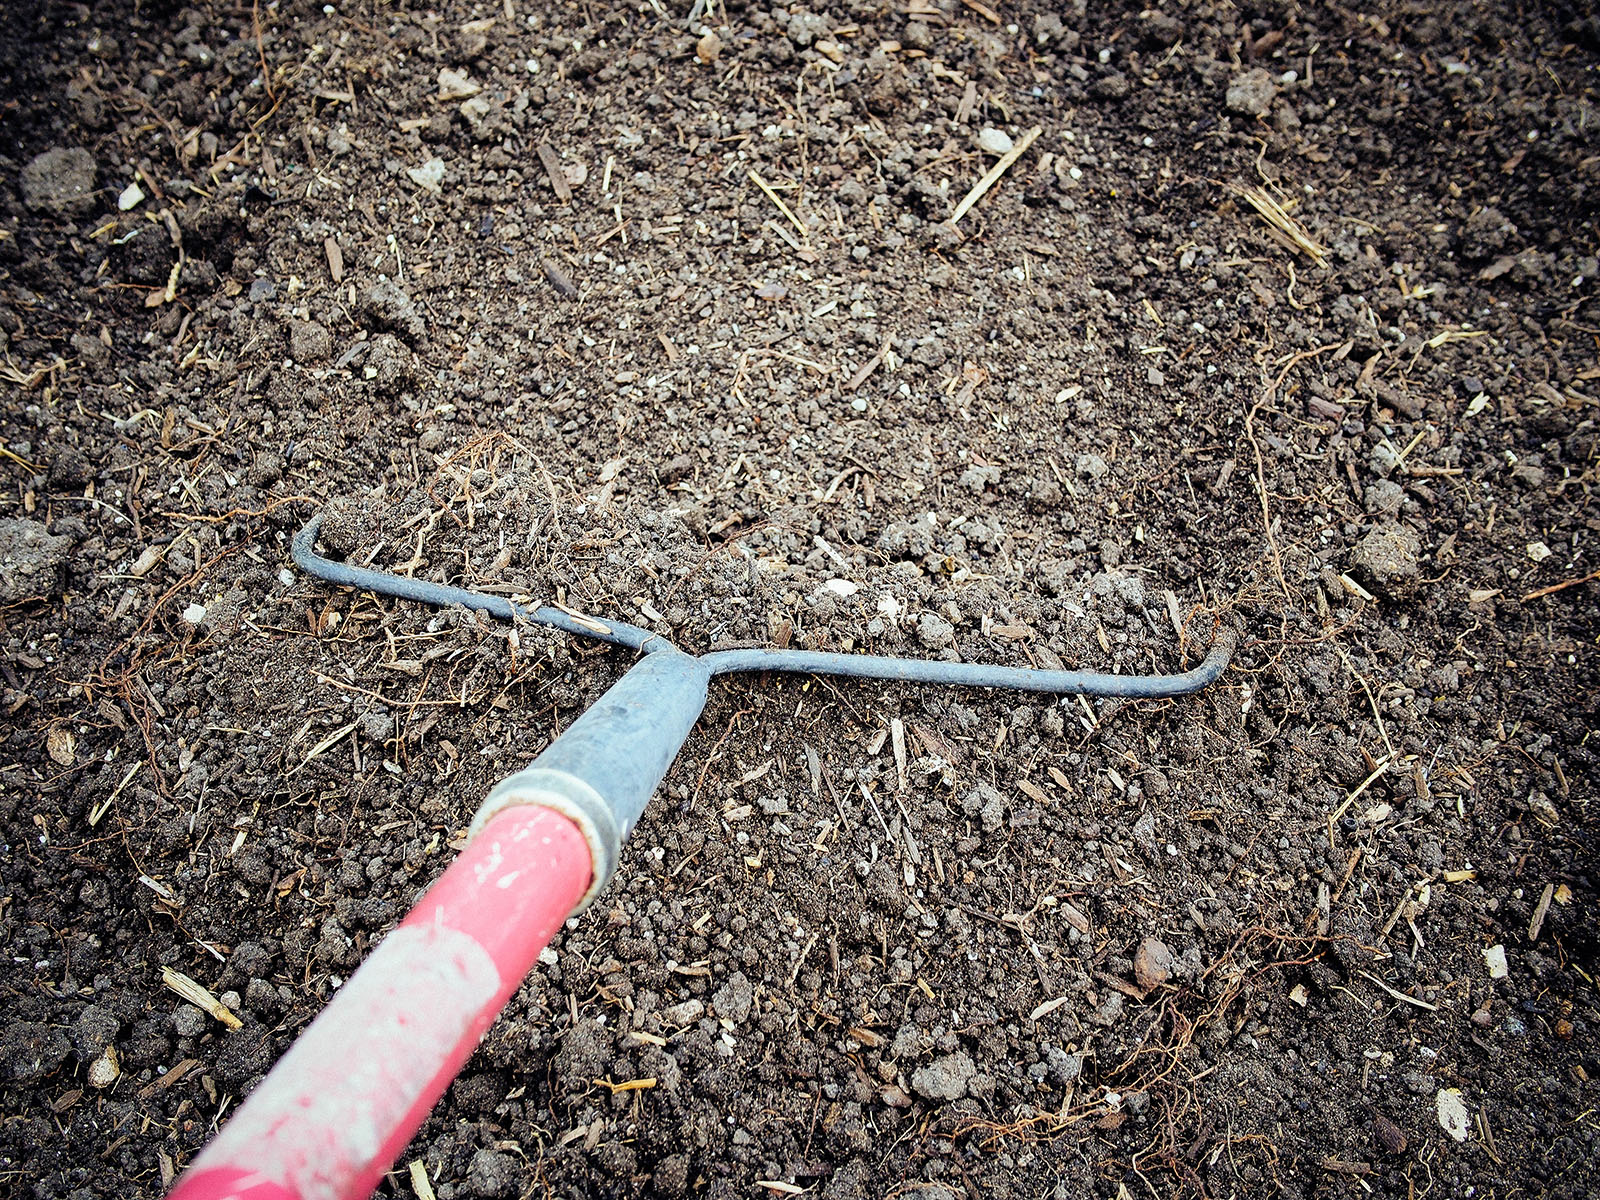
For successful solarization, the soil should be smooth and flat to allow the plastic to lay snug against it. Till or turn over the soil and remove or break up any clods, rocks, sticks, and hard roots. You don’t want anything in the soil that could potentially tear or puncture the plastic.
I typically dig to a depth of a fork tine, but for heavy clay soils or soils that haven’t been cultivated in a while, going at least 1 foot deep is recommended.
Studies have shown that adding organic animal- or plant-based amendments (such as aged animal manure or cover crop residues, especially Brassicaceae cover crops like mustard) before solarizing improves its efficacy. The amendments not only increased the rate of heat generation in the soil, but also its heat-carrying capacity. And when it comes to soil solarization, more heat is always a good thing!
A word of warning: I typically don’t use horse or cow manure in my garden unless I’m 100 percent certain the animals were fed herbicide-free hay or grazed on herbicide-free pastures. There’s always a risk that herbicide residues in manure can affect or even destroy plant growth, and it’s a very hard problem to get rid of.
So, if you have some composted chicken manure, rabbit manure, worm castings, bat guano, green manure, or well-aged kitchen compost, go ahead and incorporate that into the top 3 to 4 inches of soil, and rake it in well.
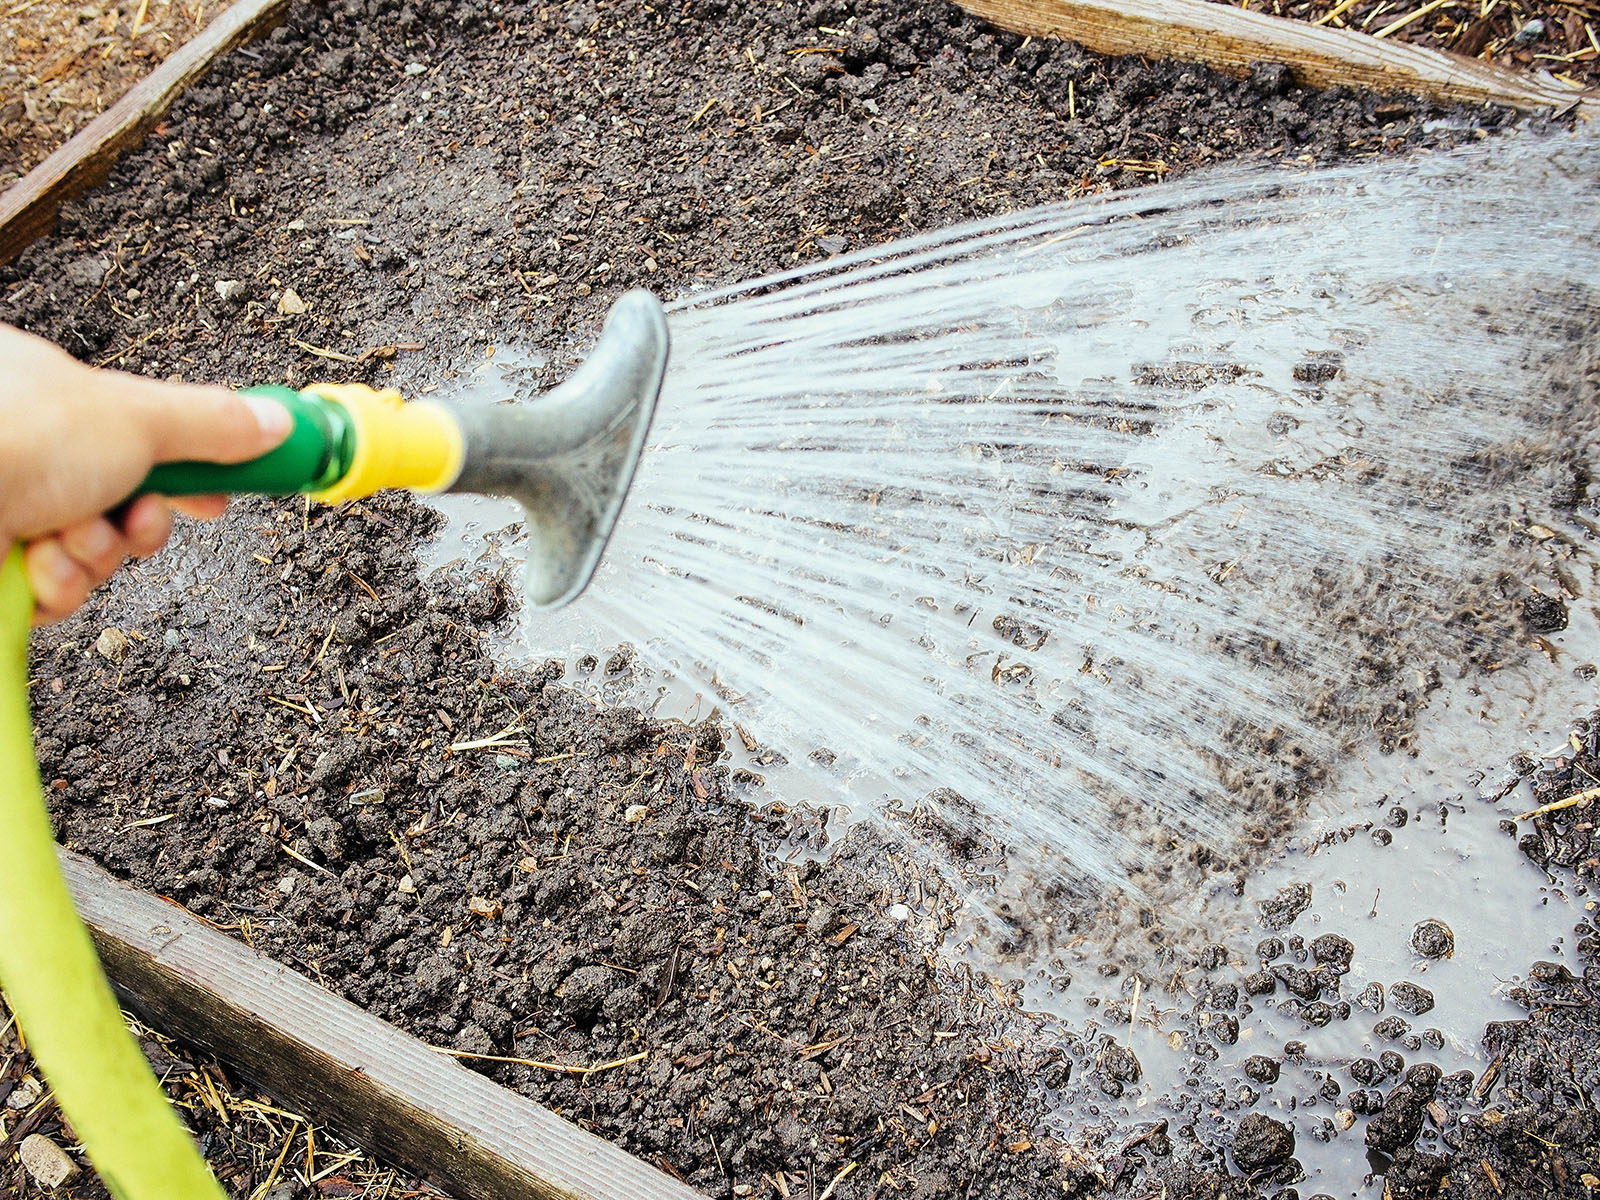
Once your soil is smoothed over, set your garden hose or irrigation system over the bed and water deeply. You want the top 12 inches of soil to be moist. The moisture conducts heat faster and deeper into the soil, while making soil pathogens more sensitive to the heat.
2. Choose the right kind of plastic.
Surprisingly, clear plastic is actually more effective than black plastic at heating up soil. The sun’s rays easily pass through clear plastic, only to be trapped inside to heat the soil. Black plastic, on the other hand, tends to absorb light but deflect part of the heat (according to UC ANR).
And though it might seem counterintuitive, the thinner the plastic, the better it captures and traps the heat—so we’re not using greenhouse plastic here.
Very thin plastic (1 mil) is the best option, but may be susceptible to damage from birds, critters, or the elements. A good compromise is 1.5 mil to 2 mil plastic with weatherproofing or UV resistance, as it will last long enough until you remove it from your bed.

Disclosure: If you shop from my article or make a purchase through one of my links, I may receive commissions on some of the products I recommend.
I used a 2 mil plastic drop cloth (found at my local hardware store), but for larger gardens, you can find bulk rolls of polyethylene from farm supply stores or online.
Recommended polyethylene sheeting for soil solarization:
- UnVert 9′ x 12′ plastic drop cloth, 6-pack (1 mil)
- Frost King 12′ x 50′ roll plastic drop cloth (1.5 mil)
- Poly America 12′ x 200′ roll clear poly film (1.5 mil)
- Pilot Fish 9′ x 12′ plastic drop cloth, 3-pack (2 mil)
- TRM Weather All 12′ x 200′ roll plastic sheeting (2 mil)
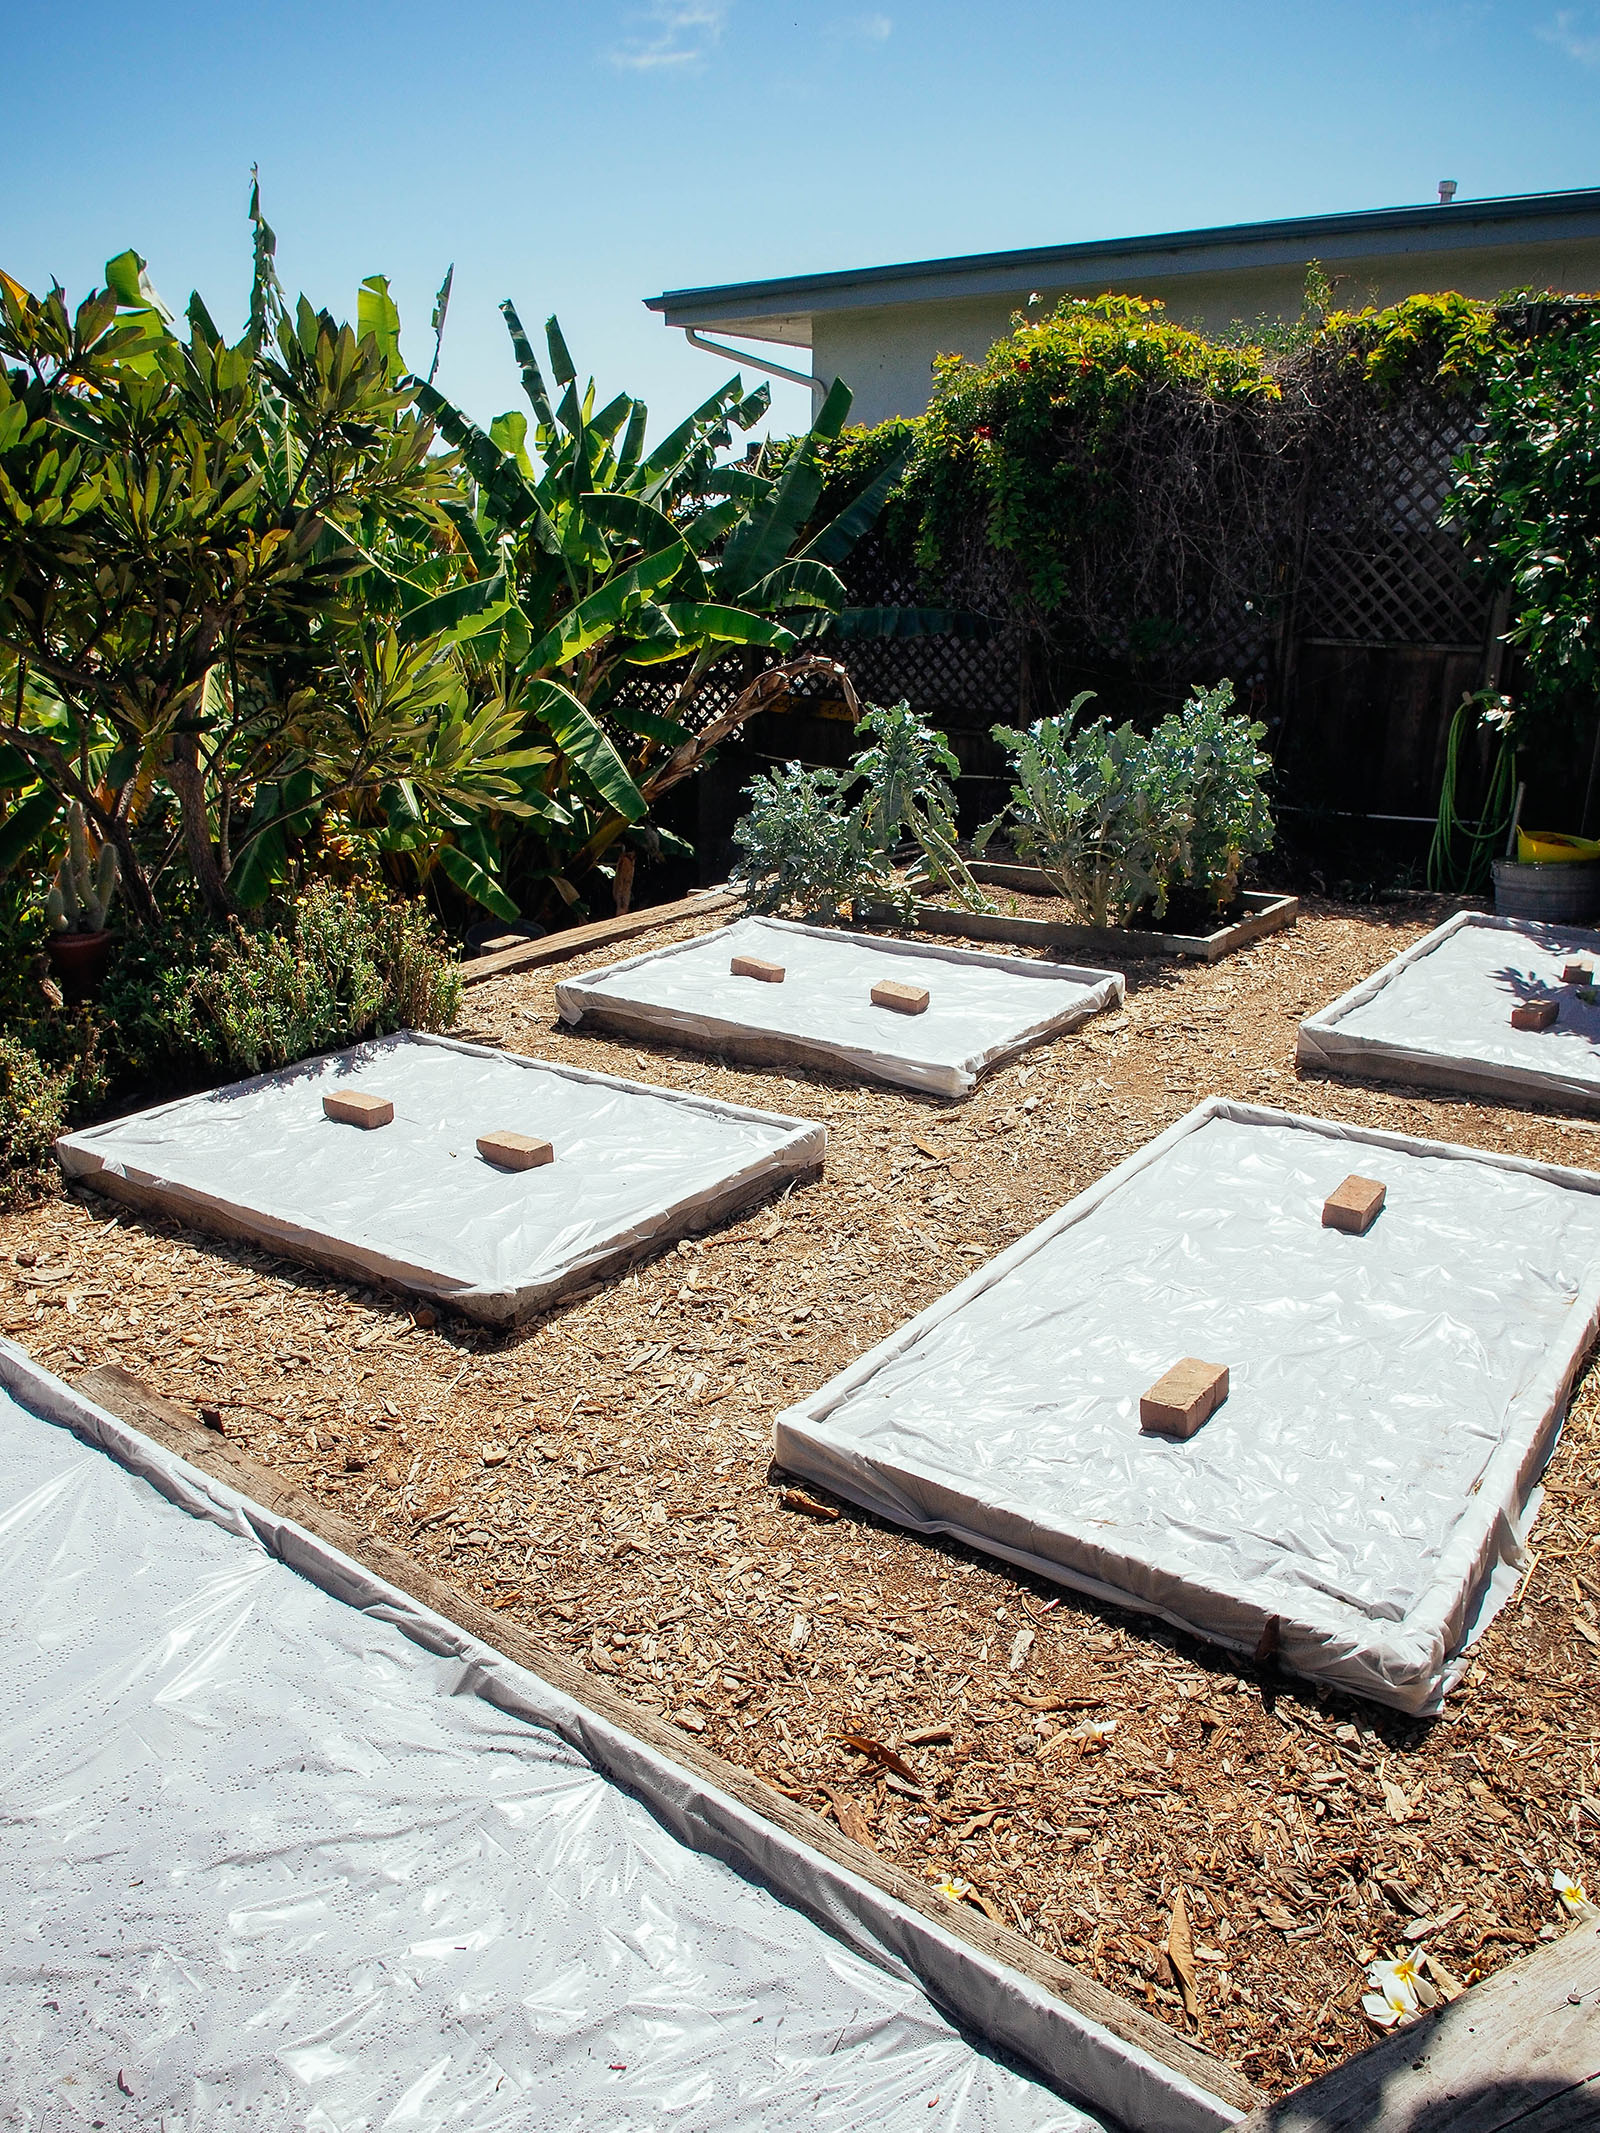
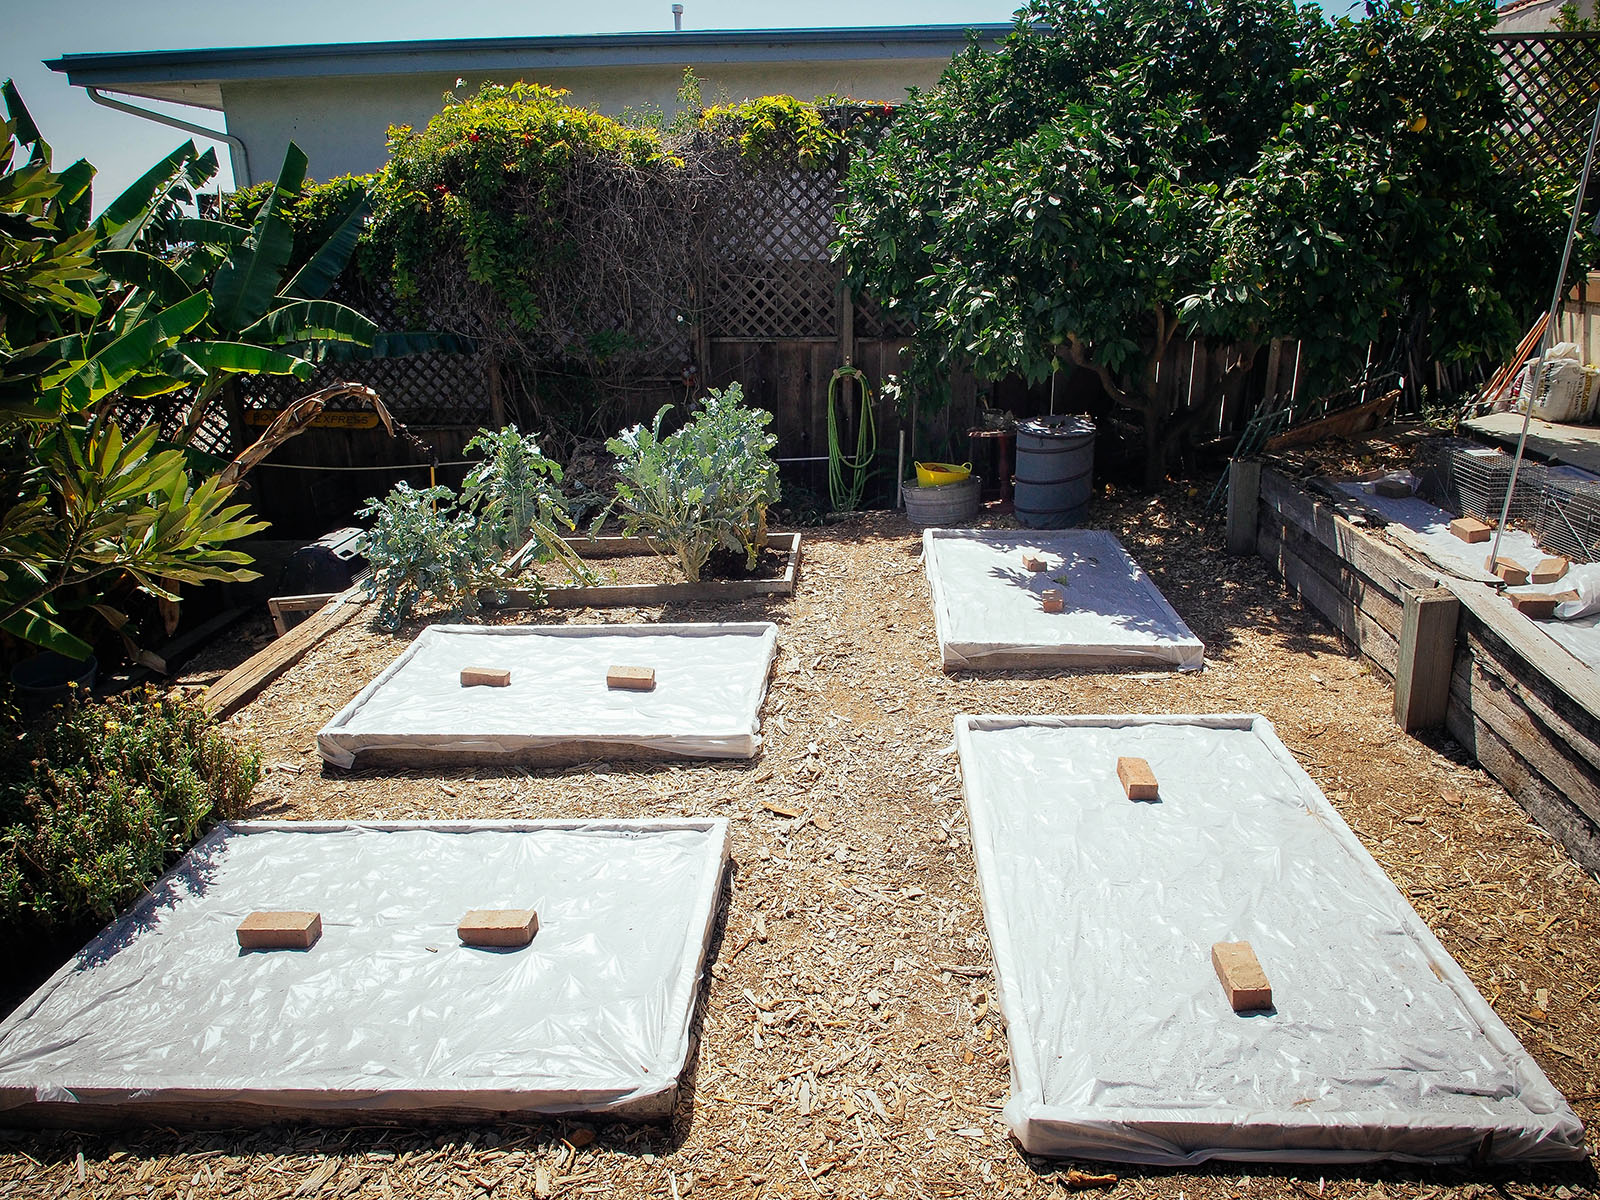
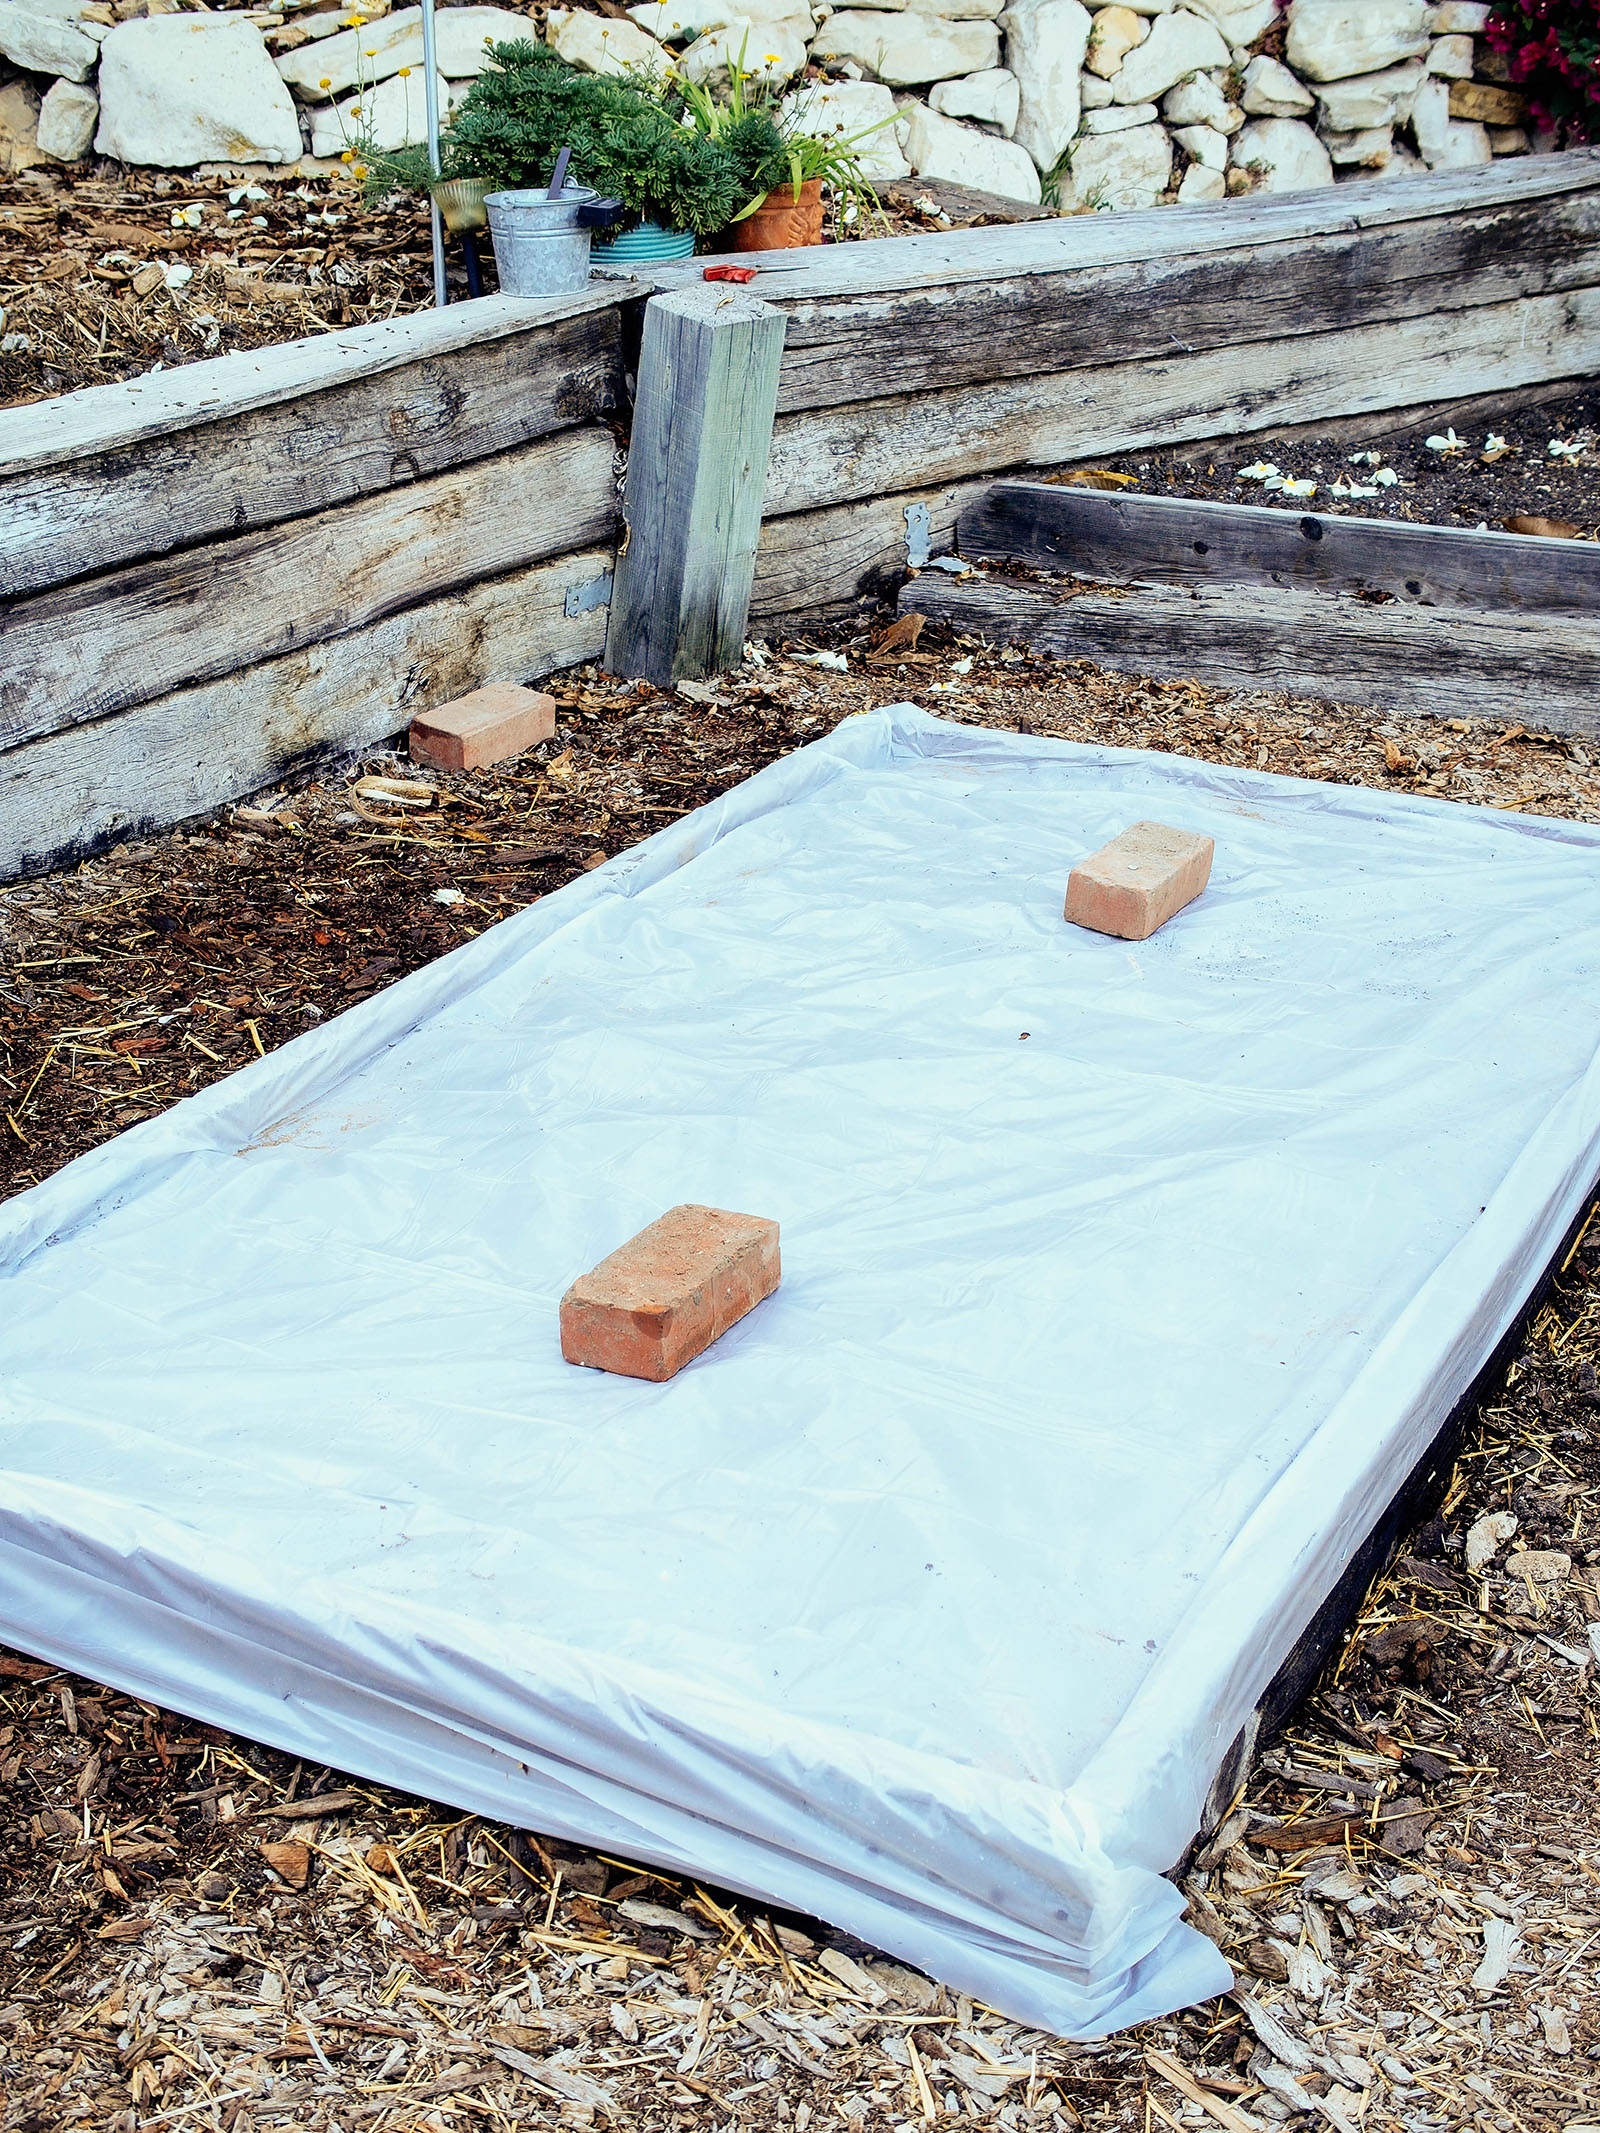
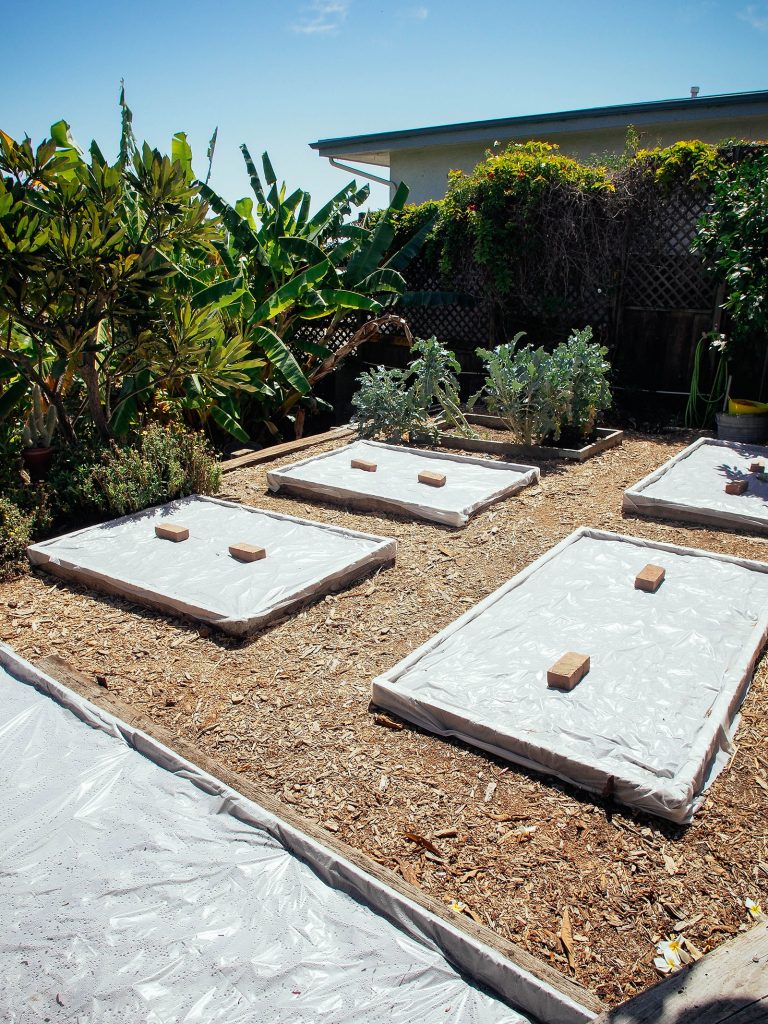
3. Cover your raised bed tightly and completely.
Cut the plastic to fit, leaving at least 8 inches of overhang on all sides.There are a few ways to secure the plastic:
- You can dig a trench along the inside perimeter of the bed and then bury the edges of the plastic 6 to 8 inches deep.
- You can hold the plastic down with heavy objects (like 2x4s, pipes, bricks, cinder blocks, or whatever you have around the house) placed around the perimeter of the bed, making sure they’re tucked tightly against the inside walls if you’re covering a raised bed.
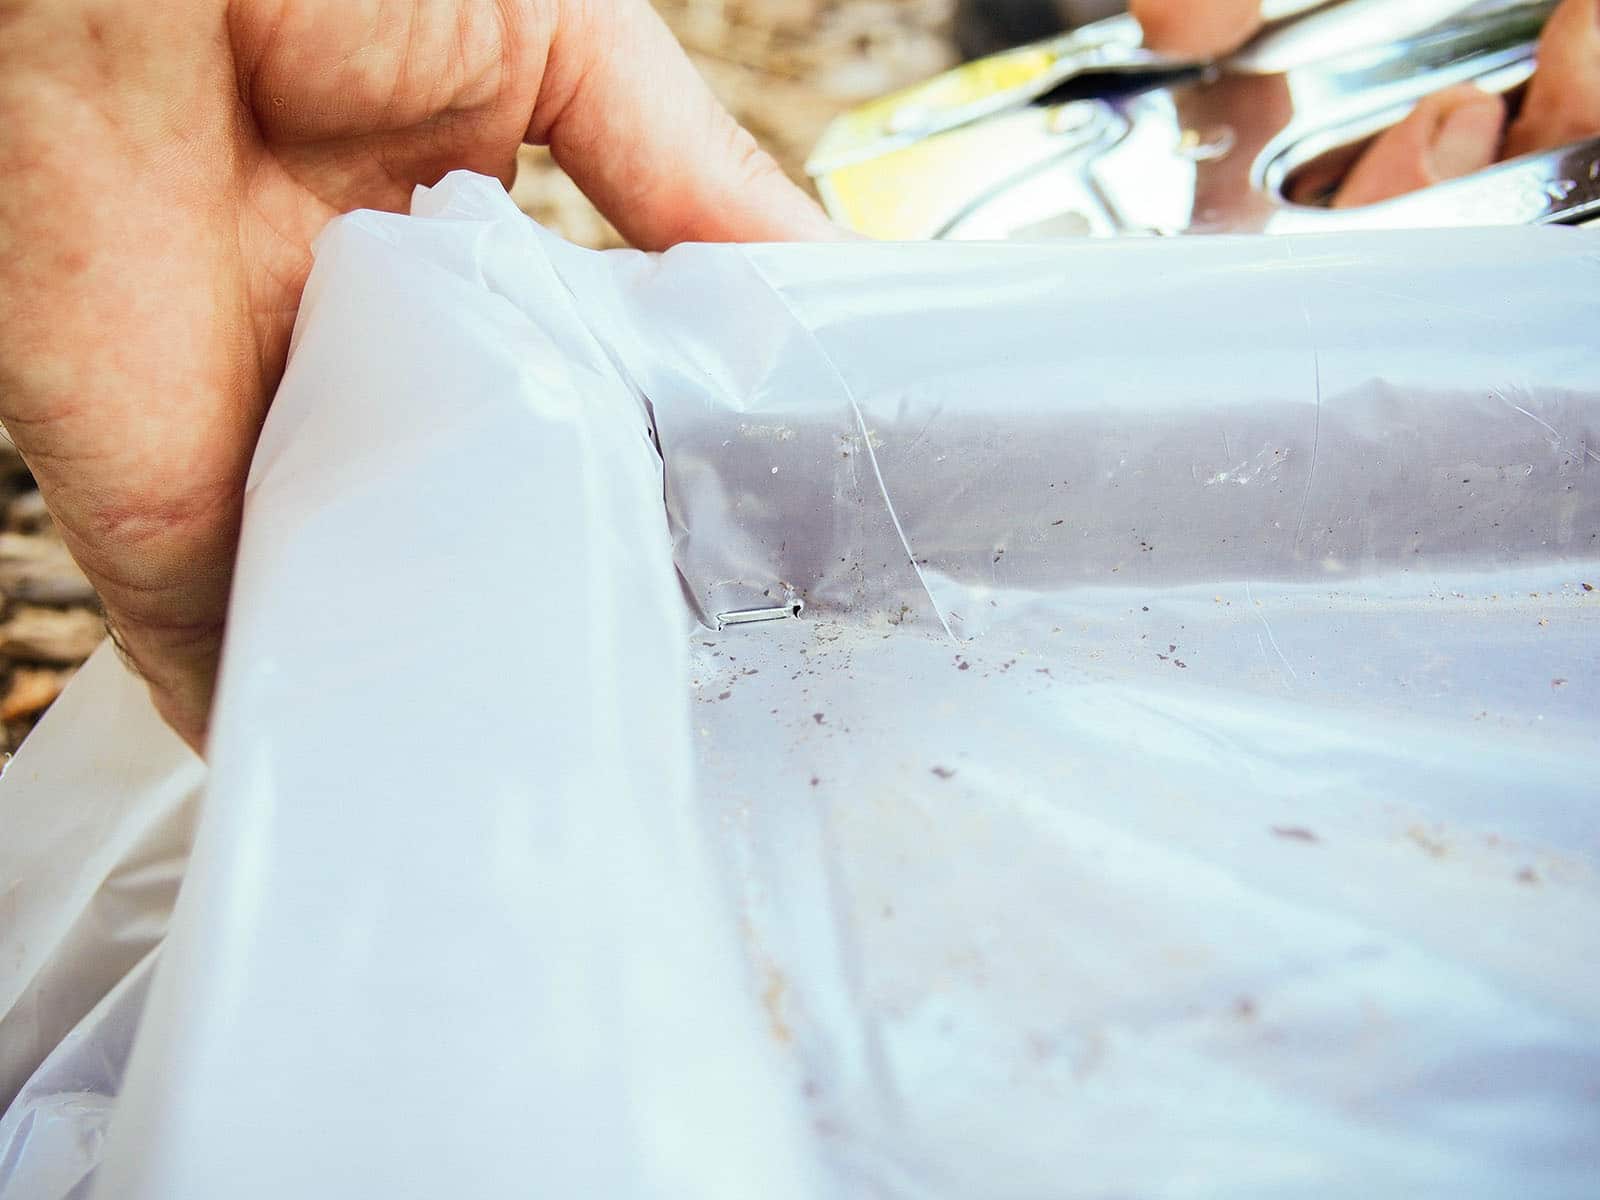
- You can staple gun the plastic to a raised bed if the walls are made of wood.
Staple gunning the plastic is the way I did it, and I simply wrapped the corners around the bed as if I was wrapping a package. Staples went in every 6 to 8 inches to ensure a secure seal, and then a couple of weights were laid on top of the plastic to keep it stable under any winds. (You don’t want your tarp to become a sail during a summer storm!)
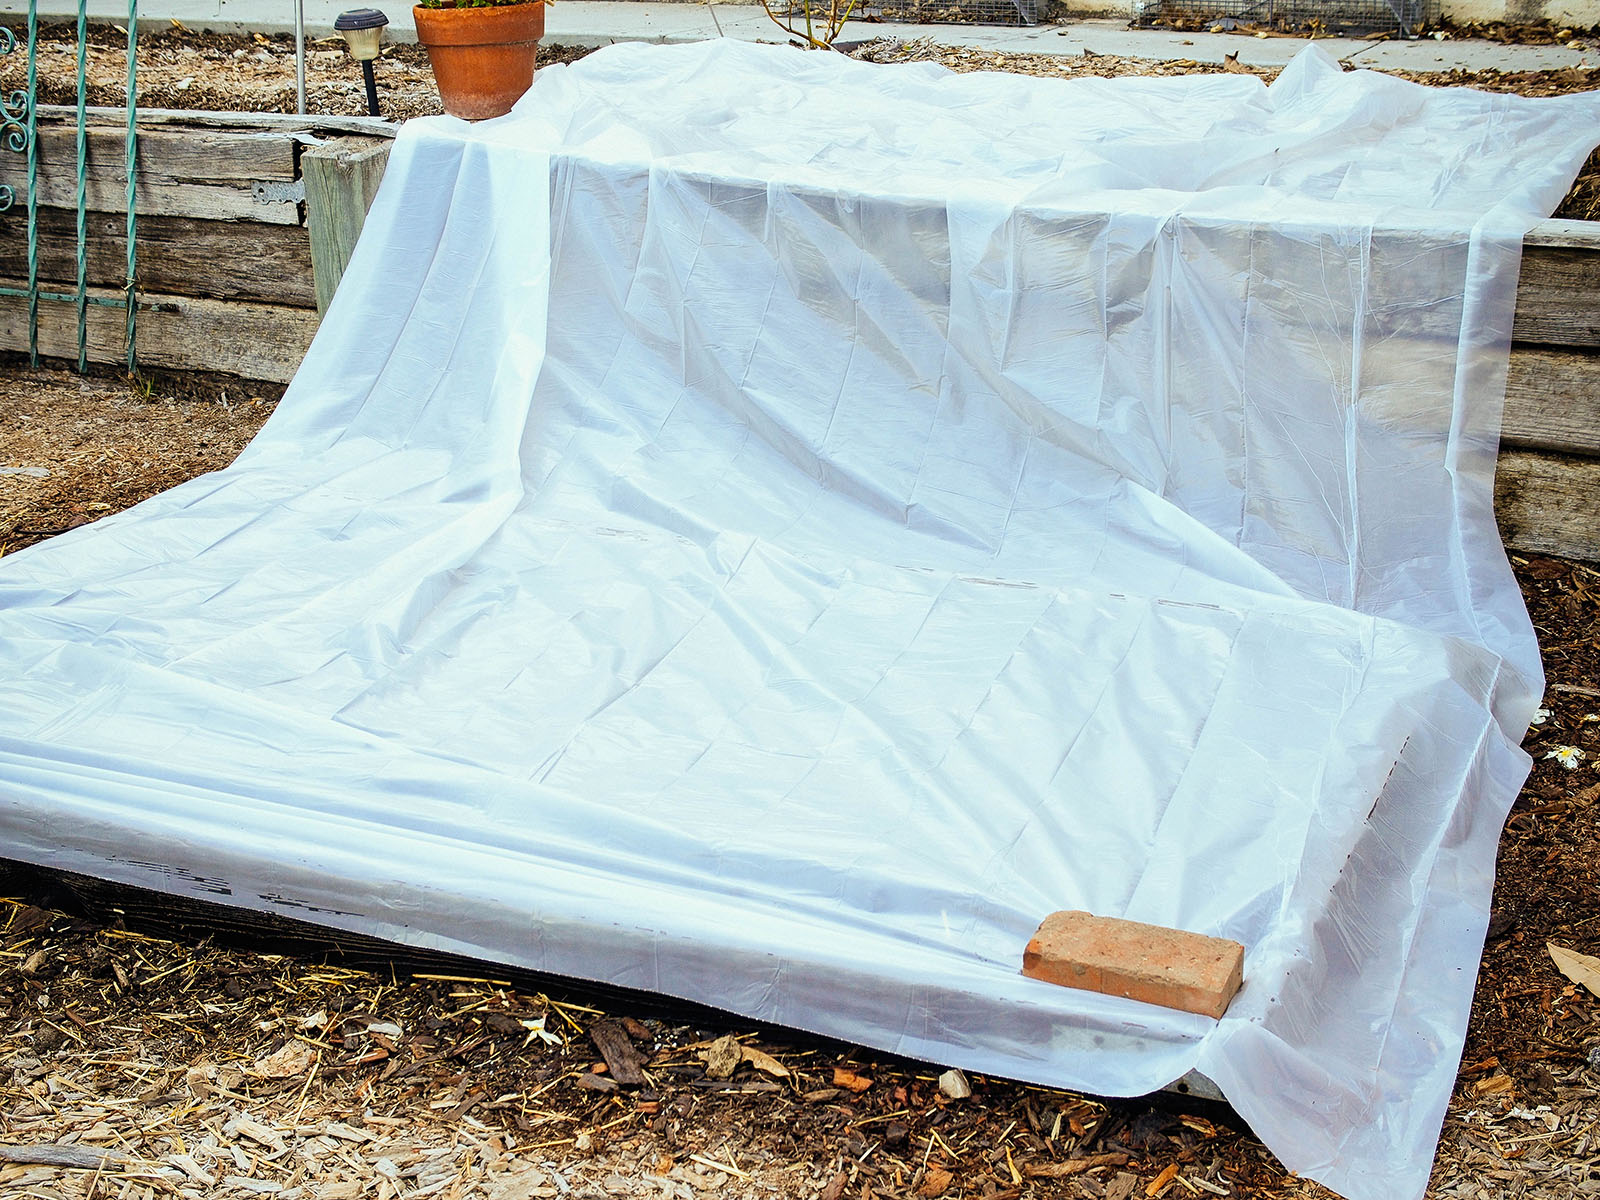
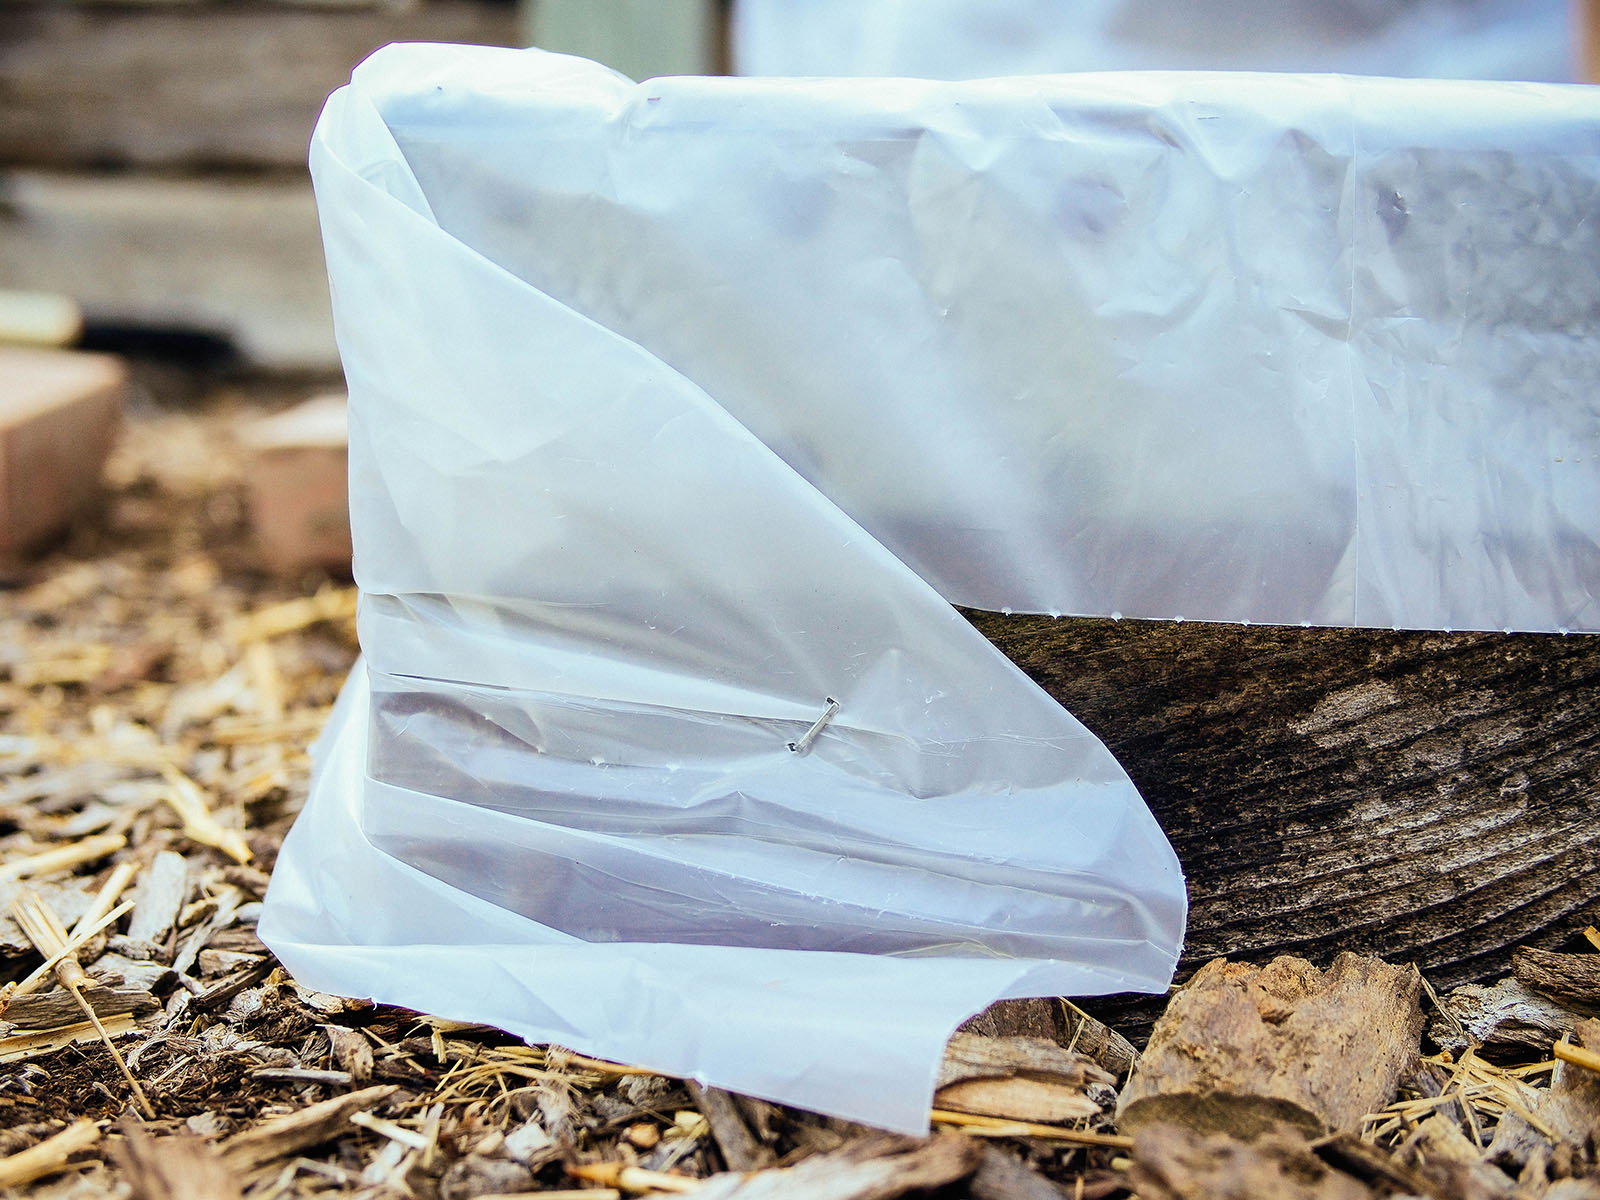
The weights can be bricks, pavers, sandbags, stones, or similarly small but heavy objects; just be careful with sharp or rough-edged weights that could cause pressure points, leading to tears.
The idea is to keep your plastic as flat against the soil as possible, with little to no flaps or openings that could let in outside air (and decrease the temperature under the plastic).
Patch up any holes in the plastic immediately with duct tape, and keep an eye on your beds throughout the four- to six-week period in case the plastic needs patching. (One morning, I found a few holes in one of my tarps that had apparently been caused by a raccoon running through the garden.)
If your daytime temperatures are cooler than normal, you can increase the amount of heat generated in your raised beds by adding a second layer of plastic over the first layer. Separate the layers slightly with PVC pipes, small plastic bottles, or other smooth objects that can run the full length of the bed; that small pocket of air can increase the heat in the soil by as much as 10°F.
Maintaining the proper temperature
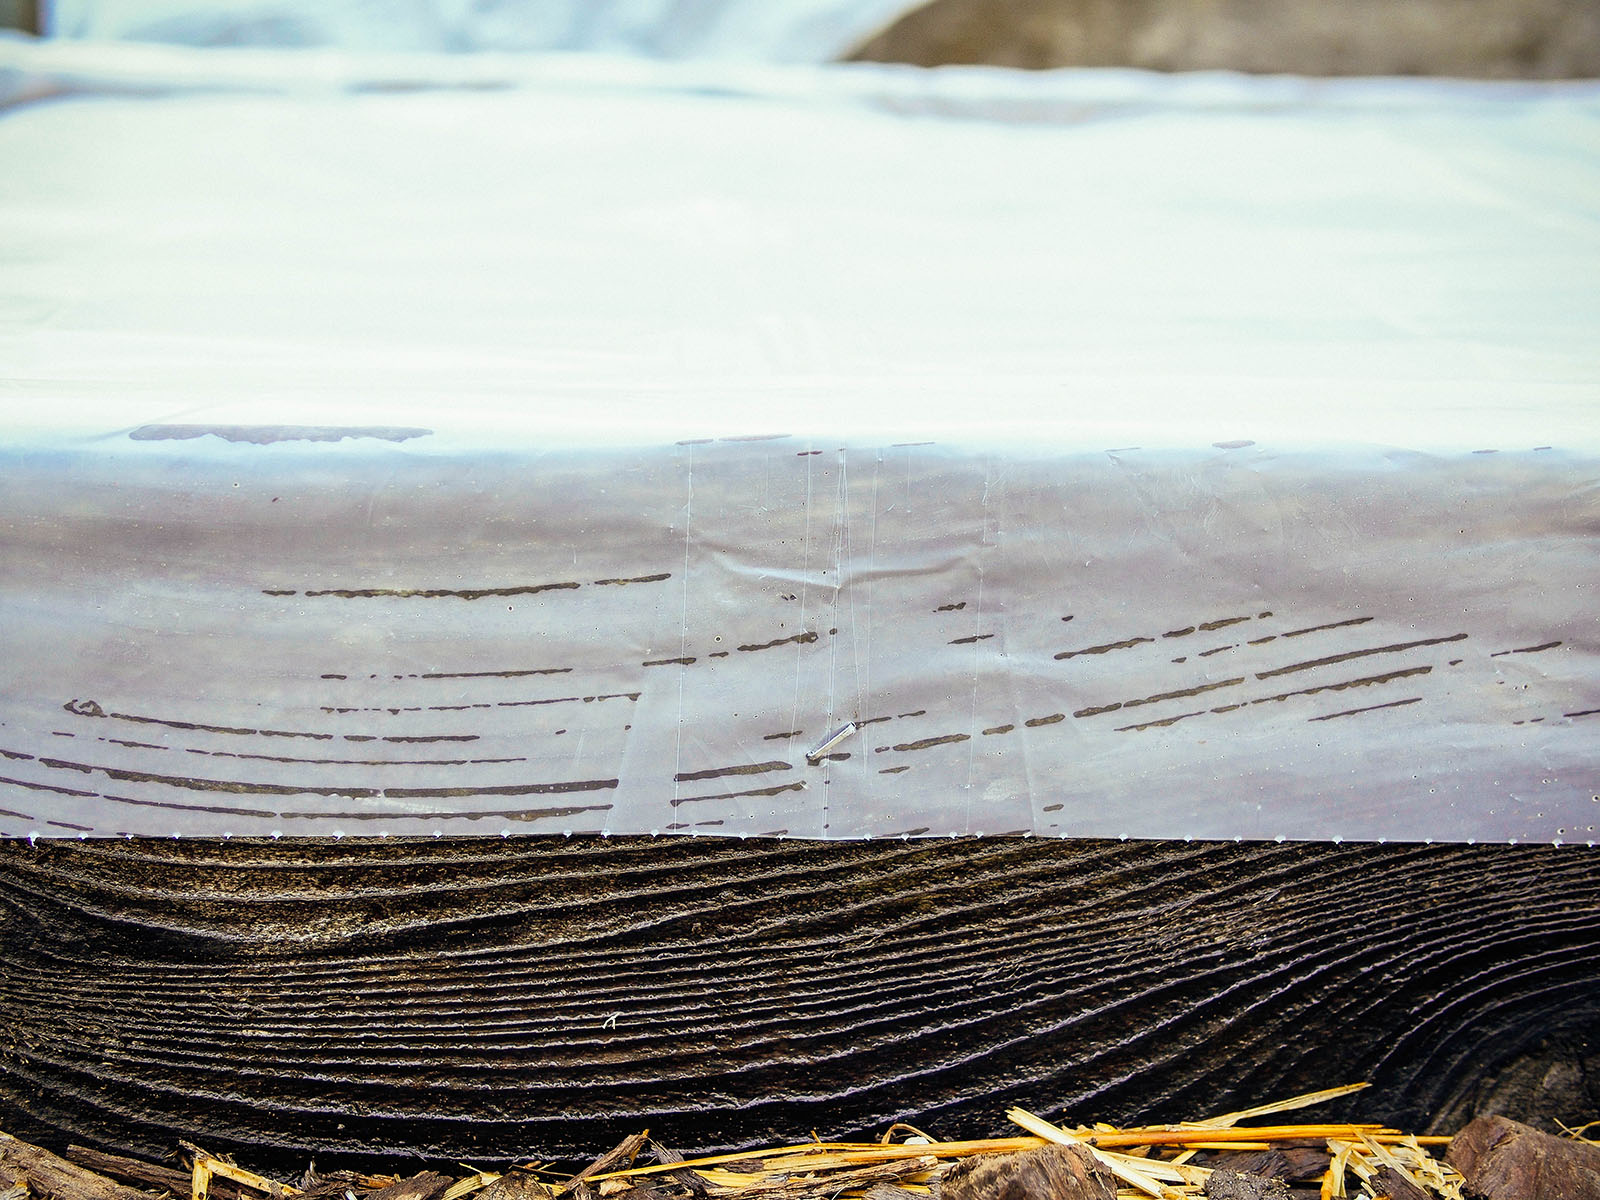
Soil solarization is most effective when the top 6 inches of soil is maintained at or above a daily temperature of at least 110°F for four to six weeks, as most pathogens reside in this upper layer.
If you don’t have a soil thermometer to test this, a meat thermometer will work in a pinch. I like to get a reading in the middle of the day right in the middle of the bed; afterward, I simply patch the hole with duct tape.
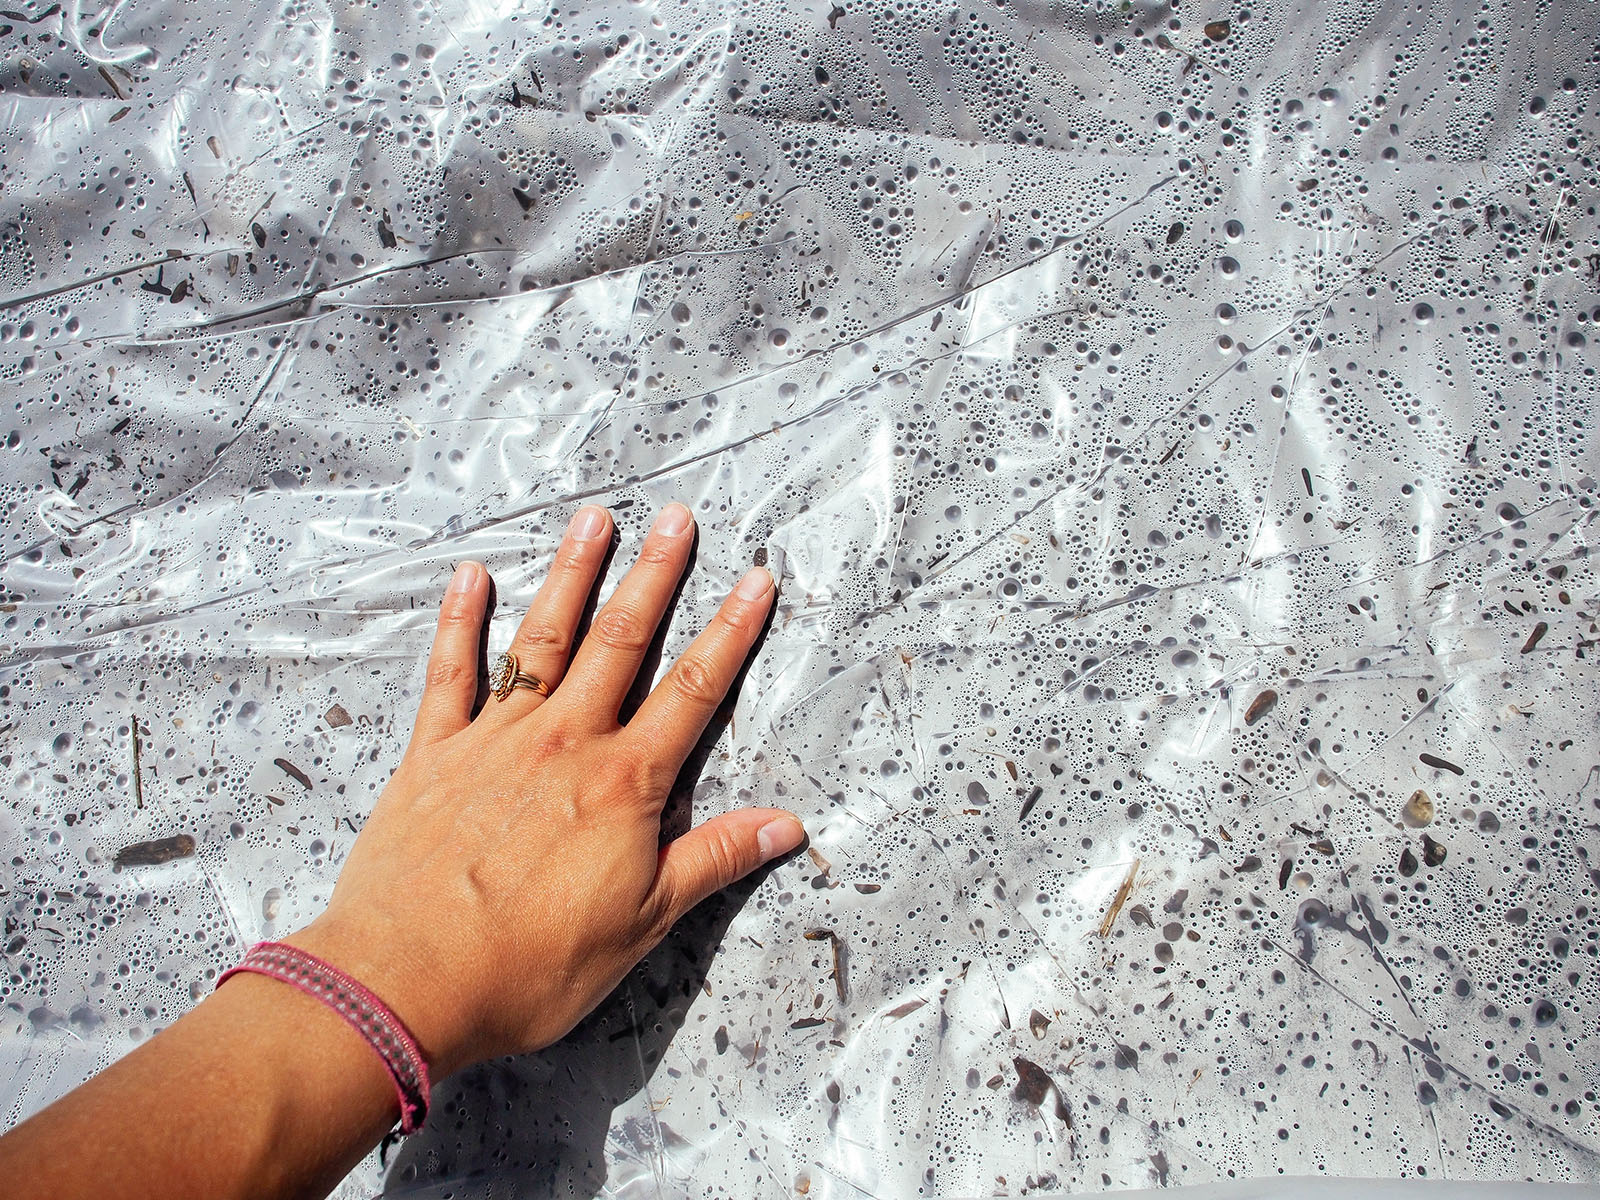
See all that condensation under the plastic? When I put my hand on the surface, I could feel how hot it was under there. That’s what you want, every single day.
Planting your garden after solarization
After removing the plastic, you can sow seeds or plant transplants like normal. To avoid bringing any surviving weed seeds to the surface, stick with shallow plantings and practice no-dig gardening methods.
There’s no need to further cultivate the soil. You’re already starting fresh with soil that’s gained additional nutrients from solarization, so fertilizer can wait until midway through the season (simply do a side dressing or soil drench as needed).
To improve your chances of not reinfecting the soil, always start with uncontaminated pots and soil for seed starting and transplanting, and clean your garden tools, gloves, and other accessories that frequently come in contact with your plants.
(You don’t have to disinfect your pots every season, by the way—just dump out the soil or rinse with water before storing or using.)
Read next: DIY Tool Cleaning Station: The Fastest Way to Clean Garden Tools
Common questions about solarizing your soil
Is solarization safe to use in the garden?
Solarization is what’s known as a hydrothermal process; it happens in moist soil that’s covered with plastic and heated by exposure to sunlight during the hottest part of the year.
Compared to chemical methods of weed and pest control, such as using fumigants, solarization is environmentally friendly and can be done in organic gardens and around children and pets.
When is the best time to solarize the garden?
You should solarize the garden during the hottest four- to six-week weather period in your climate; this will vary by location. In general, average daytime temperatures should be at least 90°F for solarization to happen.
What type of clear plastic should be used for solarizing soil?
A thin clear plastic (between 1.5 mil to 2 mil with weatherproofing or UV resistance) is best for solarizing soil, as it’s more efficient at capturing and trapping heat. Choose a completely transparent plastic, rather than one with a frosted or milky appearances, since that will reduce solar energy transmission.
Can you use thicker plastic to solarize soil?
Absolutely! If you have some 6 mil greenhouse plastic laying around (or recycled from other uses), you can use that to solarize your soil. The process may just take a little longer, depending on how hot the weather is in your area, but should be just as effective at controlling weeds and pests.
Can you use a black tarp to solarize soil?
Yes, you can use a black plastic tarp to solarize soil. When black plastic is used (instead of clear plastic), the technique is called occultation (vs. solarization).
Occultation can use any color of opaque covering, and while it takes longer than solarization, it can still be effective as long as soil temperatures remain at 110°F to 125°F for at least four weeks.
Can you keep the plastic on for longer than six weeks?
When solarizing soil, you should keep plastic covers on for at least four weeks and up to eight weeks—at that point, efficacy tends to level off and most plastic tarps begin to deteriorate.
Will soil solarization kill nematodes?
Solarization can reduce populations of pest nematodes, though nematodes are relatively mobile and can move deeper into the soil to escape the heat. Solarization is most effective on nematodes within the first 12 inches of soil; any pests living deeper in the soil may survive solarization and return to damage your crops.
Will soil solarization kill Bermudagrass and Johnsongrass?
Bermudagrass and Johnsongrass can be controlled by solarization if the rhizomes are close to the soil surface. In general, however, solarization is less effective on perennial weeds than annual weeds because perennials usually have deeply buried roots, corms, rhizomes, or tubers that can resprout.
This post updated from an article that originally appeared on September 6, 2014.
View the Web Story on how to solarize soil in the garden.


My new raised bed is constructed of corrugated metal and wood frame. The soil gets pretty hot. I raise tea roses and don’t find info on maximum temperatures. Anybody know? Bueller?
I don’t know the soil temp requirements of tea roses, but beds made of corrugated metal are quite common. Unless you live someplace like Texas or Arizona where it gets blazing hot in summer, I doubt you have anything to worry about. Just make sure you have a good layer of mulch on top to conserve moisture.
I live in Wisconsin with a shorter growing season (zone 5). I need to solar my soil in my raised beds. If I start now, (late July) and keep the soil covered until end of August/early September, do I remove the plastic or keep it on over fall/winter. Usually we get light frosts beginning after labor day so I will no longer be planting.
Hi! My raised beds have been hit with a virus and this technique was suggested. Thank you for the details! Can I mix in mushroom compost in my beds before laying plastic? I’m so sad to be giving up my garden for the summer but we have had a crazy cold spring with nights still in 40-50’s. And best to start fresh next spring…
Yes, mushroom compost can be raked into the top few inches of your soil before you solarize your beds. It should help raise the heat of your beds too.
Perfect answer to my problem. Grow about 6 cannabis a year in raised beds to make my own meds. Problem this year, I’m guessing Verticillium/Fusarium wilt. Trimming back diseased stems and hoping to salvage enough. Will use grow bags next year and solarize, then add more worms in case they got heat stroke. Thanks m’dear.
Patrick Monk.RN. SF. Ca.
You’re very welcome. Good luck!
Good article.
However, a mm (millimeter) is 1/1000 of a meter, and a mil, which is a standard unit for plastic measurements, is 1/1000 of an inch. The units (mm) in the article are incorrect.
1 mm = 39 mil
2 mm plastic is very thick; 2 mil plastic is not
Thank you for catching that; the article has been corrected. Not sure how I mistyped it when the picture of the packaging very clearly says 2 mil! 🙂
I’m preparing to solarize an area of bed. I have a river rock/stone that is square. Measures about 25 inches in width and length and about 4 to 5 inches thick. I’d like to put it back in it’s original position in this bed after solarizing is complete. How can I clean the rock (or can it be solarized) to clear any root rot nematodes/poisons from it’s side that will sit in the soil. The rock is my mothers and it came from her family farm homestead and she will not part with it. She wants it back in the original position in that part of the soil when the solarizing is complete. Is this possible? I thought of placing it on top of the solarizing tarp with side up that was in the soil and then placing a second tarp layer over that so that the rock would get it’s own ‘solarizing wammy’. Would doing that solarize the rock or must I use a bleach mixture to scrub and cleanse the rock????? Till I receive an answer I will keep the rock out of site on a part of non-traffic area sidewalk.
I would recommend scrubbing the rock with a very dilute bleach solution and then leaving it out in the sun, the same way you’d clean your garden tools.
Thank you. I will do that.
I’m in a community garden with about 30 raised beds. I have early blight in my tomato plants (Brandywine and Super Sweet 100) and so does virtually every other bed in this garden. I live in Chicago, and it’s been a horribly wet and cold couple of months. Even the farmers at the local farmer’s market who come from Illinois, Wisconsin and Michigan are telling me they’re not sure they’ll have field tomatoes this year. A couple told me they have terrible blight due to all the rain. As of mid-July, even if I ripped out all the plants, including the things that are doing well like my cucumber plant, I’m not convinced it would get hot enough the rest of the summer for solarization to work. What are my options? Give up on the raised bed? If everyone else’s bed is contaminated with blight spores, I may be SOL because I believe bugs spread it. I live in an apartment so I have no other option. It’s either this community garden or nothing. Switching to another bed won’t solve the problem if the other beds have blight as well.
With early blight, the spores are spread by splashing water, insects, tools, and human contact. Any nearby plants are easily afflicted so if your entire community garden has it, and the weather is consistently rainy, there’s not much you can do. The spores continue to live in the soil and will only dissipate through crop rotation (at least 3-4 years) or, as a last resort, application of a fungicide. I recommend trying a blight-resistant tomato variety next season and mulching heavily to ensure water does not splash up from the soil to the leaves. Also, be sure to trash your tomato plants (do not compost them) and disinfect any tools, gloves, boots, etc. that came in contact with the soil to prevent reinfection the following year. Good luck!
Thank you, Linda. I appreciate your follow-up. I will think about what to do next year. With every gardener planting tomatoes in our space, it’s going to be tough to avoid blight in the future, too. Your suggestions are good ones and I’ll certainly spread the word!
What about any toxins from the plastic leaching into the soil?
No cooperative extension site or ag resource site I’ve searched makes any mention of plastic compounds leaching into the soil. As long as you remove the plastic after 6 weeks, before it starts to break down into the soil, I think you’ll be fine. It’s only meant to be a temporary cover, not a permanent mulch.
RT @theGardenBetty: Think of it as a solar oven in the garden, baking everything under it. Soil Solarization in Raised Beds http://t.co/H1V…
Sterilize your garden soil using the power of the sun. Soil Solarization in Raised Beds http://t.co/z6CAvM4r6W < TY for RT! @Cubits
RT @theGardenBetty: If soil diseases are winning battles in your garden, try: Soil Solarization in Raised Beds http://t.co/KWRh3TvSvE < TY …
RT @theGardenBetty: If soil diseases are winning battles in your garden, try: Soil Solarization in Raised Beds http://t.co/KWRh3TvSvE < TY …
RT @theGardenBetty: If soil diseases are winning battles in your garden, try: Soil Solarization in Raised Beds http://t.co/KWRh3TvSvE < TY …
If soil diseases are winning battles in your garden, try: Soil Solarization in Raised Beds http://t.co/KWRh3TvSvE < TY for RT! @adamcortell
RT @theGardenBetty: RT @jchapstk: Great chemical-free method of improving your soil. Soil Solarization in Raised Beds http://t.co/l6v27YPJW…
RT @jchapstk: Great chemical-free method of improving your soil. Soil Solarization in Raised Beds http://t.co/l6v27YPJWg via @theGardenBetty
Some might find this helpful – for disease control http://t.co/PNO3l5EQdl
SOIL SOLARIZATION IN RAISED BEDS for controlling disease
http://t.co/PNO3l5EQdl
RT @theGardenBetty: Sterilize your garden soil using the power of the sun. Soil Solarization in Raised Beds http://t.co/z6CAvM4r6W #gardenc…
Sterilize your garden soil using the power of the sun. Soil Solarization in Raised Beds http://t.co/z6CAvM4r6W #gardenchat
RT @jchapstk: Great chemical-free method of improving your soil. Soil Solarization in Raised Beds http://t.co/cqbtG1CyiQ via @theGardenBett…
RT @theGardenBetty: Eliminate weed seeds, control soil diseases, and improve your soil. Soil Solarization in Raised Beds http://t.co/KDBJSD…
RT @theGardenBetty: Eliminate weed seeds, control soil diseases, and improve your soil. Soil Solarization in Raised Beds http://t.co/KDBJSD…
Eliminate weed seeds, control soil diseases, and improve your soil. Soil Solarization in Raised Beds http://t.co/KDBJSDPAHo #gardenchat
Very well written with plenty of detail. This is a great technique for also warming your soil up right before you plant some seeds also.
I just saw this technique being implemented on El Camino Real–they were wearing white suits. I assume you didn’t need the white outfit for your beds. I may give this a shot with a section of our garden…I think we are invaded by ants, however…they will be back even with soil solarization.
Also what do you do to keep your pathways weed free?
I apply at least 6 inches of wood chips as a mulch for my pathways. Since wood chips break down over time, we “refill” the paths once a year.
I do this too but I have a terrible time with grass and weeds growing in the wood chips. I’m thinking of hitting it with vinegar.
If you’re smothering the weeds with a very thick layer of mulch but they’re still popping up, I’m guessing you have seeds blowing in from elsewhere and taking root. Or, there might be weed seeds traveling with your mulch.
Will this help with thistle, grass and morning glory? The last two years I’ve not planted all of my raised beds because of a very difficult pregnancy and a rough start for baby, so I’m suddenly seeing morning glory in places I never have. And orchard grass is showing up everywhere. Same with thistles. I’m surrounded by farmland and lots of wind, so it blows in. Maddening! Also, this is the year I refresh the wood chips in my beds. Should I add them before I cover? For morning glory and grass would it be better to use black plastic to starve them out? I have enough beds that I can do most this year and the rest next year.
You would need to dig up and pull out all traces of those weeds (like the rhizomes from the thistles as well as the long root systems from the morning glory — I assume you mean wild morning glory, i.e. bindweed here) in your beds before solarizing. Then, the heat will kill off any seeds that have dropped.
As for the wood chips IN your beds… I’m not sure if you mean mulch? If you are going to solarize a bed, it has to be completely empty. The only thing you should be adding in, before covering with plastic, is organic fertilizer. Once the plastic is removed, you can plant and mulch like normal.
I was afraid you would say that. Since most of what I’ve read about killing morning glory says keep pulling it so it starves the root system, I was hoping that black plastic would accomplish the same thing. I’ve been digging up thistles and half the time not getting that very tip of the root. So irritating. The morning glory is also showing up in my asparagus bed. That one is what I’m most worried about. Asparagus is sacred. I never dealt with these types of weeds where we used to live, so I’m new to this particular problem.
Persistent pulling is the only method I’ve heard of for eradicating bindweed. Their roots go down several feet, and they creep much like mint does, sprouting new shoots very easily. But each year that you pull them up, you’ll weaken the plants more and more. Just remember to remove the vines right away and never let them flower.
Soil Solarization in Raised Beds http://t.co/vJLwGsKlHz
Very useful info! I will also be doing this, as soon as I make more beds. Thanks for sharing!
Think of it as a solar oven in the garden, baking everything under it. Soil Solarization in Raised Beds http://t.co/H1VijwSxTZ #gardenchat
Great post! Super informative and I will be doing this, I got wilt on my zucchini and crane melon this season. Boo.
If you’ve got the space and the time, I highly recommend it.
Great chemical-free method of improving your soil. Soil Solarization in Raised Beds http://t.co/cqbtG1CyiQ via @theGardenBetty #groundchat
RT @jchapstk: Great chemical-free method of improving your soil. Soil Solarization in Raised Beds http://t.co/cqbtG1CyiQ via @theGardenBett…
An effective, nonchemical method for controlling pests and pathogens. Soil Solarization in Raised Beds http://t.co/WPhfagrqiK #gardenchat
Great chemical-free method of improving your soil. Soil Solarization in Raised Beds http://t.co/cqbtG1CyiQ via @theGardenBetty #gardenchat
RT @theGardenBetty: If soilborne diseases are winning the battles in your garden, try this: Soil Solarization in Raised Beds http://t.co/KW…
If soilborne diseases are winning the battles in your garden, try this: Soil Solarization in Raised Beds http://t.co/KWRh3TvSvE #gardenchat
Interesting. I had not heard of this technique before. We have a problem with squash vine borer and tomato blight every year, but I don’t know if I am willing to give up any of my raised beds for so long during Iowa’s already short growing season. I will keep it in mind if we ever plan to be gone a good chunk of the summer. By the way, your garden looks a lot like mine – a series of rectangular raised beds surrounded by wood chips. Of course, mine is minus the tropical plants and has a six-foot-high fence around everything to keep the deer out! 🙂
If you’re able to rotate your crops on a 3-year basis, that should take care of many soilborne pests and diseases. But I definitely recommend solarizing if those problems seriously persist every season. Sometimes it’s just better to sacrifice part of a growing season and work on prevention (especially if you plan ahead and start your plants in pots while waiting) than to constantly deal with treatment.
Blogged on Garden Betty: Soil Solarization in Raised Beds http://t.co/KWLhpxe4Fp