I’d always known that shaping a surfboard was an art form, but not until I had the opportunity to shape my own board did I truly appreciate it as so.
For our wedding, my now-hubby and I decided to do something a little different for our guestbook. We wanted to honor our guests with something we would still show off years after the wedding, and not just tuck away on a shelf until… well, whenever married people actually looked at their guestbooks again.
After working with a local shaper last summer to design my shortboard, I was intrigued with the whole process. My first board, a 9-foot longboard, was simply handed to me as I had no idea what I wanted to start surfing on. But as I progressed to a shorter board, I became more particular about the shape, the size, the fins… and working with a shaper, I actually had a say in the making of my own board.
When we were planning our surfside wedding in Baja, Will and I came up with all sorts of silly ideas to tie in the surf theme somehow, from having a paddle-out for our ceremony to riding off into the sunset on our surfboards. But the one idea we kept coming back to was hand shaping a board (our first splurge as newlyweds!) and having all of our guests sign it.
It’s incredible when you really think about it… In what other sport can you actually make your own gear using the most minimum of equipment? Sure, you can build a canoe out of wood or fashion a pair of snowshoes à la Bear Grylls, but to match the quality of your professionally made gear would require a fair investment in time and money.
But with a surfboard? Your custom creation can ride the waves within a week, and just as well as a shop board.
A few weeks before our wedding, we booked a private lesson with Shaper Studios, a Southern California-based studio that offers shaping classes as well as shaping bays for aspiring and veteran shapers alike.
Before coming in for our class, we’d decided on a 7-foot-6 egg based on the classic Cooperfish Comet shape — thick nose, low rocker, pintail — suitable for surfing small, mushy waves but easily maneuverable for bigger, steeper days.
Every surfboard starts out as a foam blank, and the foam we chose, EPS, is a closed-cell expanded polystyrene — the same styrofoam you keep your beer in.

It didn’t look like much in the beginning, so our first step was to pare it down into the shape and size we wanted. It’s mind-boggling to think of all the things that go into the making of a board… length, width, thickness, concave, hull, rocker, rails… all the nuances that make it ride a certain way.
Our instructor, Lee, discussed every possible detail with us, including final fin placement and even the type of glass to go over it (a resin top coat that seals the board). Even the tiniest of details (or so I thought) were decided down to the nitty gritty.
Once we plotted out the perfect board, we measured the foam a million ways and traced a template based on where we wanted the rocker (the curve of the board from nose to tail). For such a simple shape, a lot goes into making sure it stays symmetrical on either side of the stringer, which is a wooden strip that runs down the middle and gives a surfboard its strength.


Finally… we have a template!

As Will cut out the shape with a jigsaw, I secretly hoped he wouldn’t accidentally turn our surfboard into a boogie board! Steeaady… steeeeaaaady…


Once the blank was cut, we shaved down the edges using a surform — basically, a glorified cheese grater.

Since we were so nervous about sawing too close to the template, we had quite a bit of work in whittling the foam down to the outline. This is where working as a team of two came in handy… We got more of a workout doing this than if we’d actually been surfing!

After the foam was sheared down to the proper shape, we finetuned the edges with a sanding block.

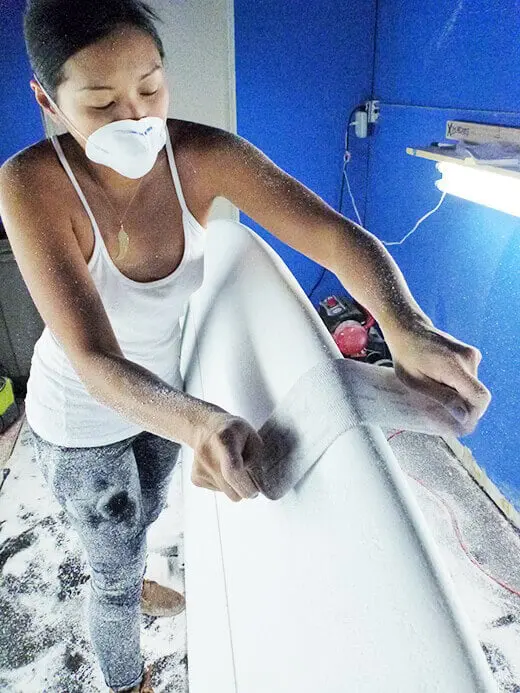
If you’ve ever looked at pictures of other surfers’ shaping bays, there is a reason why most shaping bays are painted blue, and why fluorescent lights are hung at waist level. The flat, mid-toned paint offers good contrast against the white foam, and the horizontally mounted lights help you see shadows from any irregularities in the foam while you work. All of a sudden, bumps and slumps appear in places you typically can’t feel with your hands.

Shaping involves a good deal of sanding, and half our day was spent sanding. We obsessed over sanding our first edge evenly, and then we realized we had to make the other edge the same. With Will’s perfectionist Virgo-ness and my Gemini eye for detail though, I think we had both sides aligned right down to the nanometer!


This stuff is messy business — there was foam everywhere! In my shoes, down my shirt, on my face, even inside my ears. It looked like a snow globe inside the bay.


After sanding… and more sanding… and more sanding… it was starting to resemble a surfboard!

Using a planer, we shaved off the “skin” of the foam — the outer layer of a raw piece of foam.


We planed the foam a few more times from top to bottom until it was just the right thickness (as measured by this groovy pair of calipers).

To create a hull under the nose (a shape similar to the bottom of a boat), I planed the foam in a series of stepped arcs.

Will sanded it smooth, and though that little tweak was so subtle, you could actually see the gradation of the hull if you looked at the board closely at eye level.

Moving on to the edges, we used some simple calculations to measure the transitional radius on the rails and help us figure out how much of a curve to create. Rails can be soft or hard, full or pinched, 50/50 or 60/40 or what-have-you, and a combination of all those traits dictates how well your board leans on edge and cuts through water. I still don’t fully understand it all!

Brandishing our surforms, we each took a side and grated away. It was a little daunting because hand shaping is never a perfect art, but miraculously, our sides matched perfectly… if I do say so myself!


We smoothed out the hard edges for a more natural transition from edge to edge, and before long, the rails were starting to take shape!


In our final step of rail shaping, we used plain old sandpaper to round out the edges. The lines were getting smoother, and we were getting more excited!

Our Virgo and Gemini traits were out in full force. We wanted nothing less than perfection. No hills, no dips, just a smooth, solid curve from tip to tail. It went something like this: Run a hand along the rail, sand, sand, sand. Run a hand along the rail, sand, sand, sand. Repeat another hundred times.


Ahhh, look at that rail. Smooth as a baby’s butt!

To finish, we used a spokeshave to whittle down any part of the stringer that was sitting above the foam.


Six hours later, we still couldn’t believe that we’d taken a block of foam and turned it into this…

And finally… our masterpiece! The first-ever surfboard from Casa Taylor, ready for finning and glassing (which we’re having Shaper Studios do for us… because those two things alone would require many, many more hours of a totally different lesson).

There’s nothing quite like building a board with your own two (or four) hands… It’s like being back in eighth-grade woodshop, only cooler. And messier. And much, much more addictive. I’m already thinking about my next board and saving up my pennies for it!


Jun Iguchi liked this on Facebook.