
Growing tomatoes in pots really levels the playing field in the home garden game, as it lets people who are short on space grow beautiful and productive plants regardless of real estate.
And you can do this without a yard. If you have a patio, balcony, or deck, you can successfully grow full-sized tomatoes in containers—not just cherry tomatoes or “patio” varieties, but salad tomatoes and juicy beefsteaks as well.
In fact, tomatoes are sometimes easier to grow in containers than in the ground.
I’ve found that an unexpected benefit of container plants is being able to protect them more easily from critters. You can move and cover them as needed, or put them where you can monitor your plants daily. (In my experience, growing tomatoes on a second-story deck deterred all the deer in my neighborhood.)
Container plants are also less likely to be affected by pests and diseases that naturally live in the garden, since you start with fresh potting soil. If you’ve struggled with root-knot nematodes, blight, or other problems, you can grow tomatoes in pots and still harvest enough to eat fresh and cook with.
Here’s how I’ve grown hundreds of pounds of tomatoes from just a handful of container plants in my Zone 5 microclimate.
(And if you’ve got more garden space, you can find more tips here for growing perfect tomatoes.)
1. Find a location with plenty of sun.
So, what’s the first thing you need to know?
Tomatoes like at least 8 to 10 hours of sun (6 hours is the bare minimum, but more is always better).
You’ll have the best results placing your plants on the south side of your home. Sometimes the east side of your home can work if it gets at least 6 hours of direct sun. (Any less than this and your plants will become leggy, grow weaker, or produce very few flowers.)
In hot climates, I generally recommend a spot that has morning to early afternoon light (so your plants get afternoon shade when the sun is blazing).
(If your yard has limited sunlight, here are a few options for tomatoes that can grow in partial shade.)
2. Choose the right type of tomato.
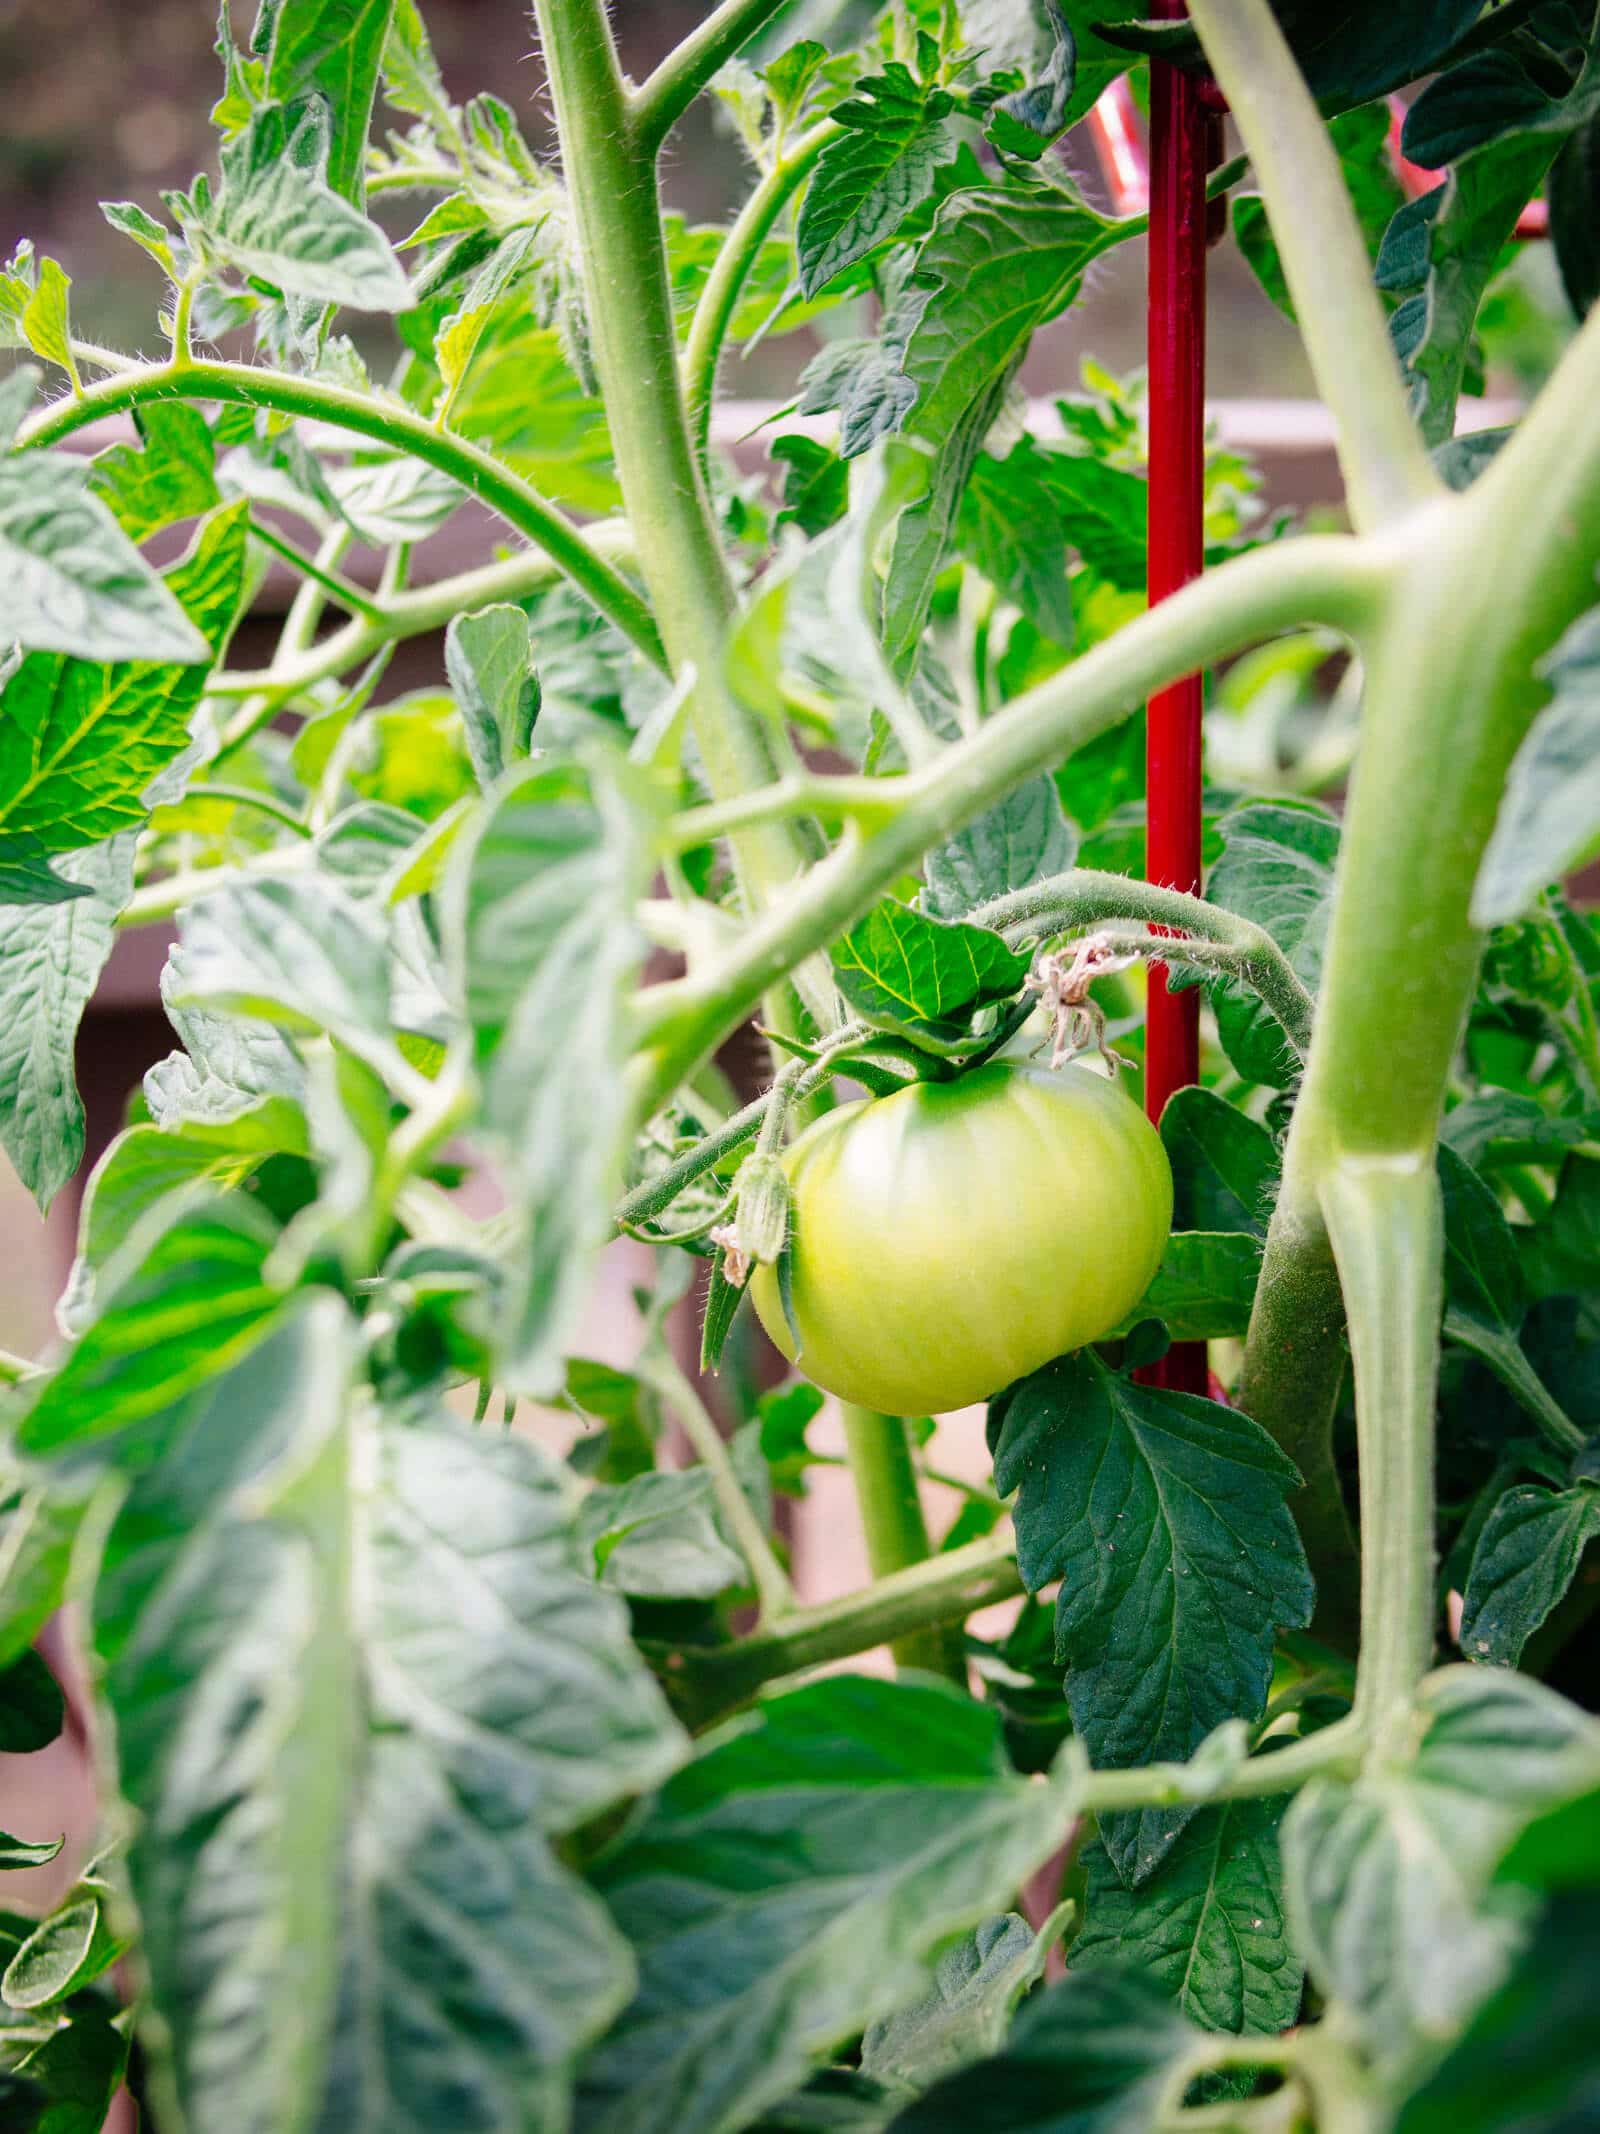
Determinate types (also called bush, compact, or patio plants) are usually the best tomato plants for containers, as they grow to a predetermined size—no more than 3 to 4 feet tall—and set flowers and fruits all at once, making them reliable and predictable in tight quarters.

However, you can still grow indeterminate tomatoes if you give them a large enough container and good support for their vines. (More on my favorite tomato supports below in Step 10.)
A good rule of thumb is to grow determinate tomatoes if you have a short growing season, got a late start in the season, or have a very limited footprint.
Disclosure: If you shop from my article or make a purchase through one of my links, I may receive commissions on some of the products I recommend.
Where to buy
Determinate tomatoes
If, on the other hand, you have a decent growing season and enough space for a large, tall plant, indeterminate tomatoes will give you abundant harvests all summer long and are totally doable in containers!
Where to buy
Indeterminate tomatoes
Read more: The best tasting heirloom tomatoes, sorted by color
Get the PDF
Want to download this article with no ads?
You can get this entire article emailed to you as a PDF to read at your convenience! Simply save it to your device or print it out for easy reference.
3. Start with a strong and healthy transplant.
Ideally, the tomato plants you start with should have been repotted at least once, and hardened off properly so they’re ready to live outside in the sun.
(If you started your own plants from seed, follow my previous guides on how to repot your seedlings into larger containers, and how and why to transplant them a second time.)
Repotting assists your tomato plants in developing larger root masses, which in turn helps them survive the shock of transplanting, resist pests and diseases that prey on vulnerable young plants, and grow stronger overall.
If you’re bringing transplants home from a nursery or garden center, look for thick, sturdy stems and healthy green foliage free from insect damage, sunburn, and yellowing (which indicates watering issues or nutritional deficiencies).
I also try to avoid “top heavy” plants on tall, skinny stems, as it could be a sign they haven’t received adequate sunlight or been repotted.
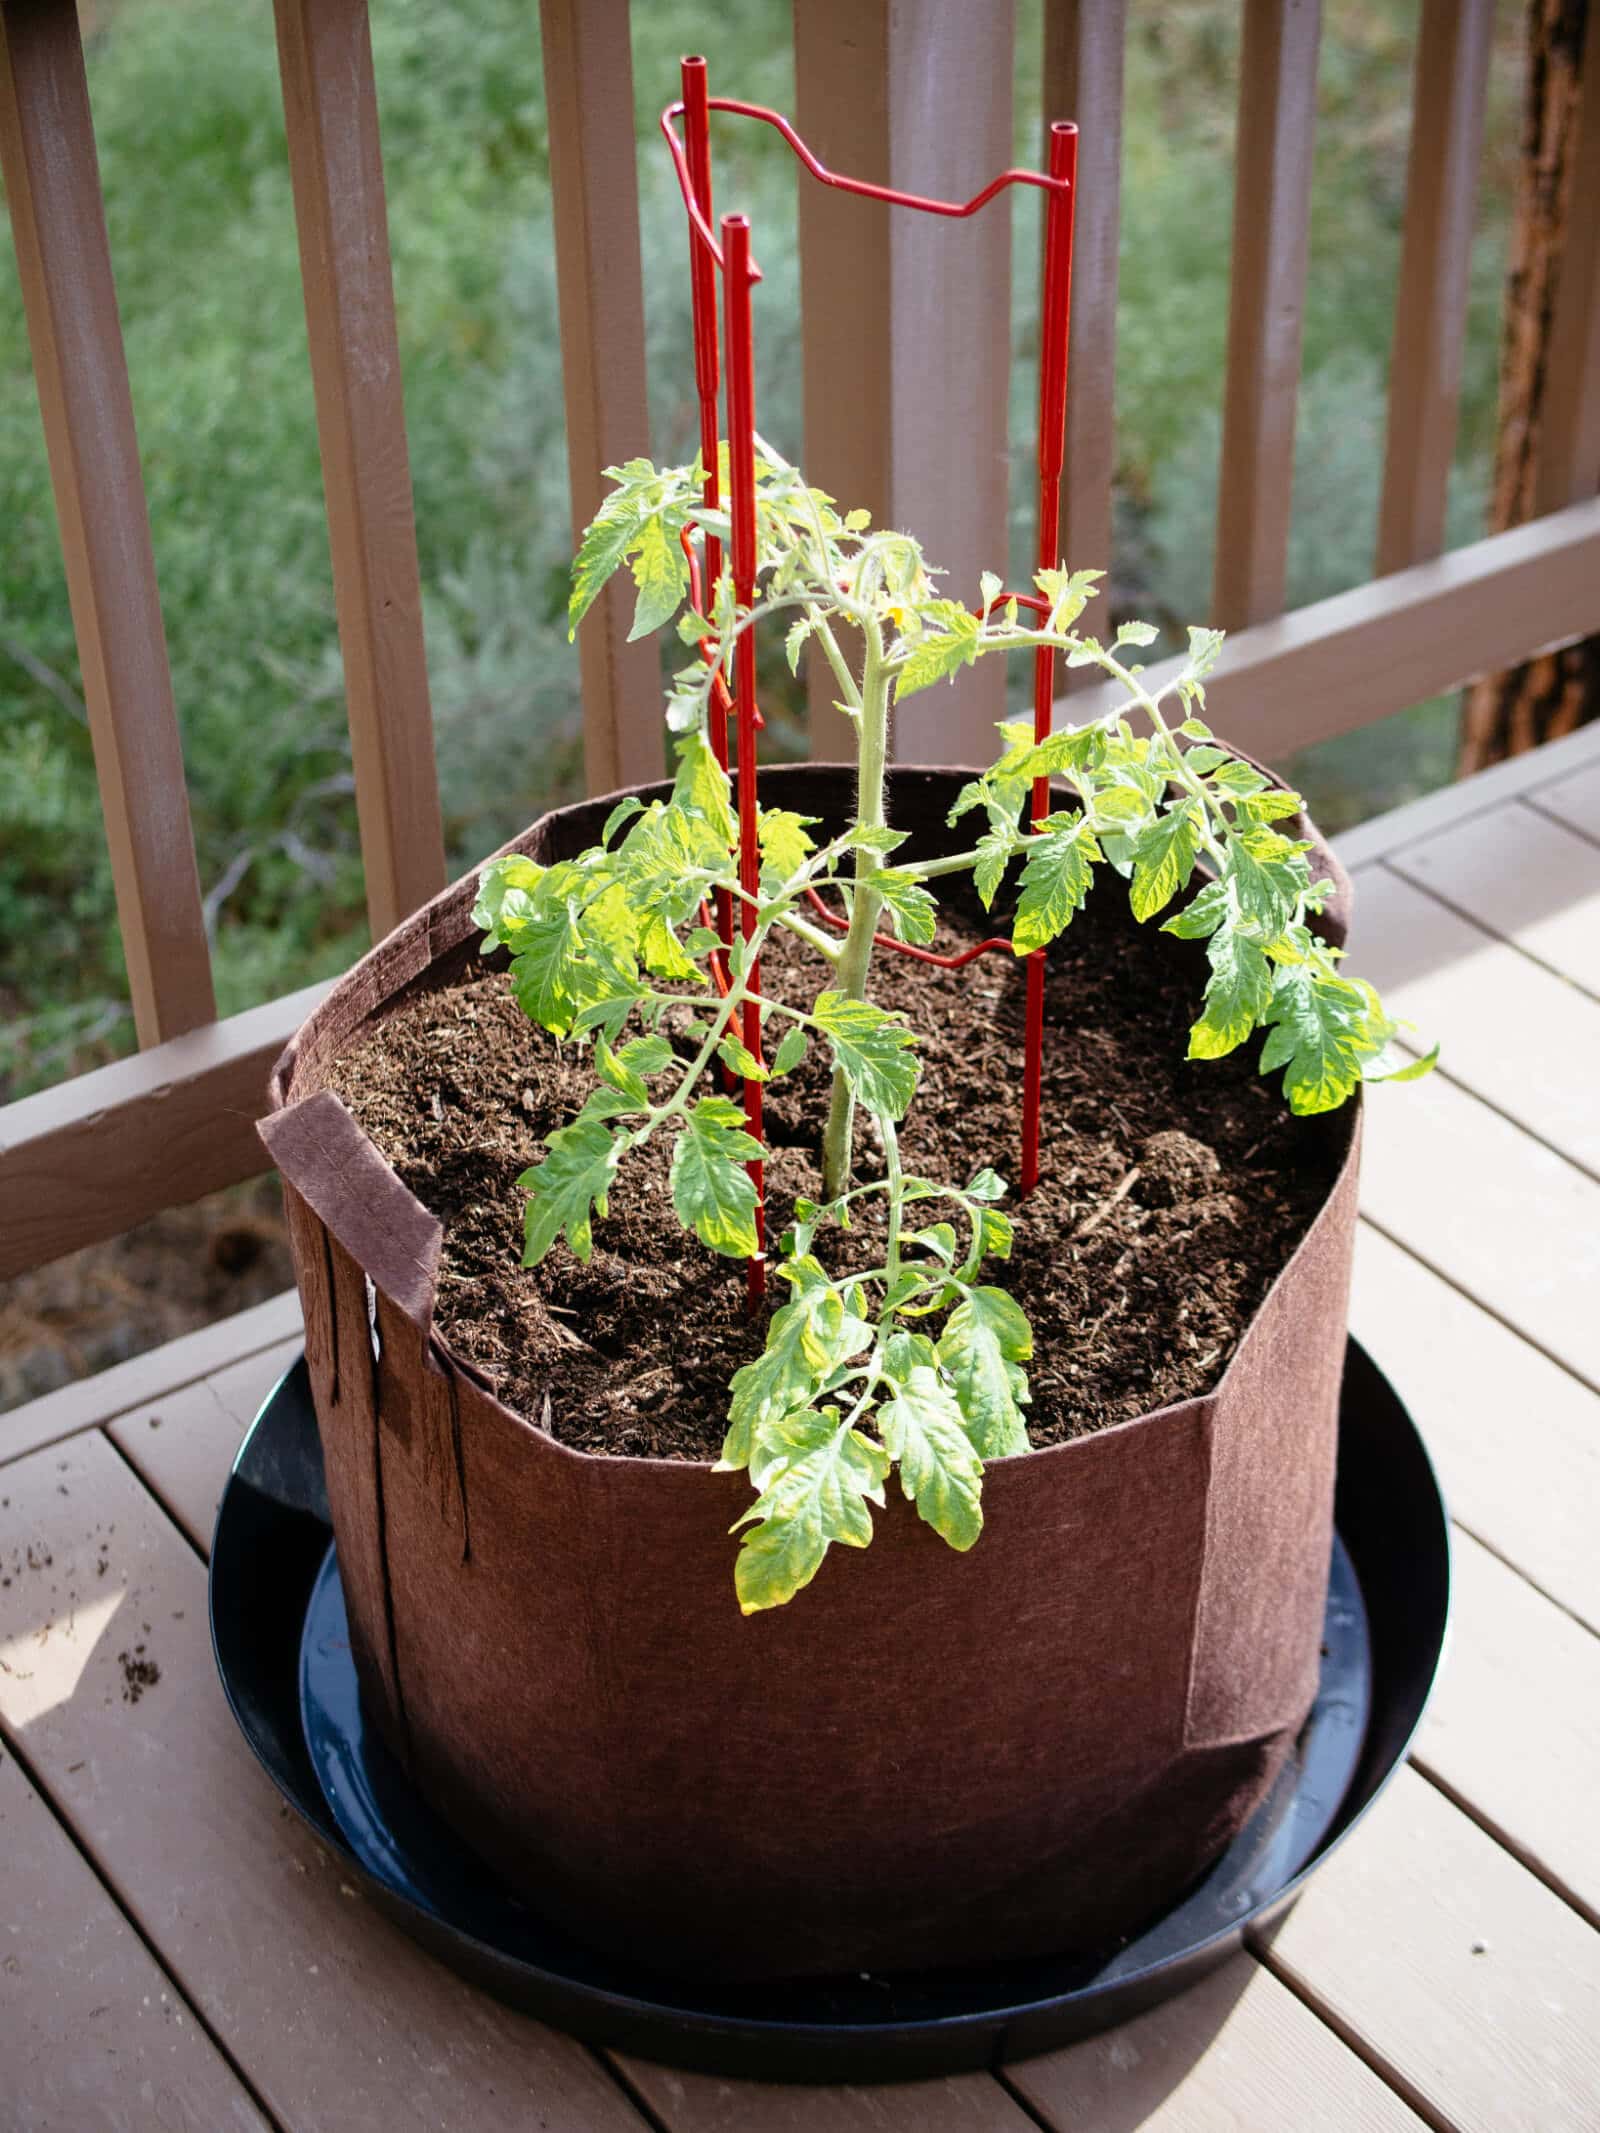
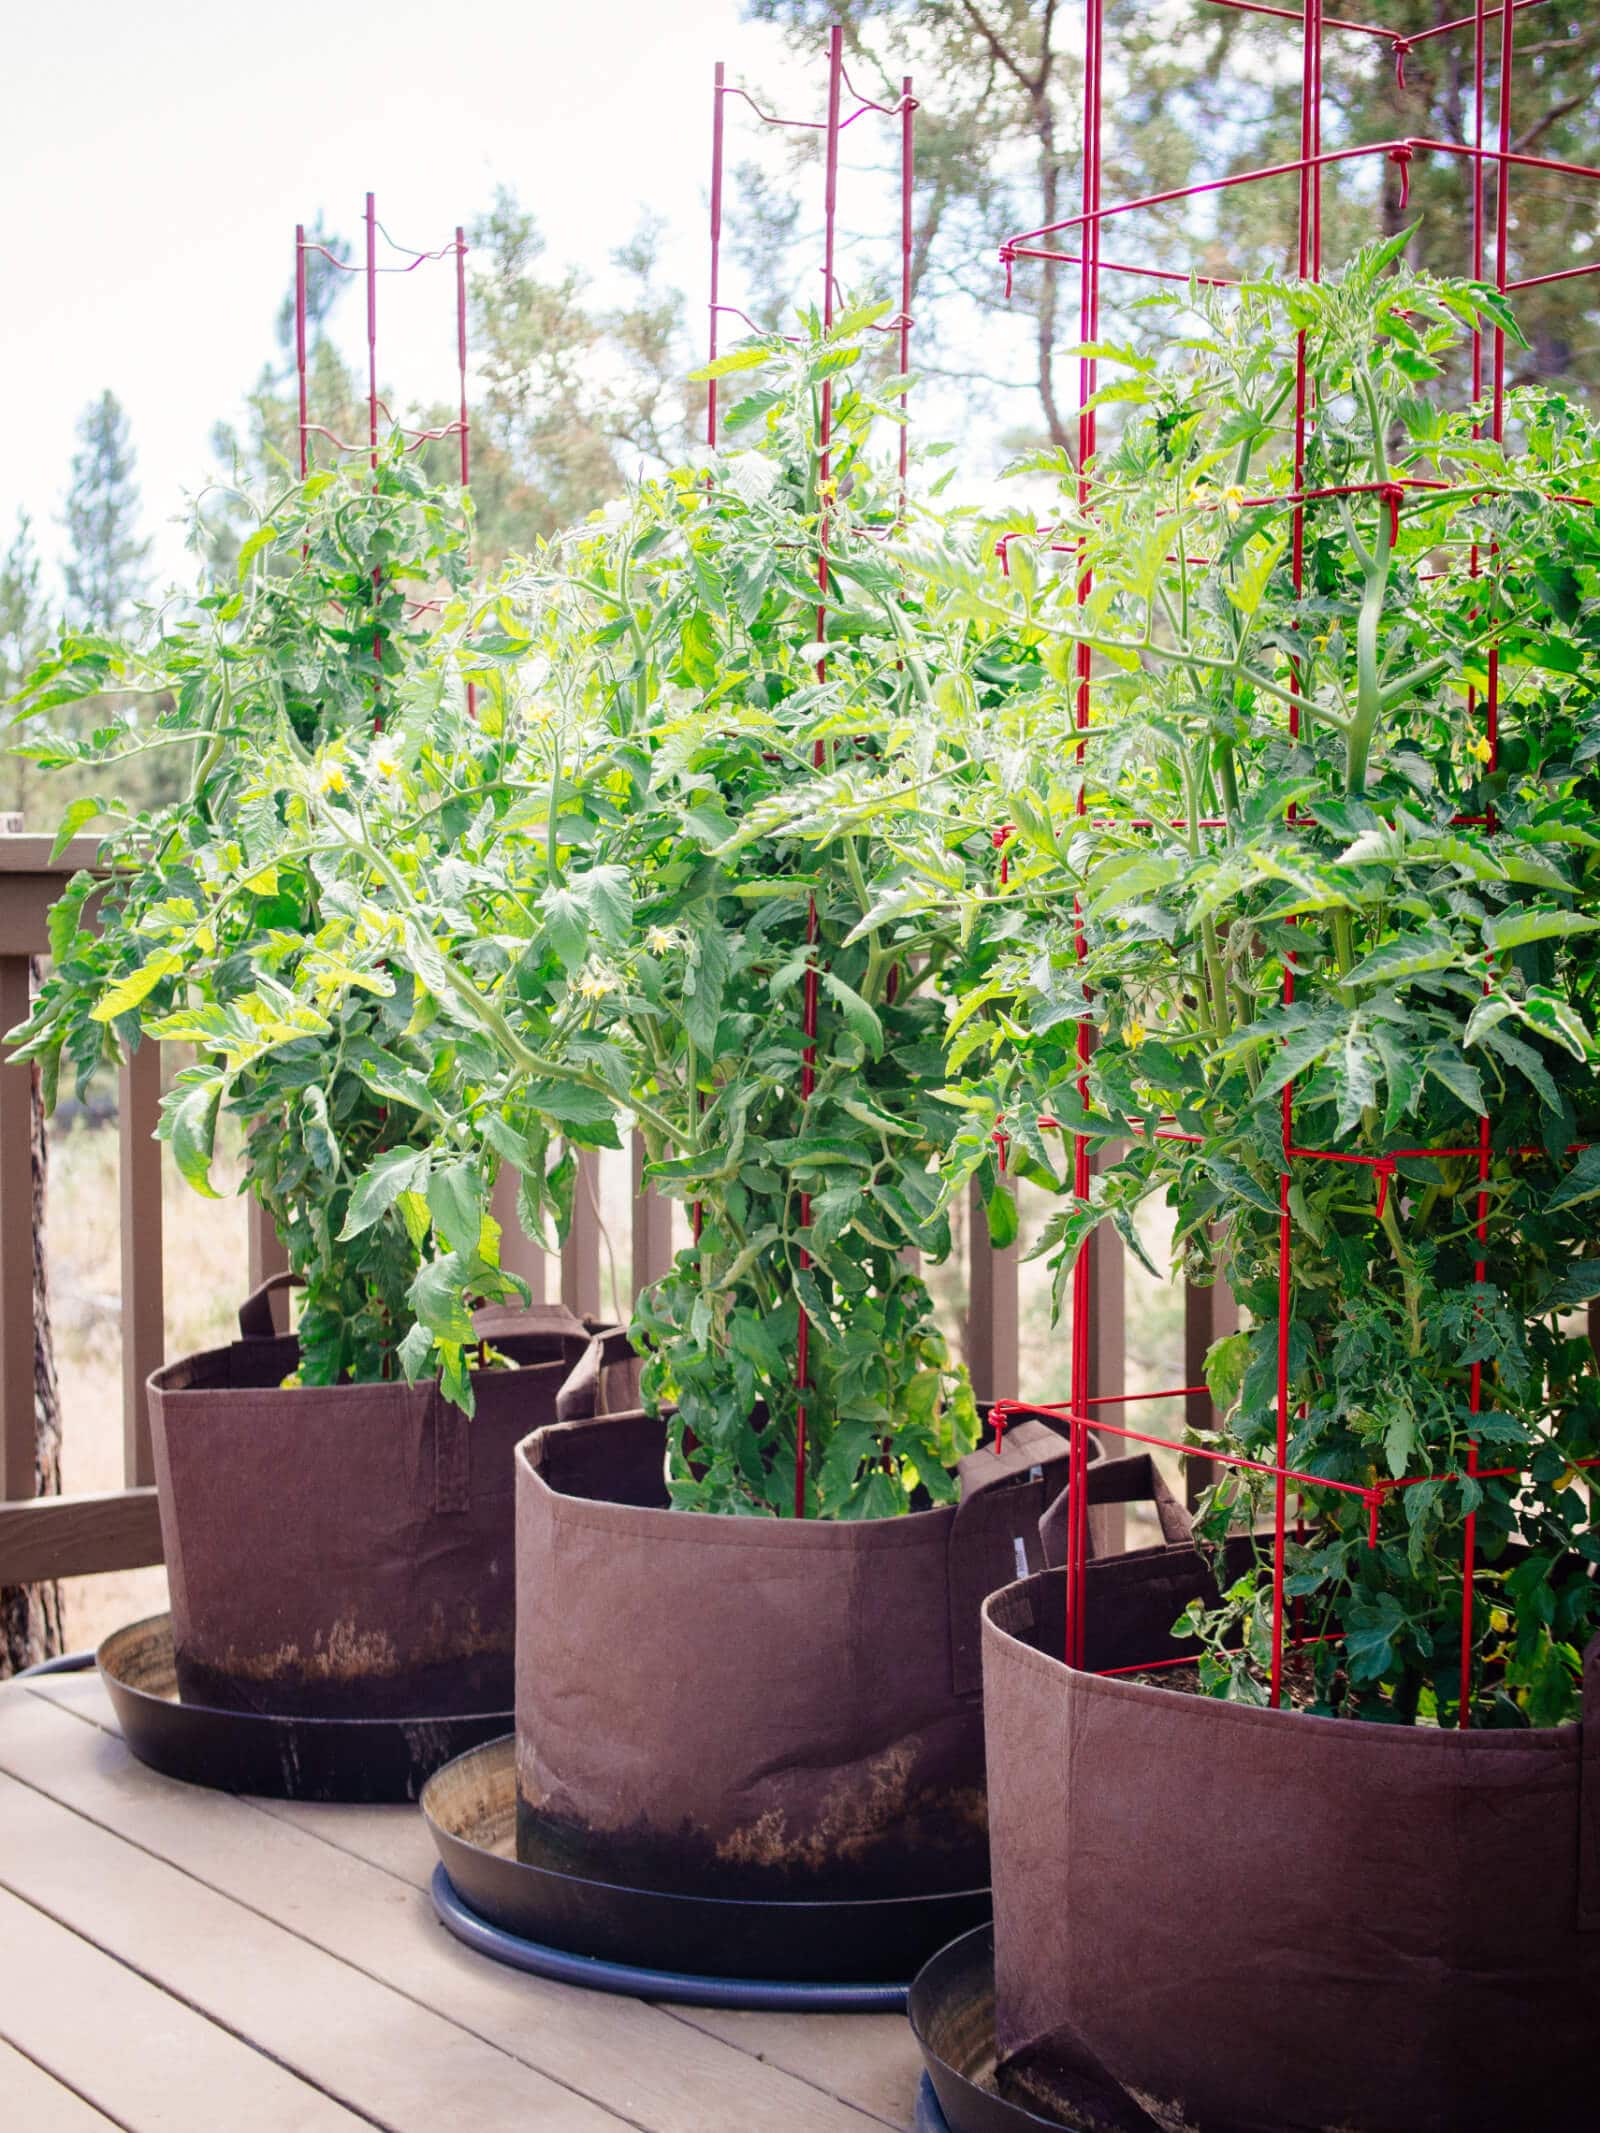
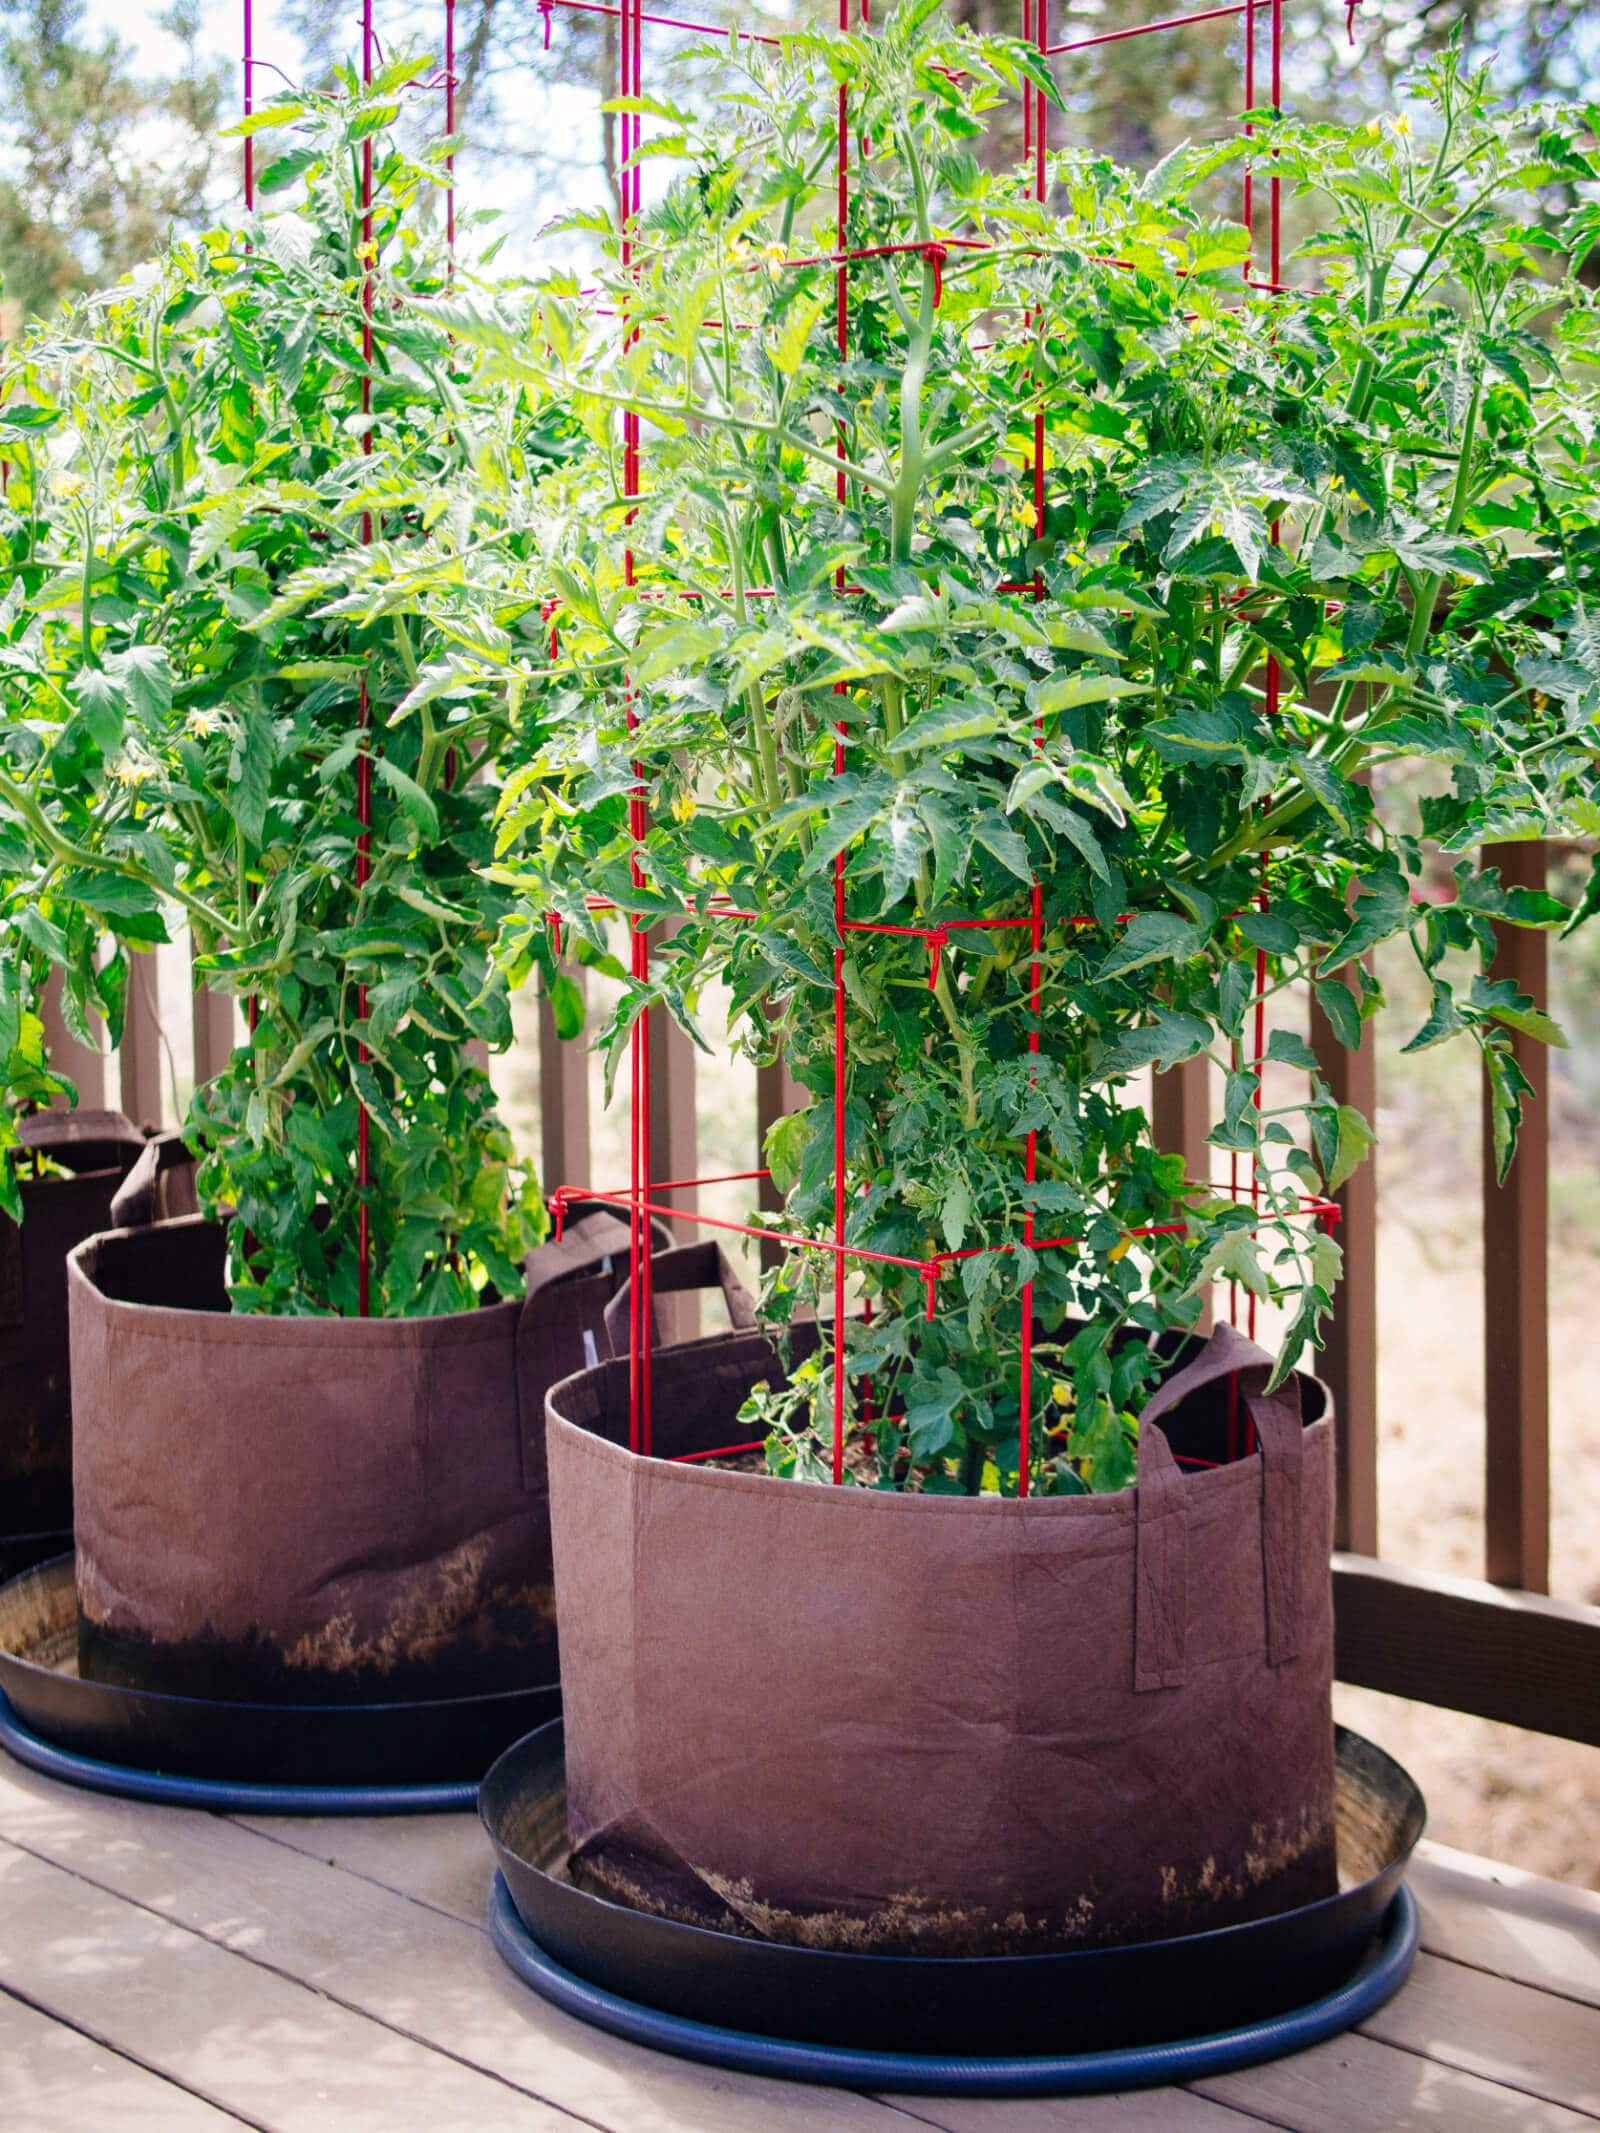
4. Don’t be shy with container size, and choose a fabric pot over a plastic pot.
When it comes to tomatoes, the bigger the pot, the better.
Determinate varieties should be planted in 10-gallon containers at a minimum, while indeterminate varieties need, at the very least, 20-gallon containers to thrive.
Any smaller than these sizes and your plants may not be as productive as they could be.
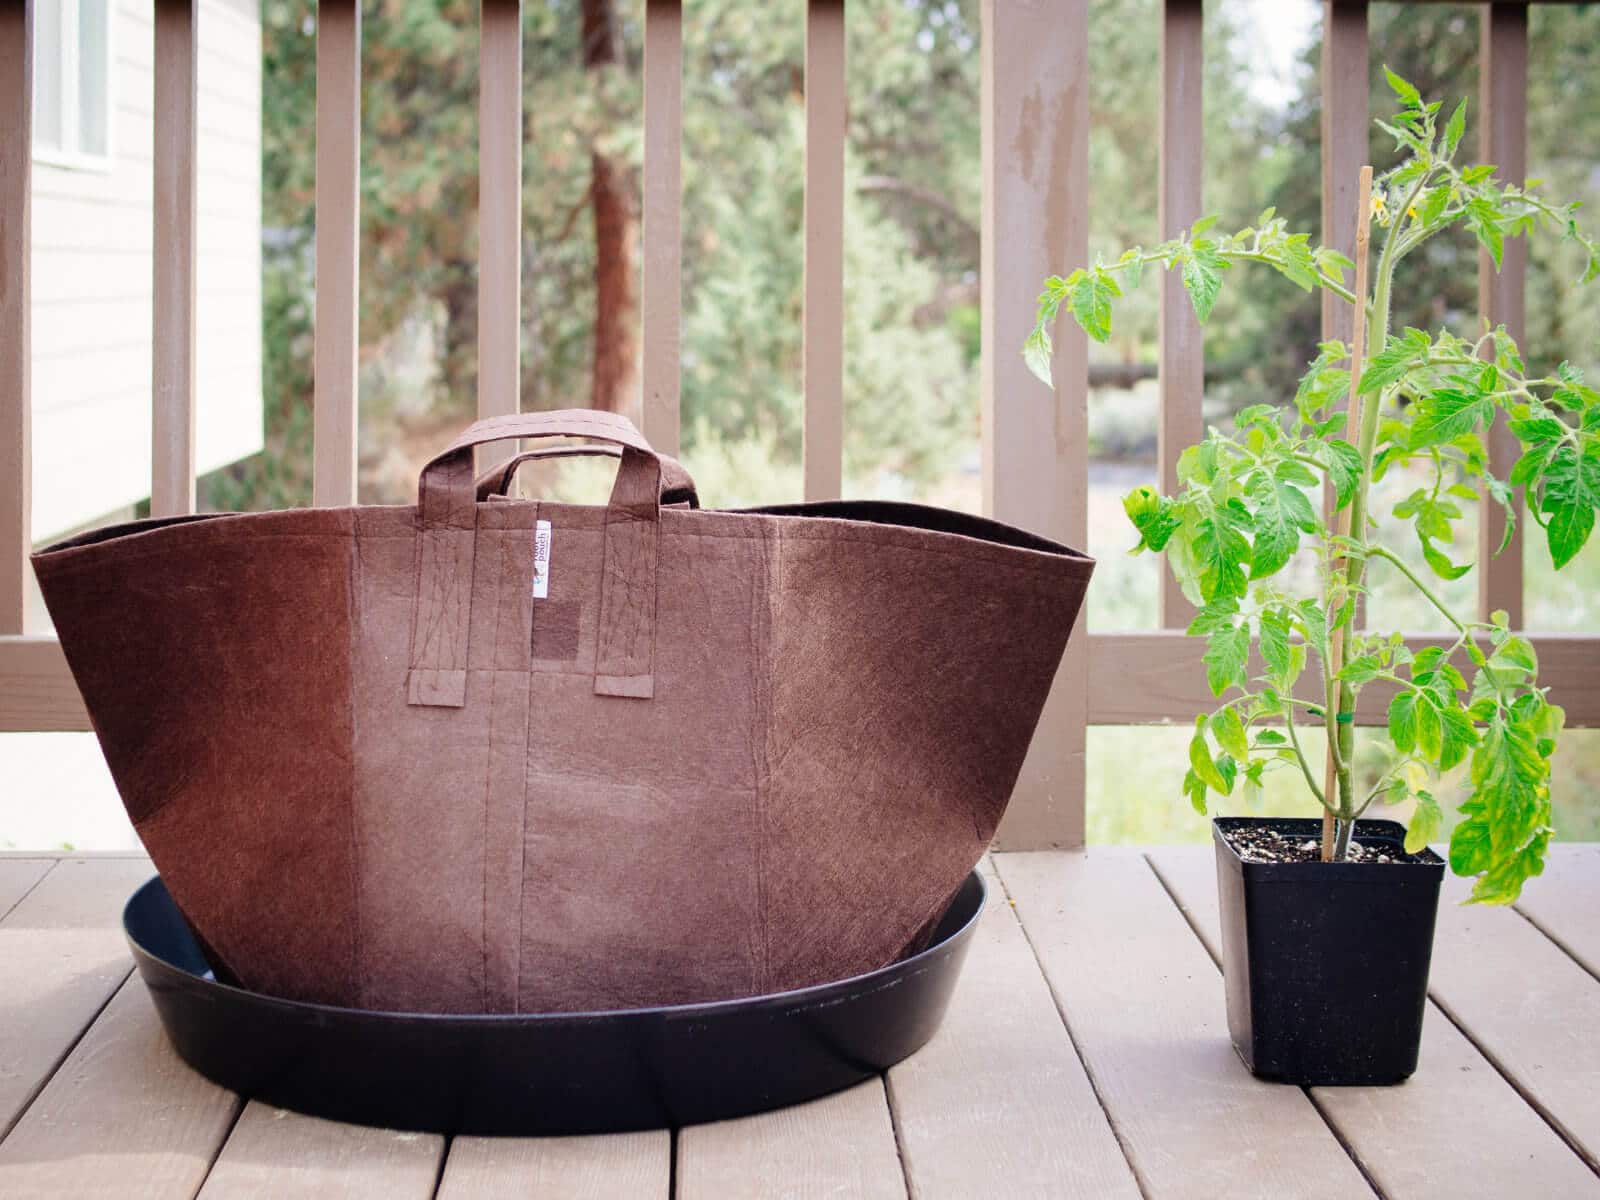
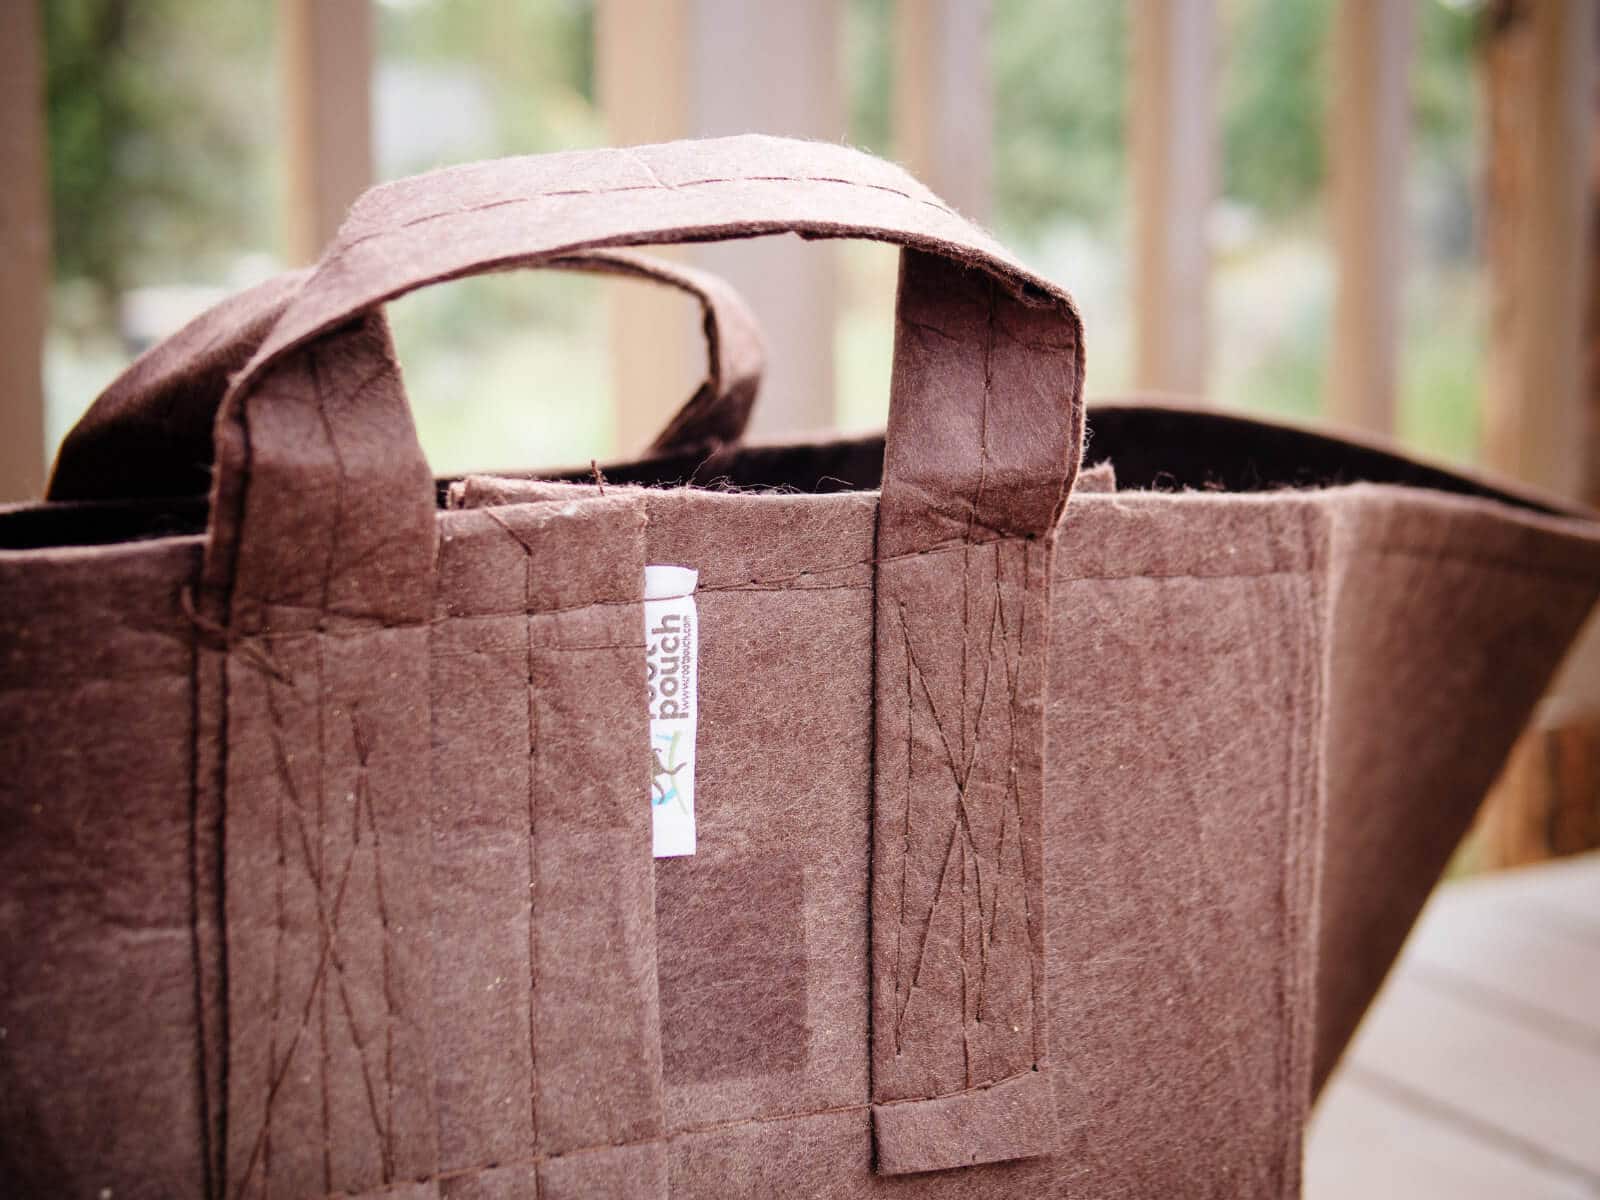
My favorite type of containers are fabric pots, like these ones from Root Pouch. They come in either non-degradable or biodegradable versions, but for container gardening, I prefer the non-degradable Boxer line so I can reuse them year after year.
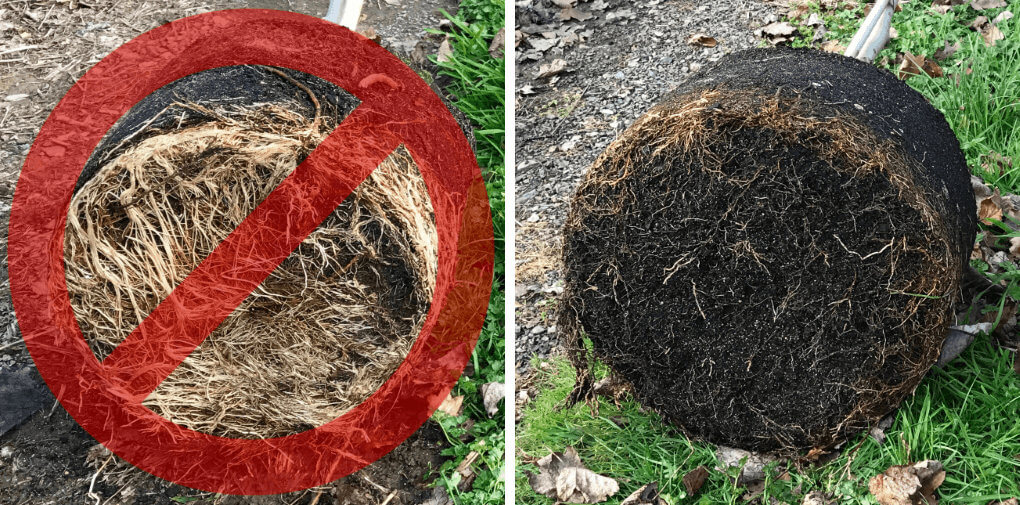
Fabric pots are beneficial for plants with extensive root systems because they naturally “air prune” the roots.
The effects of air pruning in breathable fabric pots are best seen when compared side by side with plants contained in non-porous plastic pots.
When the roots in plastic pots grow long enough to hit the sides of the pot, they continue to grow round and round in a constricted pattern (spiraling, kinking, and twisting around themselves), eventually becoming rootbound.
Roots in fabric pots, on the other hand, are exposed to air as they grow. This exposure “burns off” the tips of the roots, which stops them from growing long and spindly. Instead, they branch off and form new, shorter, fibrous feeder roots.
Read more: These are the best grow bags for your garden
Because growth is well distributed throughout the soil volume (and not just on the edges of the pot), the dense network of branched roots is able to increase the plant’s uptake of water, utilize all available nutrients, and aid in its natural defenses.
The permeability of fabric pots also helps to promote proper drainage of excess water and improve oxygenation to the roots (which maximizes the plant’s metabolic performance and, in turn, boosts crop yields).
In cooler climates, however, black plastic pots do serve a practical function. They hold heat in and keep roots warm in late spring to early summer, when tomato transplants are most susceptible to temperature swings.
On the flip side, black plastic pots may get too hot in the peak of summer, so they need to be shaded to prevent the rootball from overheating.
You can wrap or cover plastic pots with shade cloth, canvas, or towels to insulate against the heat (office binder clips work great for securing them), as well as try to keep them off heat-retaining surfaces like concrete.
Whichever kind of container you use, be sure to place a heavy-duty saucer (I use this one) underneath before you load it up, and have it placed exactly where you want it—it’ll be very heavy to move later on.
Not only will the saucer protect your deck or patio from standing moisture, it will allow your plant to absorb any excess water over the course of a hot day.
5. Use high-quality potting soil.
Plants in containers need a good combination of breathability, absorption, and moisture retention.
The topsoil from your garden (as well as any commercially bagged mix labeled as “raised bed soil” or “garden soil”) is generally too dense for potted plants, and it increases the risk of your tomato plant picking up a soil-borne disease that’s otherwise easily preventable.
I recommend using a high-quality premium potting soil or potting mix like this one, and try to avoid reusing potting soil from past seasons if your plants had pests or diseases. You can also make your own potting mix with only three ingredients.
Spread about 3 to 4 inches of potting soil on the bottom of your container, then continue with Step 5.
6. Feed your tomato plant well.
Tomatoes are heavy feeders and need ample nutrients to produce well and long into the season.
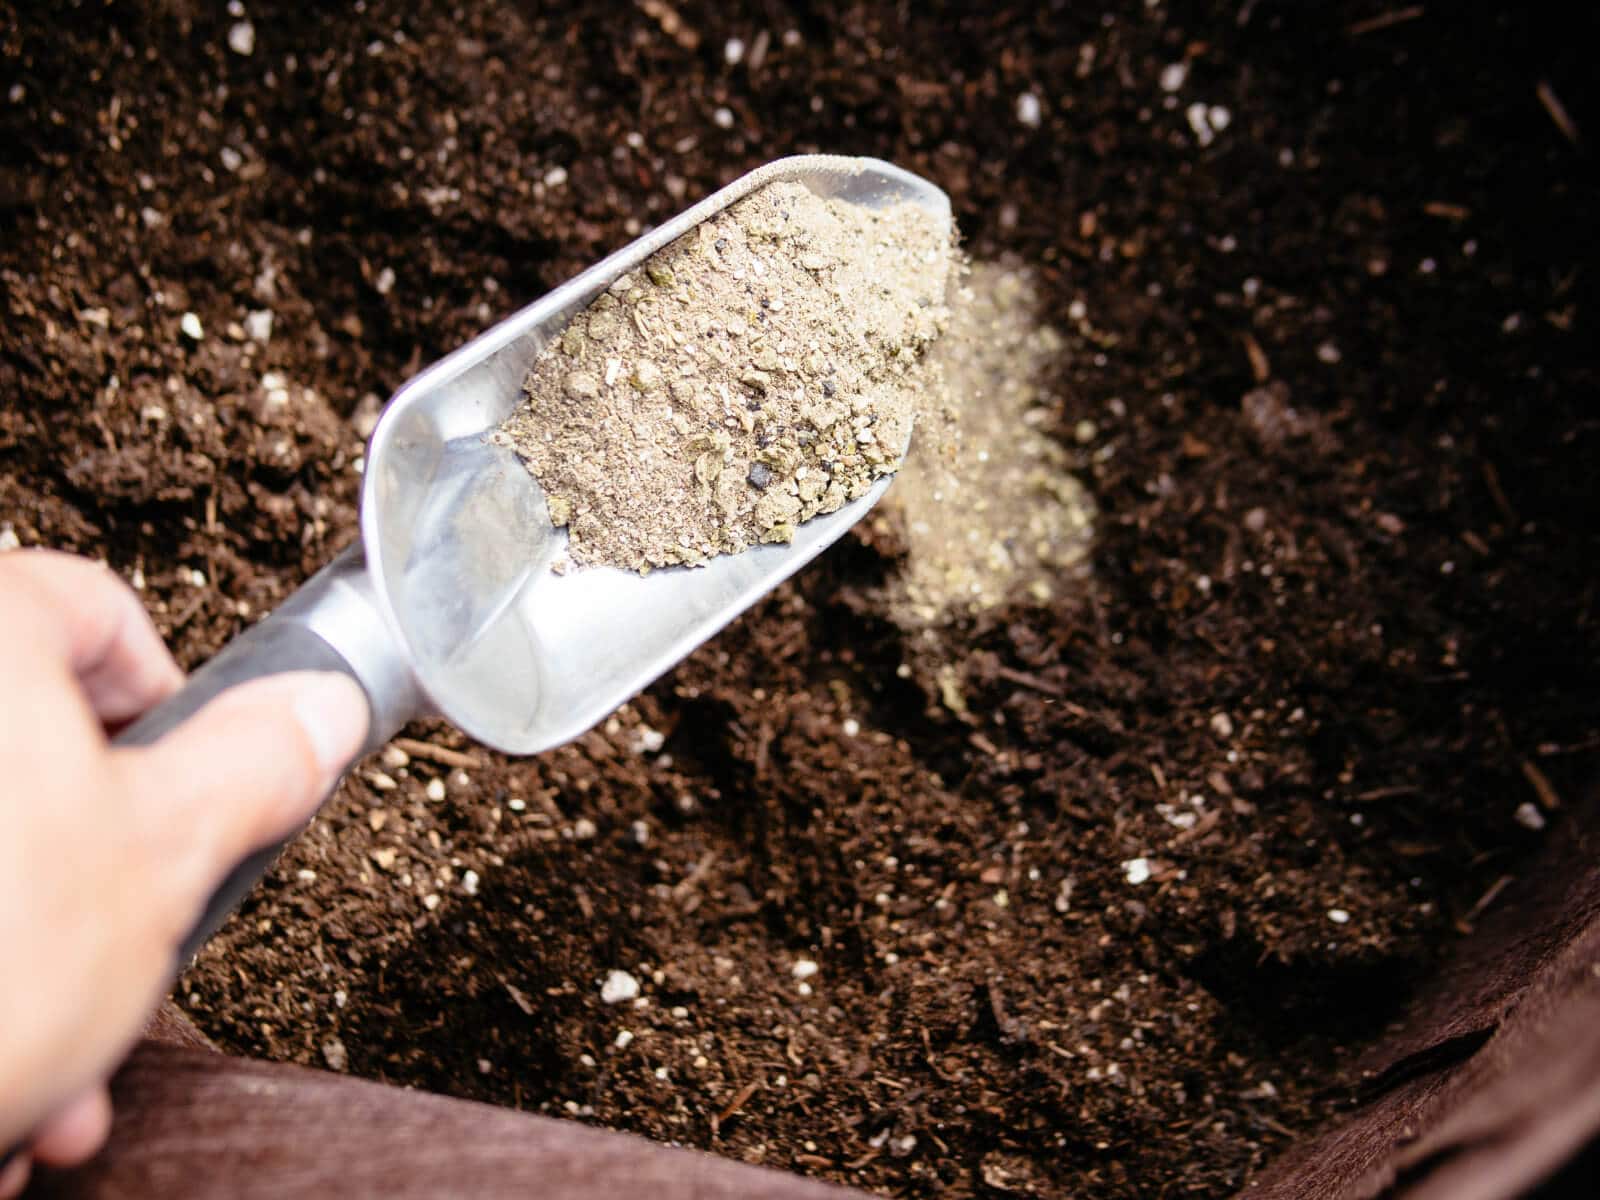
Before putting the tomato transplant in its final planting hole, add the following amendments to the soil and stir them around a bit:
- 1/2 cup of organic all-purpose fertilizer
- 1/4 cup of fish meal
- 1/4 cup of bone meal
- 2 aspirin tablets
- Handful of crushed eggshells

Related: How to use fish heads to fertilize your tomato plants
Once the amendments are in, spread another 2 to 3 inches of potting soil on top.
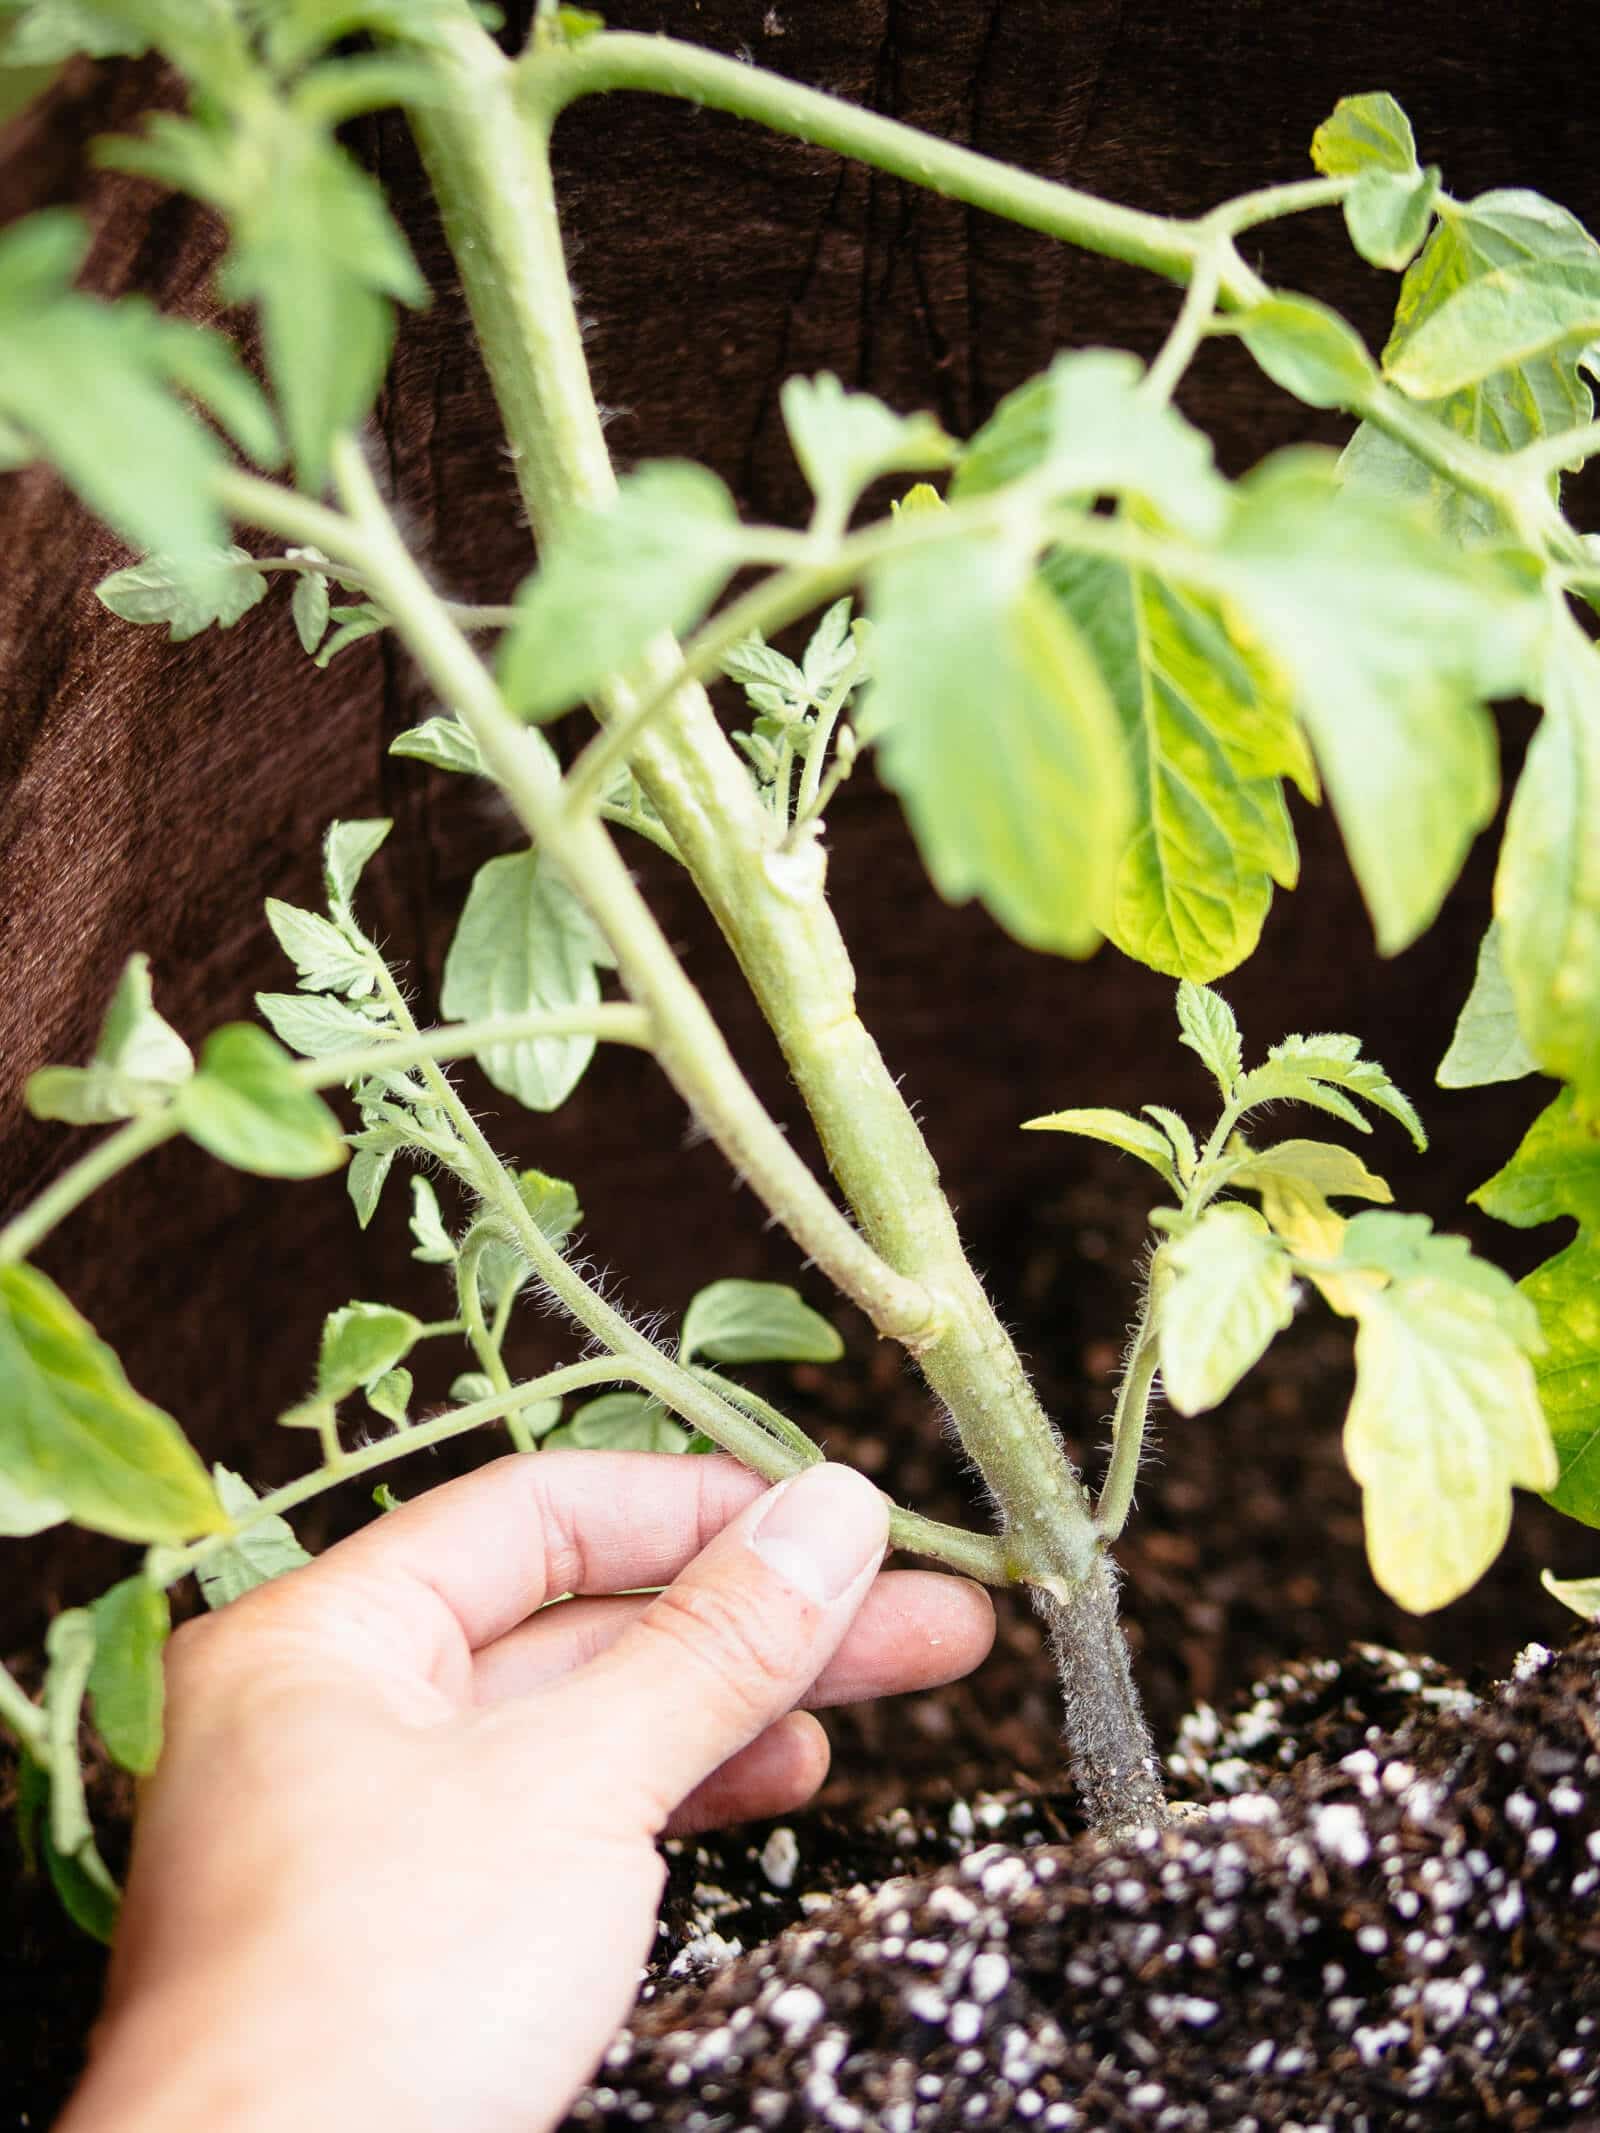
7. Bury the stem of the tomato plant.
Gently pinch or snip off the lowest sets of leaves until you’re left with a bare stem on the bottom one-third to one-half of the stem.
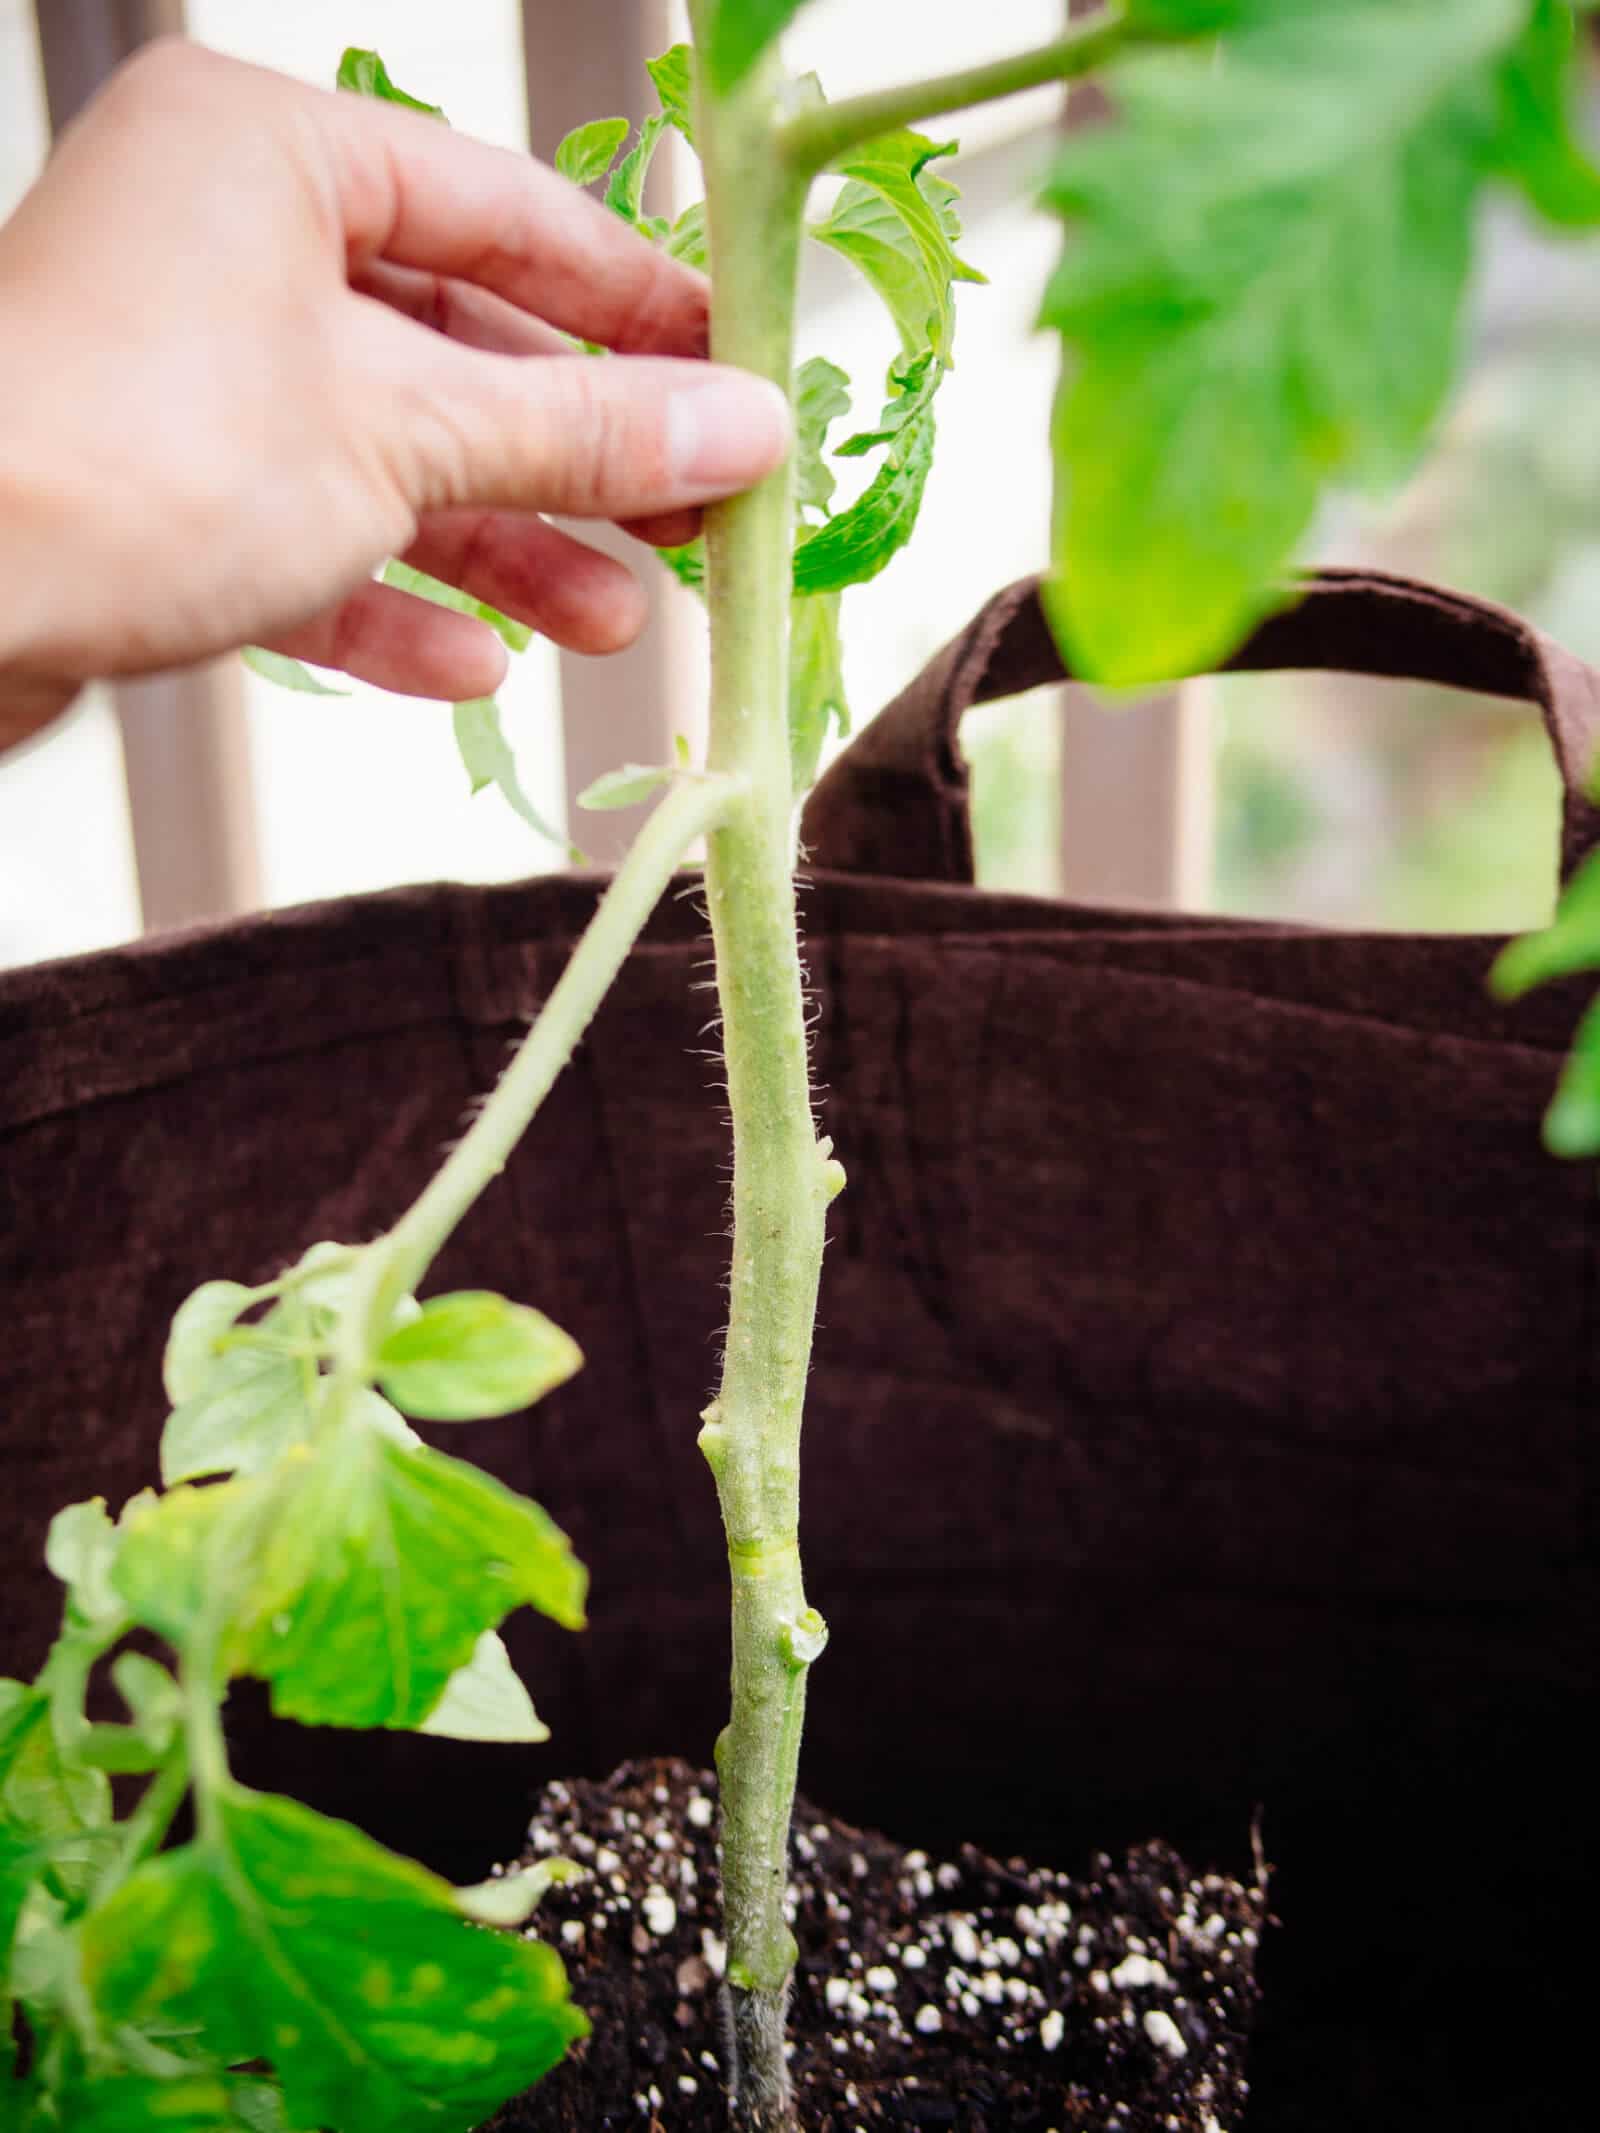
Center the tomato plant in the pot and fill the remainder of the pot with more potting soil until it’s filled to the brim (just below the last set of leaves). Gently shake the pot to settle the soil and add more as needed.
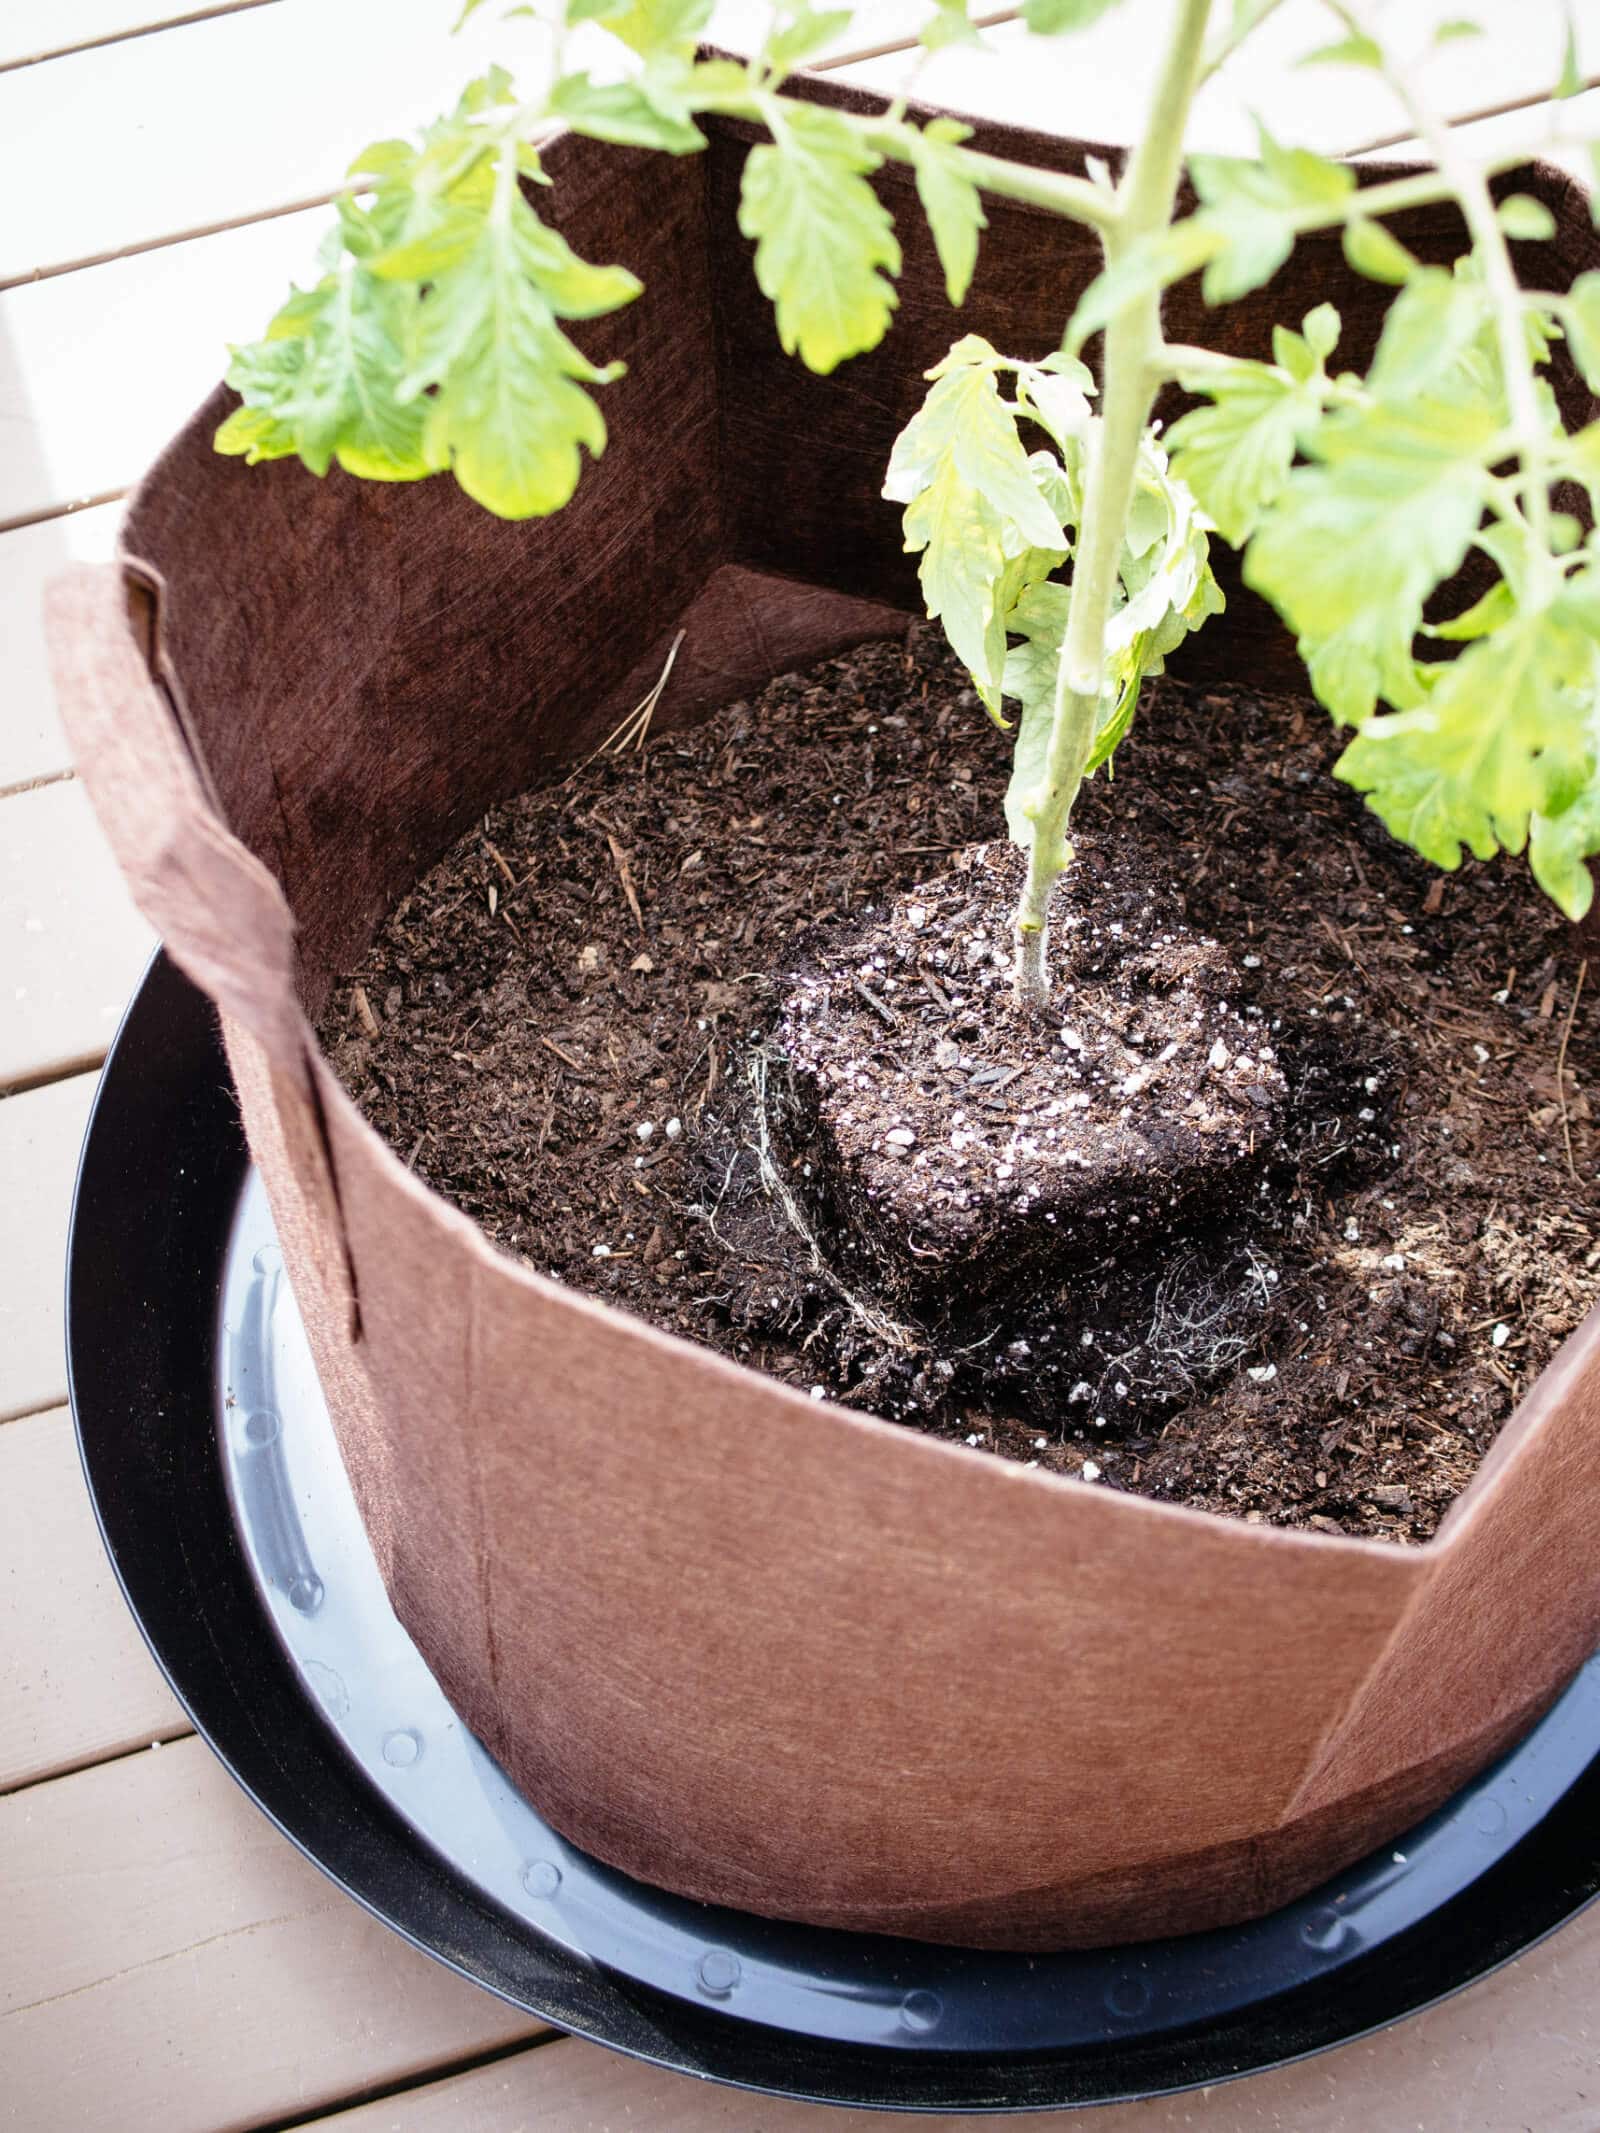
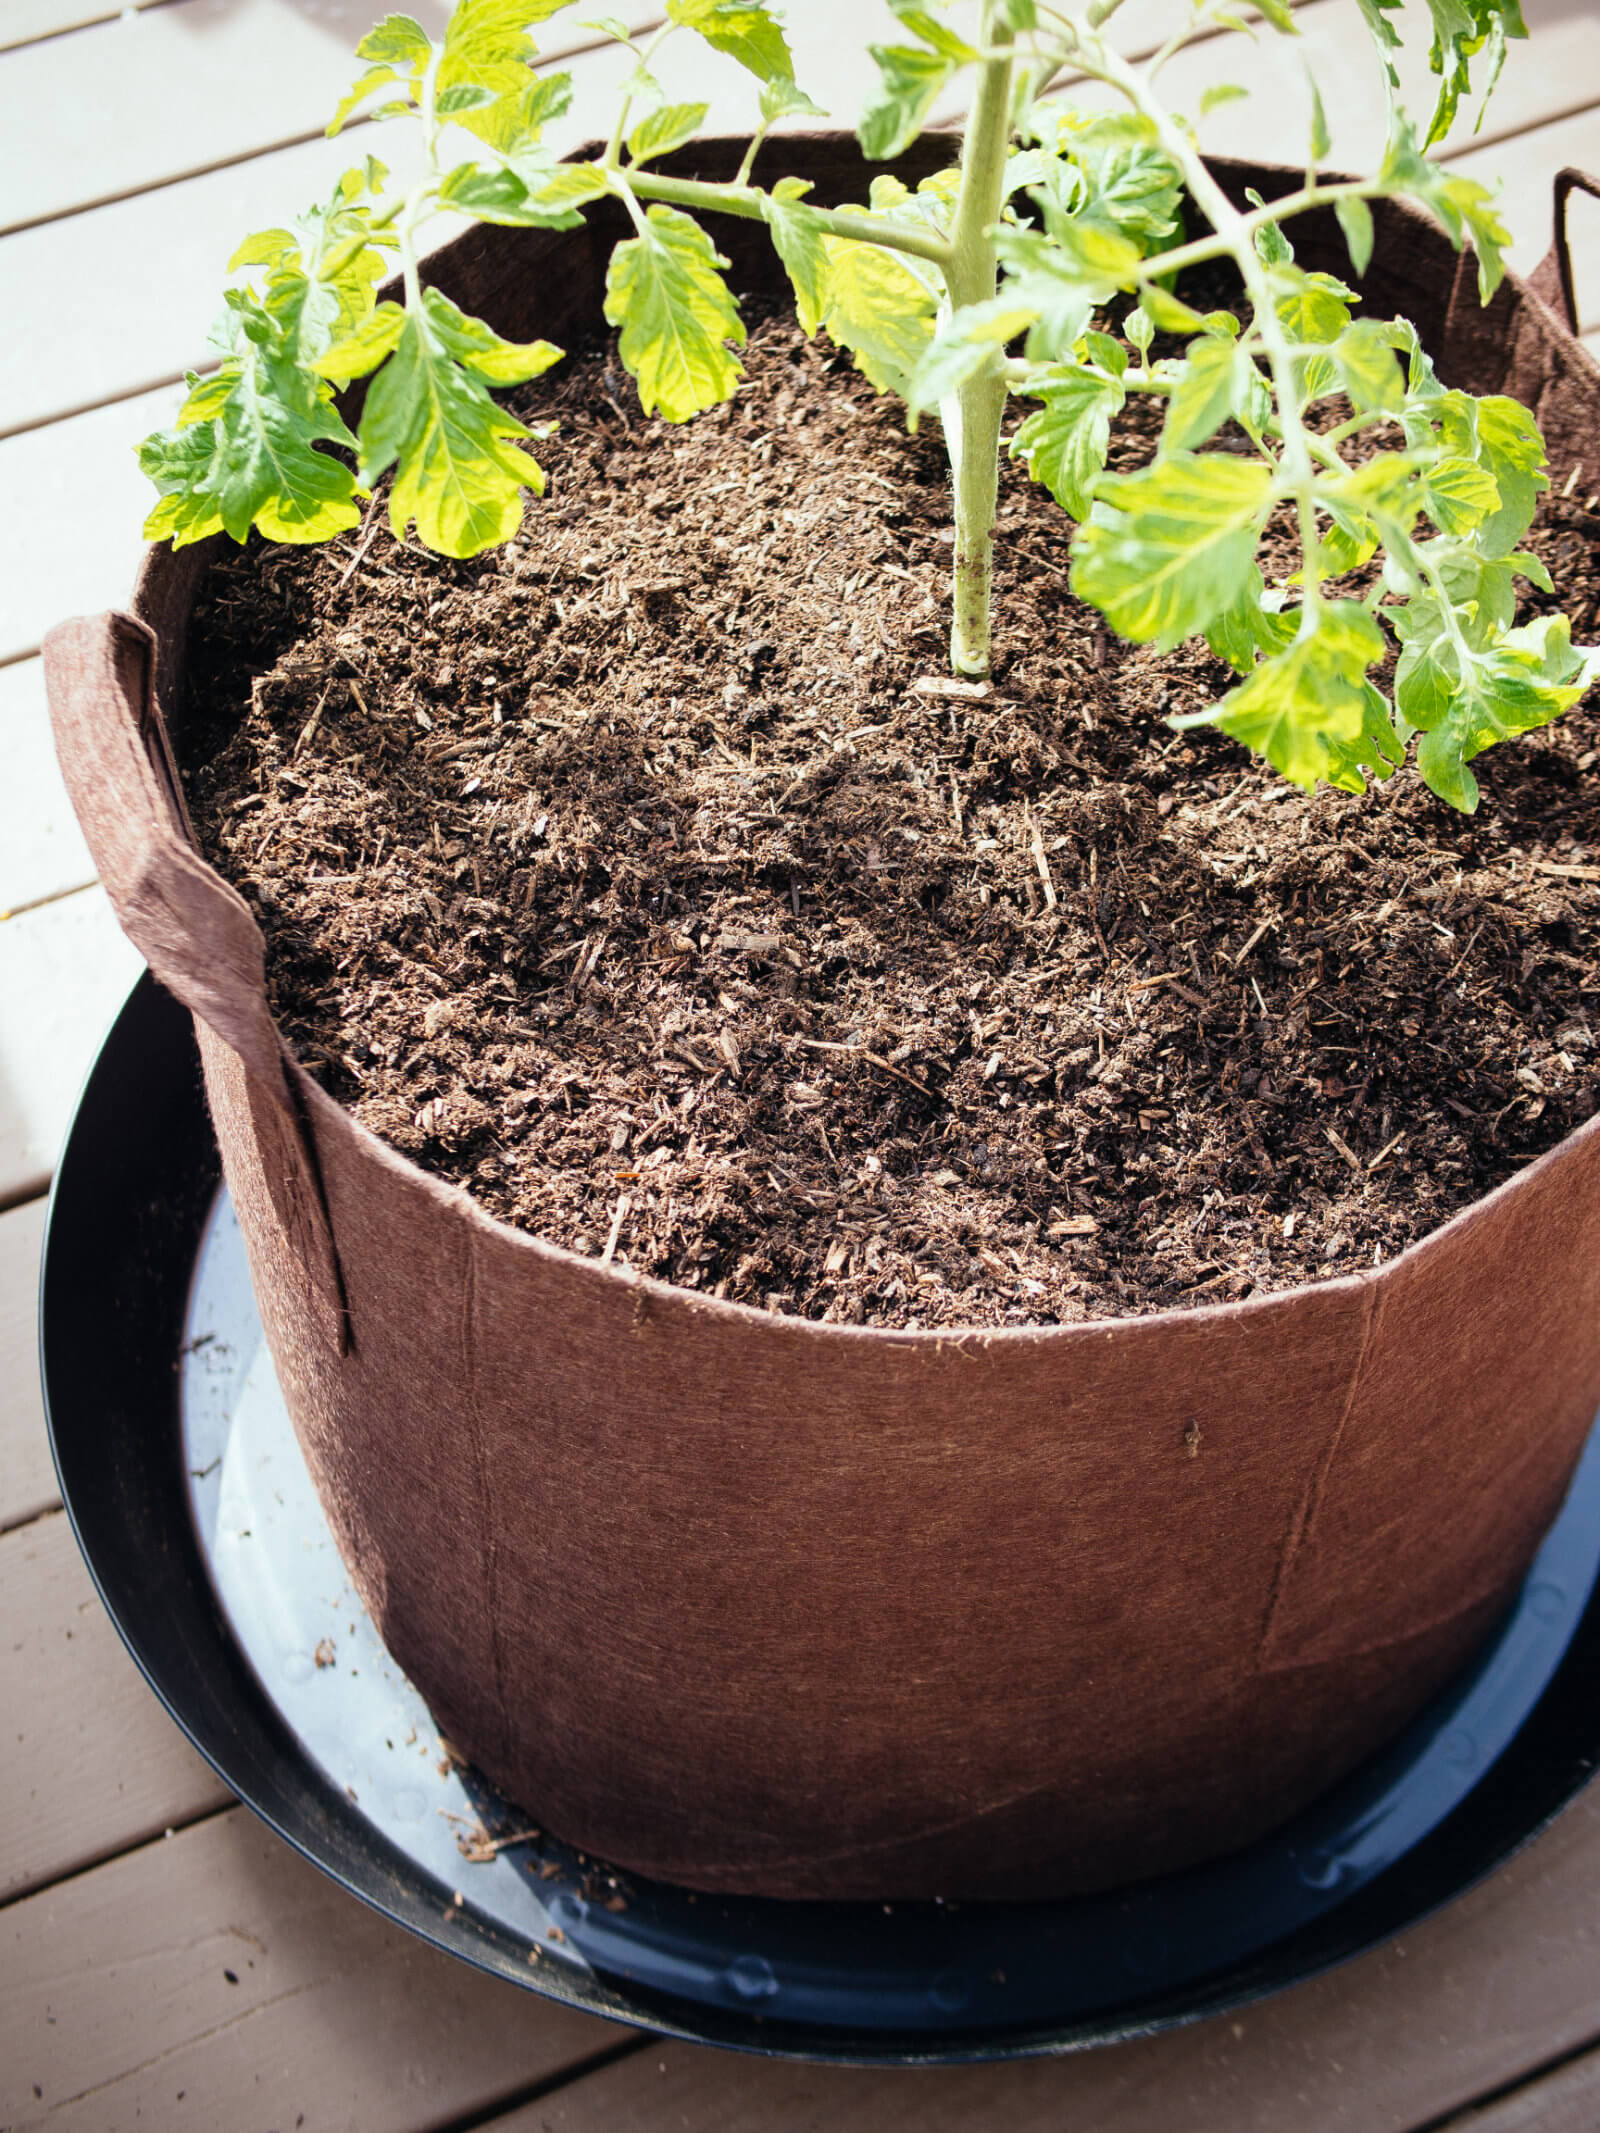
Top off the soil with 1/2 cup all-purpose fertilizer (I like this one) and lightly rake it in around the base of the stem.

8. Water thoroughly and consistently.
Water the root zone thoroughly until the soil is evenly moist. I usually water the plant in, wait about 10 minutes, water again, wait 10 minutes again, and repeat until water runs freely out the bottom of the pot.
It takes a surprisingly large amount of water (at least a gallon, from my experience) to fully saturate the soil the first time. Don’t assume that just because the water drains right away on the first watering that the soil is soaked through.
Proper watering is the key to success when it comes to growing tomatoes in pots. Too little or too much water can stunt your plant’s growth, contribute to blossom end rot, or encourage pests in times of hot weather or plant stress.
For those same reasons, water only the root zone with a watering can, garden hose, drip irrigation, or soaker hoses (not overhead on the leaves) so you can see exactly how much water your plant is getting each time.
After the initial watering, and depending on the weather, you probably won’t need to water again until three days later. Check the top 3 to 4 inches of soil with your finger; if it feels dry, give it a good drink.
As summer goes on, you’ll want to check the soil a couple times a week to ensure a consistent level of moisture.
Plants in containers tend to dry out more quickly than those in raised beds or in-ground garden beds, so it’s not unusual to water at least once every other day as temperatures climb higher. The smaller the pot, the more often you’ll need to water.
Remember that tomato plants like to be watered deeply, so be sure to saturate the soil until excess water drains out the bottom. Give another nice, long soak only when the top 3 to 4 inches of soil feel dry.
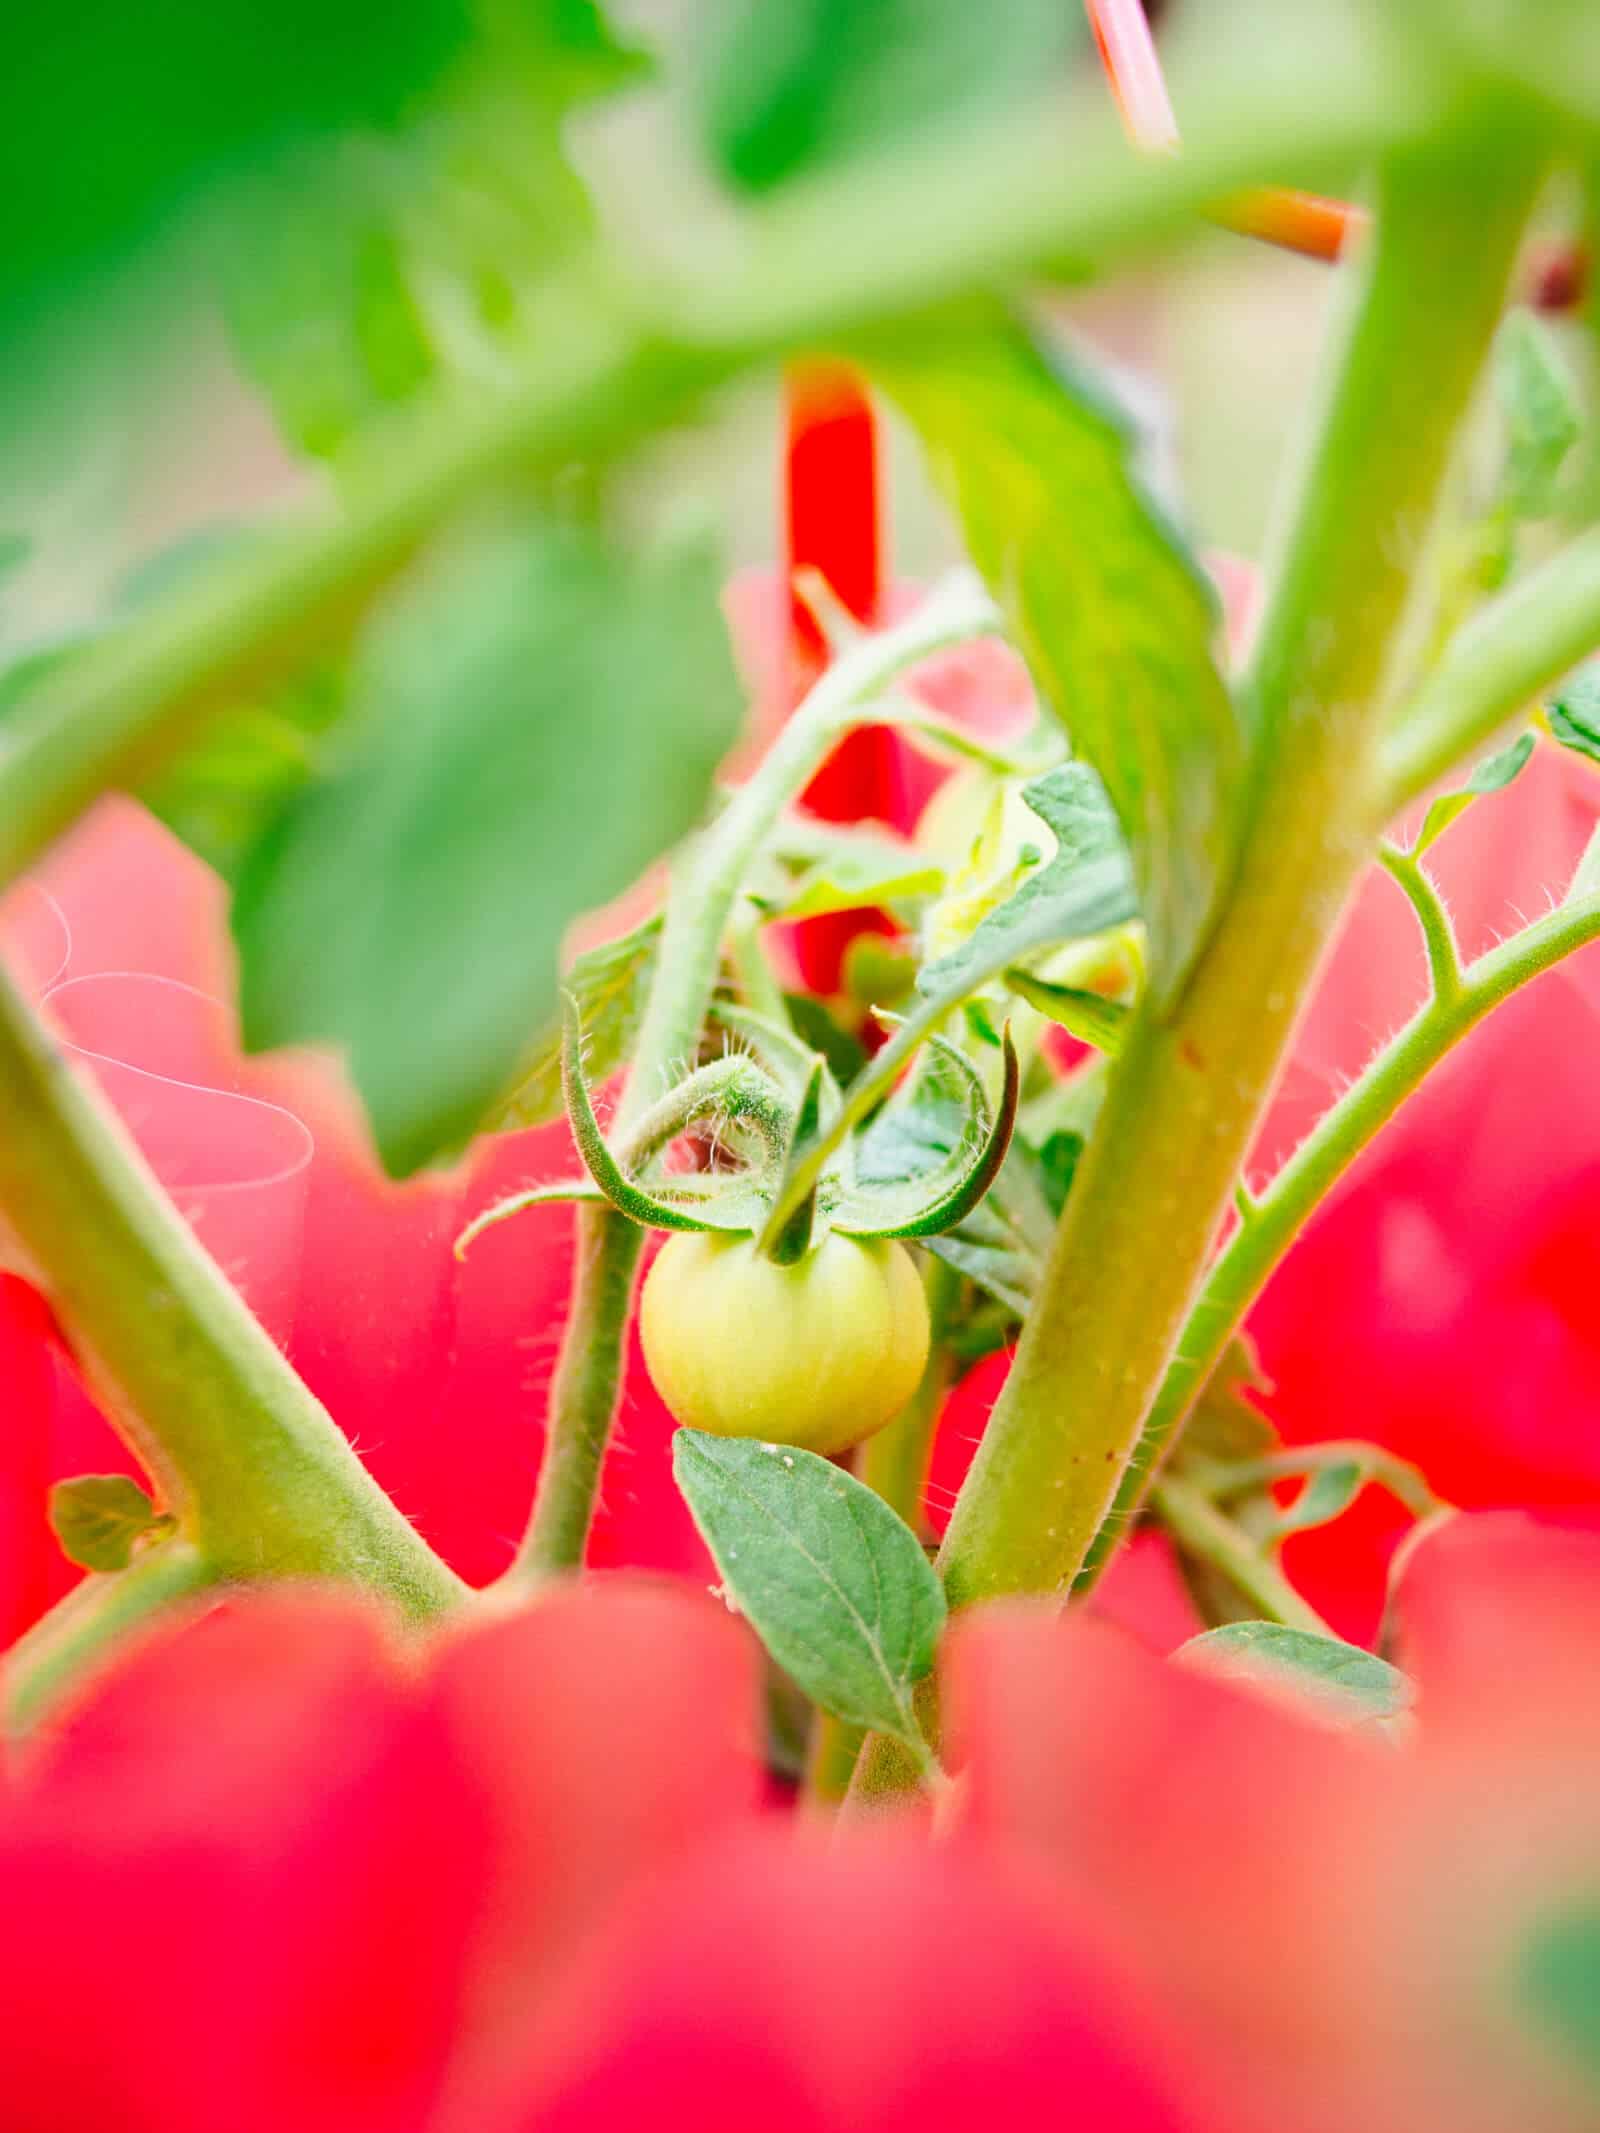
9. Protect young transplants from frost with “tomato teepees.”
Generally, it’s a good idea to wait until nighttime temperatures are consistently above 45°F before you plant tomatoes outside.
But in climates with short or finicky growing seasons, sometimes you just need to get them outside sooner (or you never know when temperatures may dip below freezing). Here in Central Oregon, it’s not unheard of to get frost in July!
Related: Look up the frost dates for your exact location
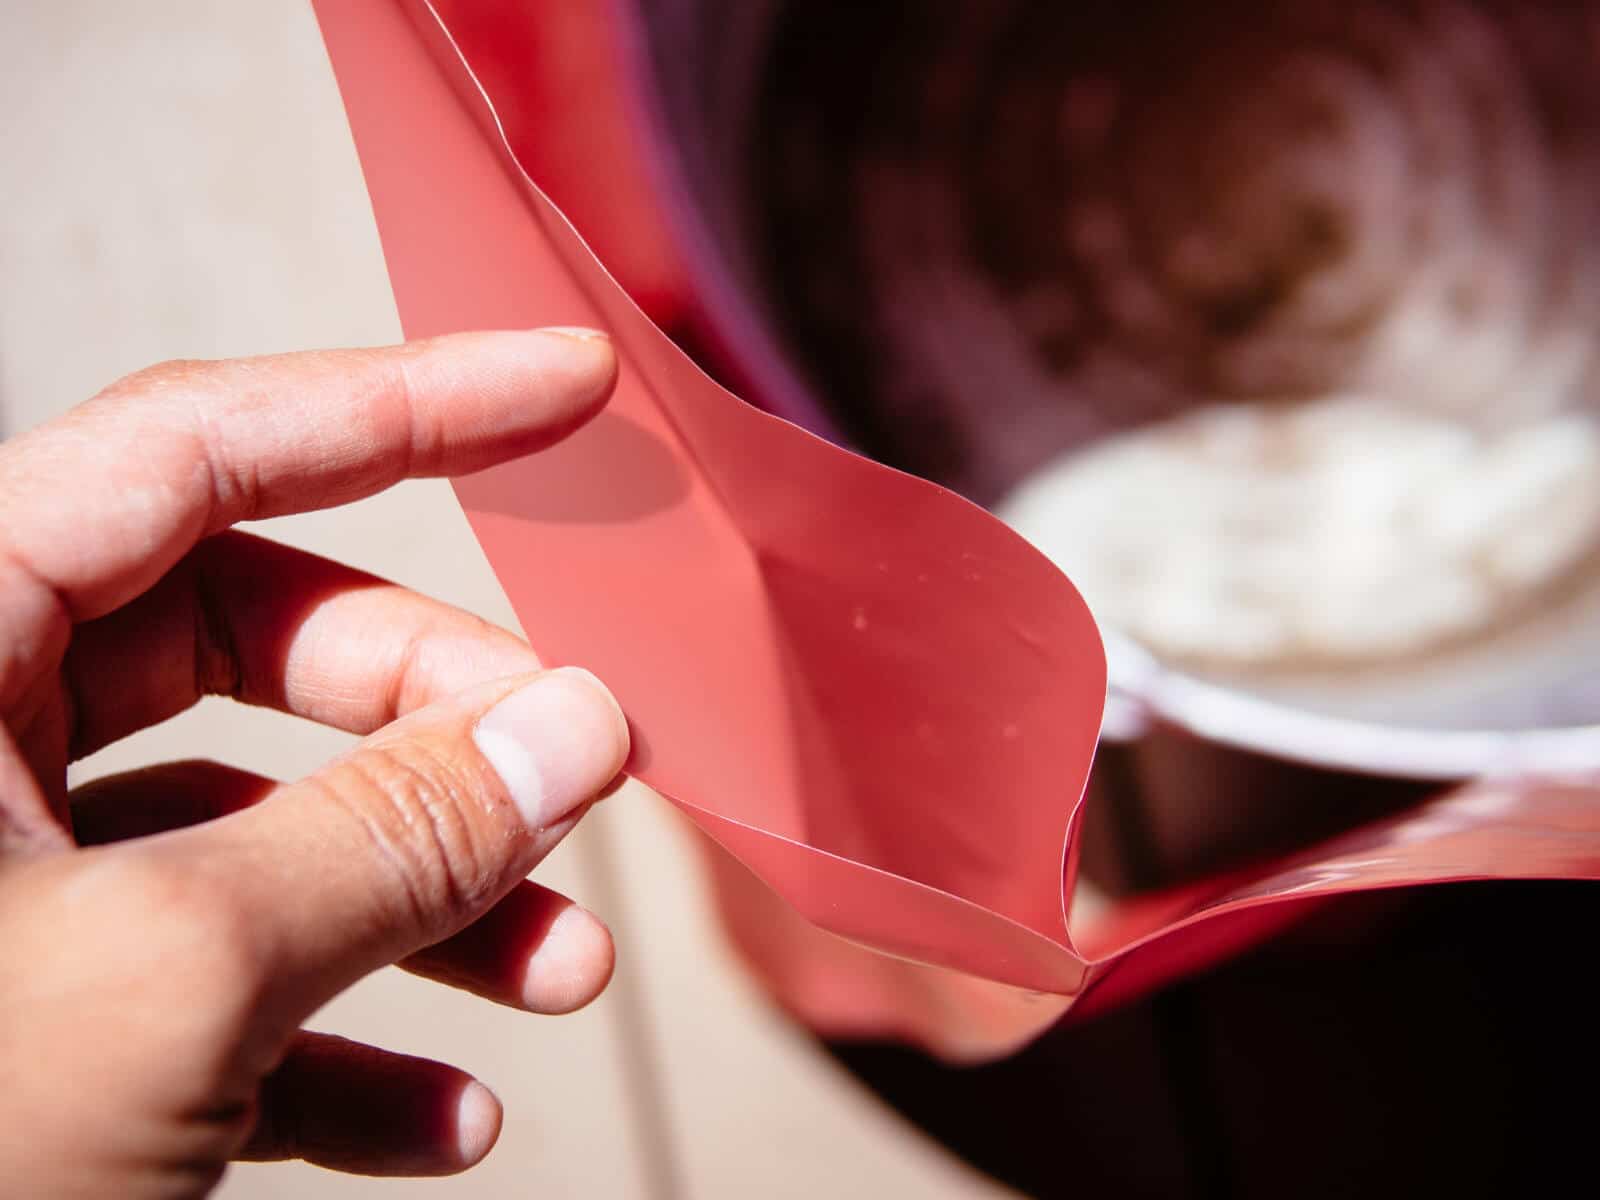
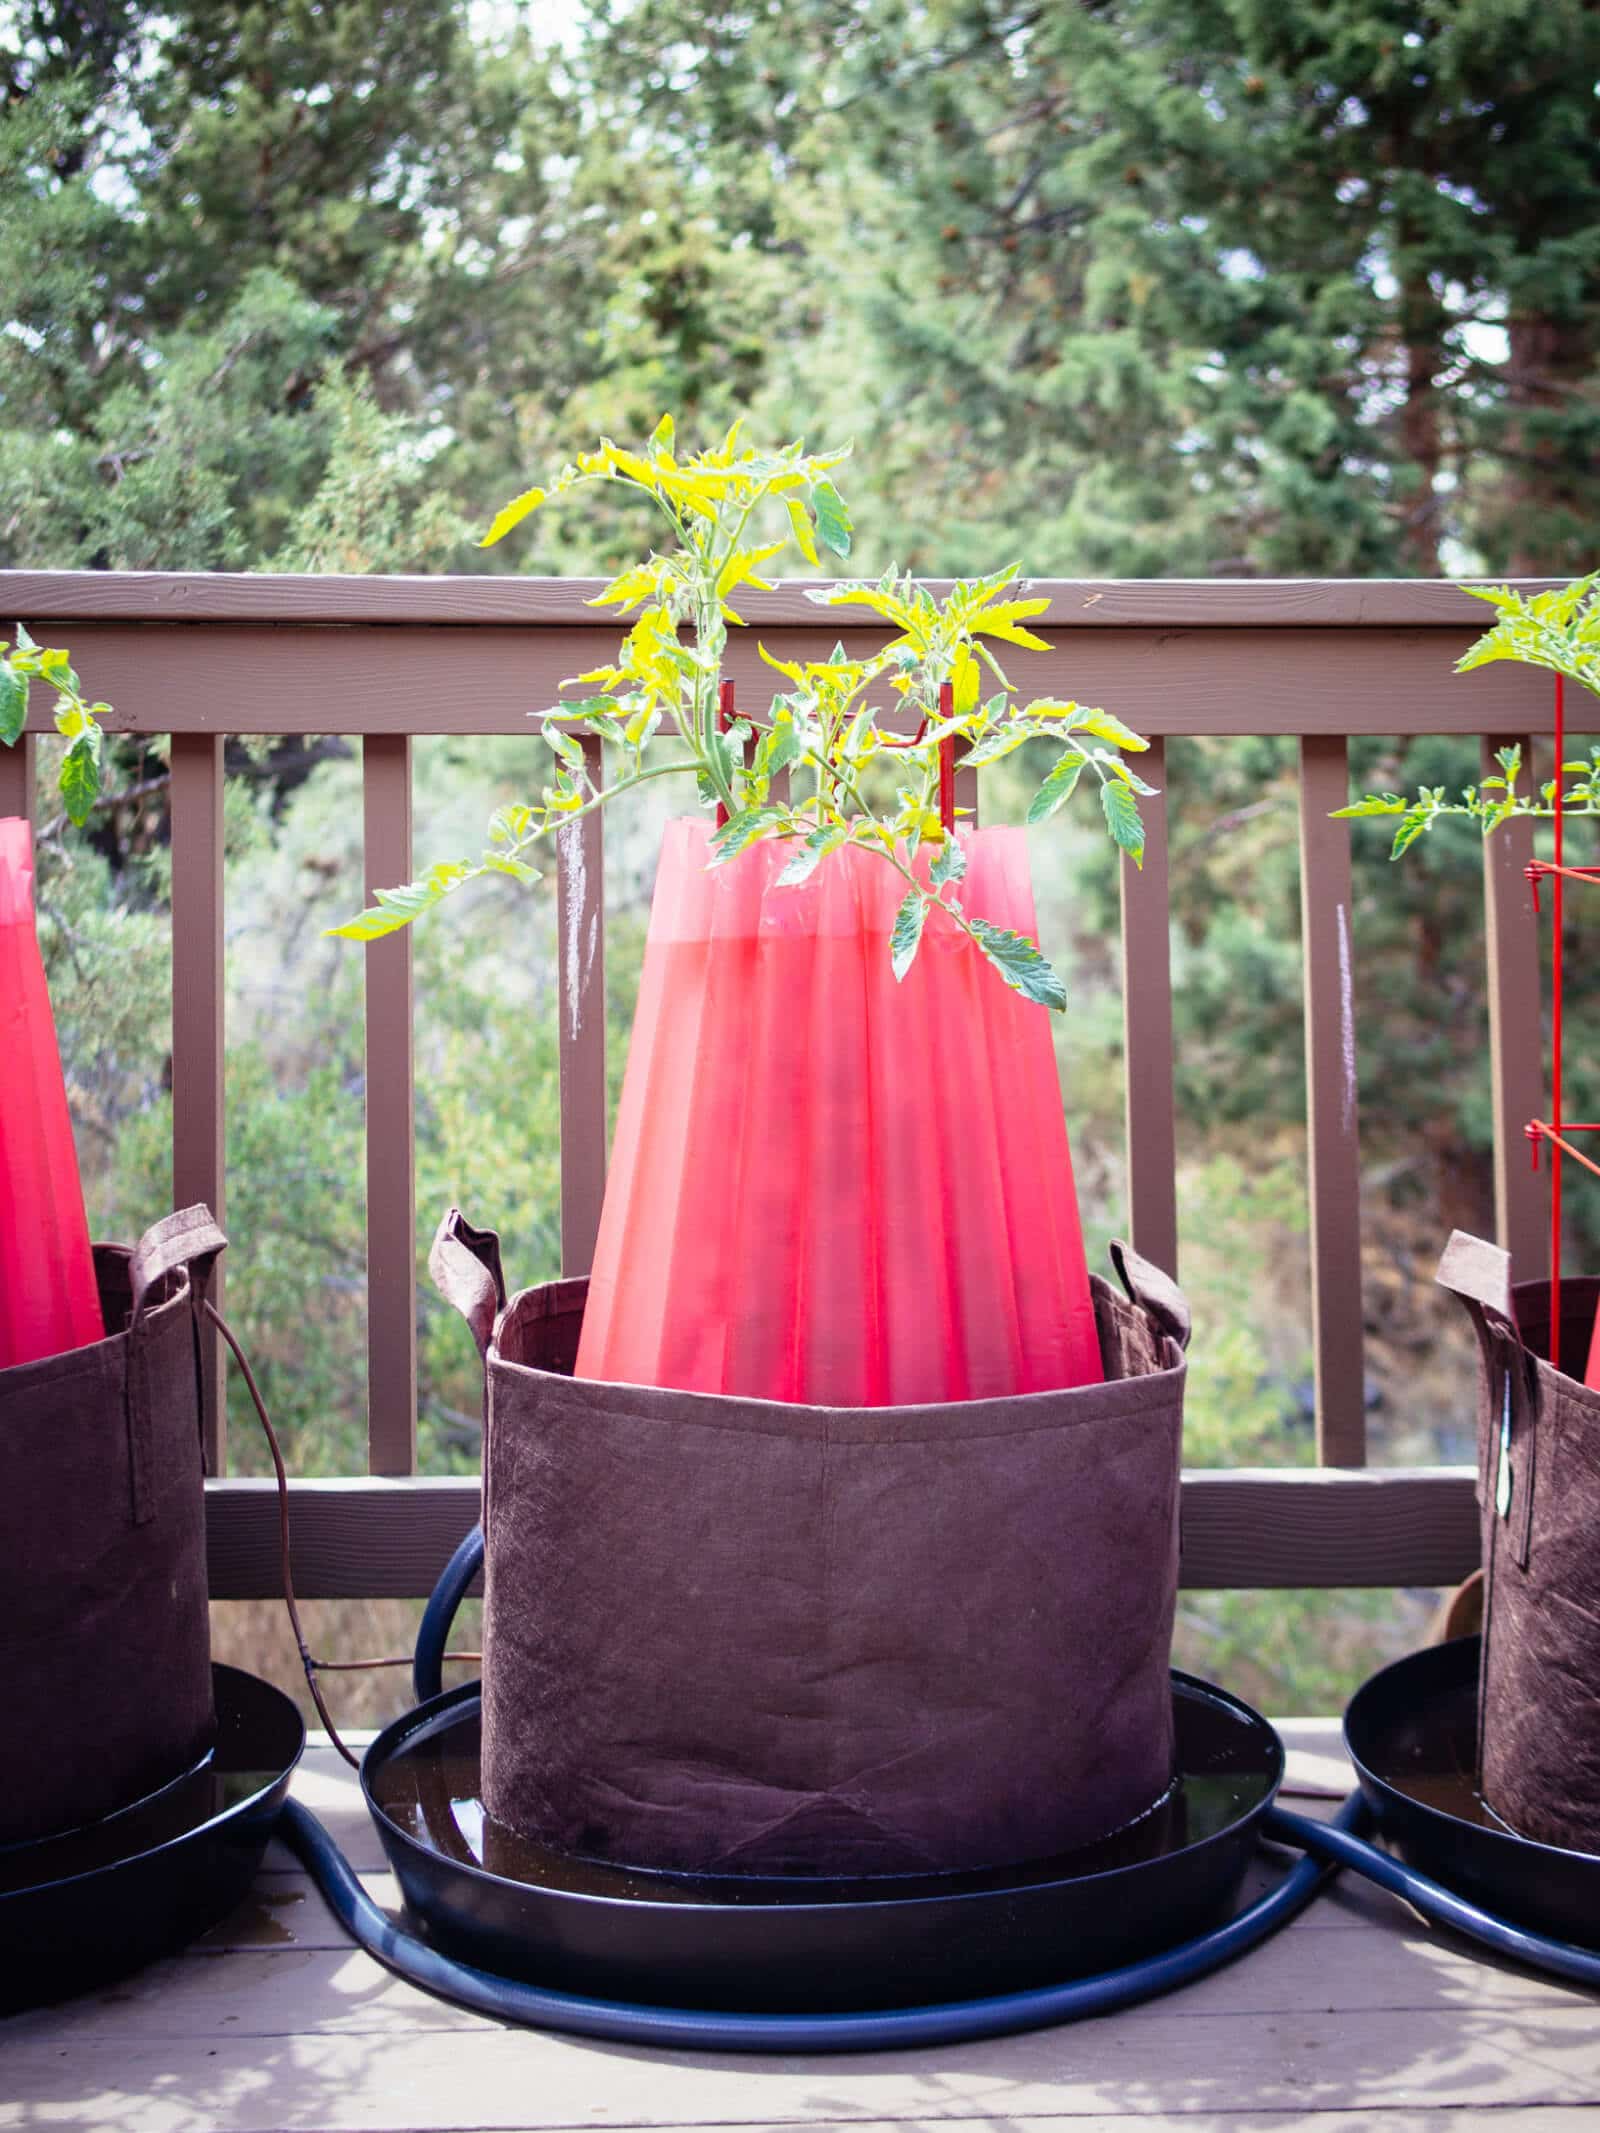
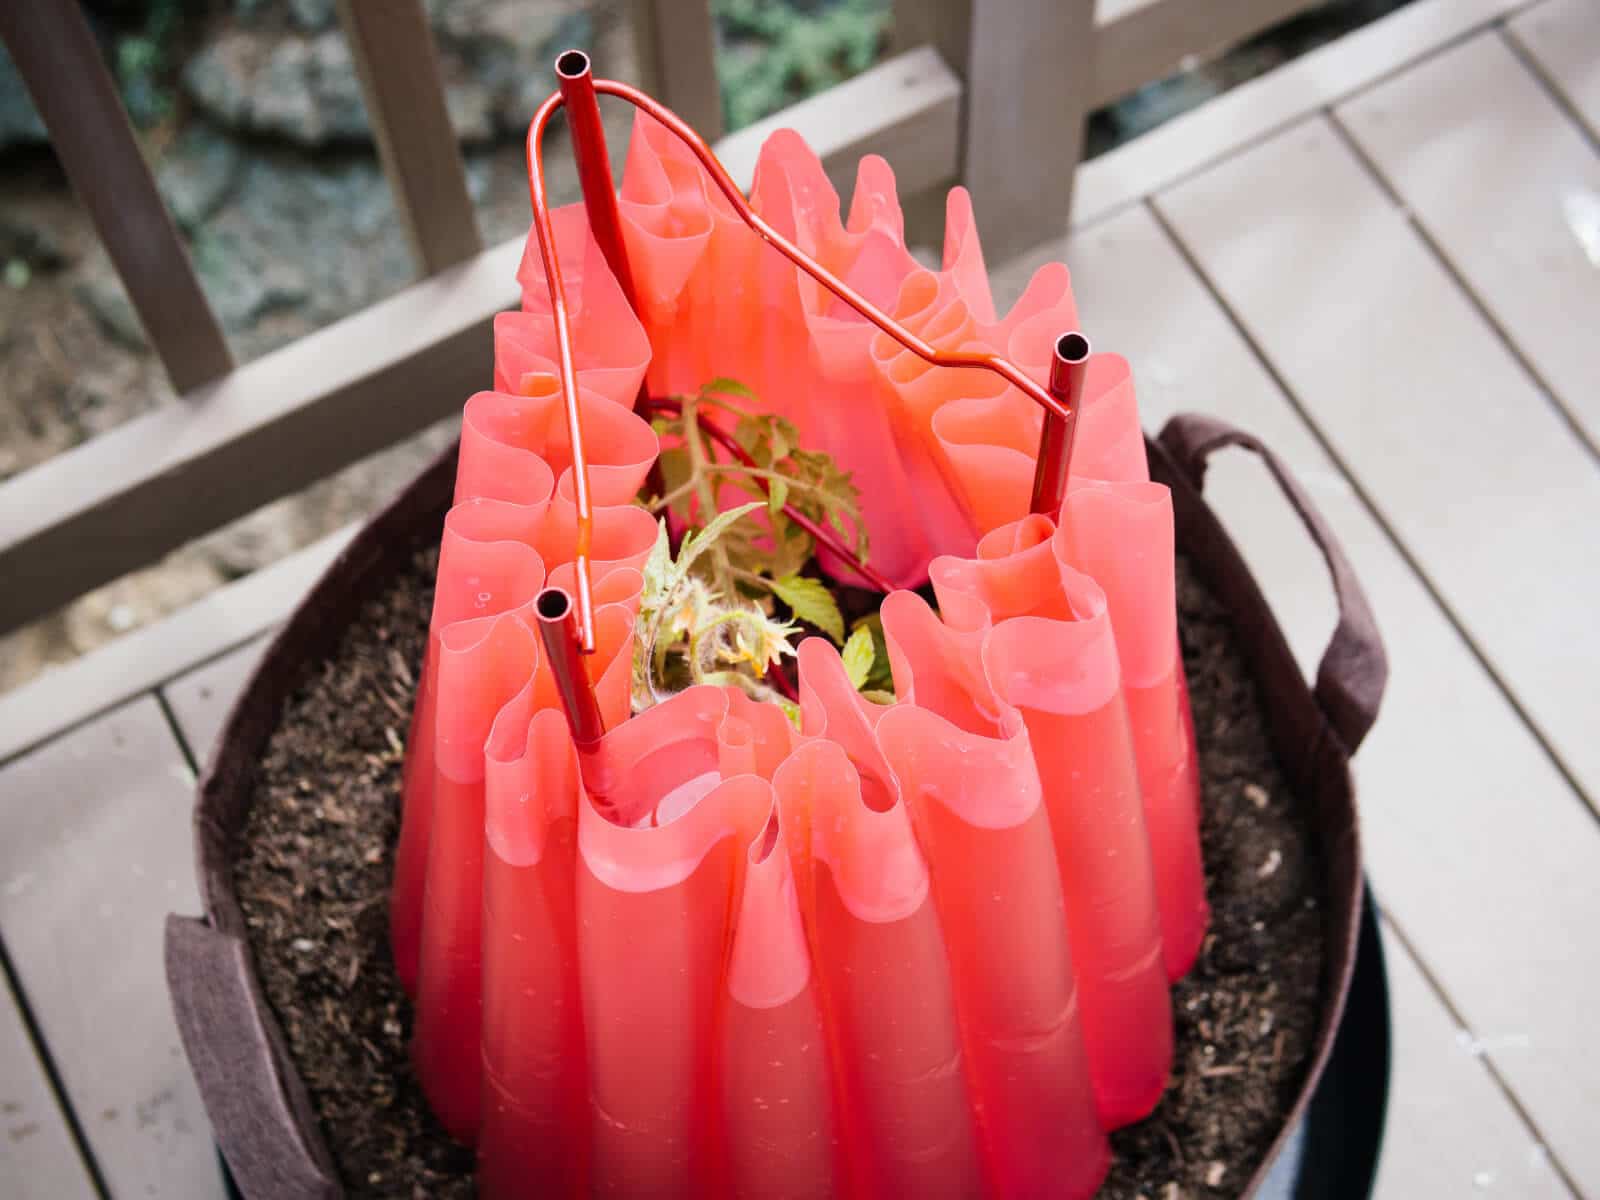
So in spring, one way that I protect my transplants is with “tomato teepees” (also known as water teepees or walls o’ water).
They keep plants nice and toasty and are super easy to use. (No need to take buckets or frost covers on and off each day.)
Easy frost protection
Tomato teepee
Water-filled tubes trap heat during the day and release it at night to protect tomatoes and other sensitive plants from frost.
Tomato teepees allow you to plant your tomatoes up to six weeks before your last frost date, as they’re rated to withstand temperatures well below freezing. (They haven’t failed me yet, though I’ve personally never used mine below 28°F.)
The teepees also protect against wind, so they’re useful for delicate young plants that haven’t fully anchored themselves into the soil yet.
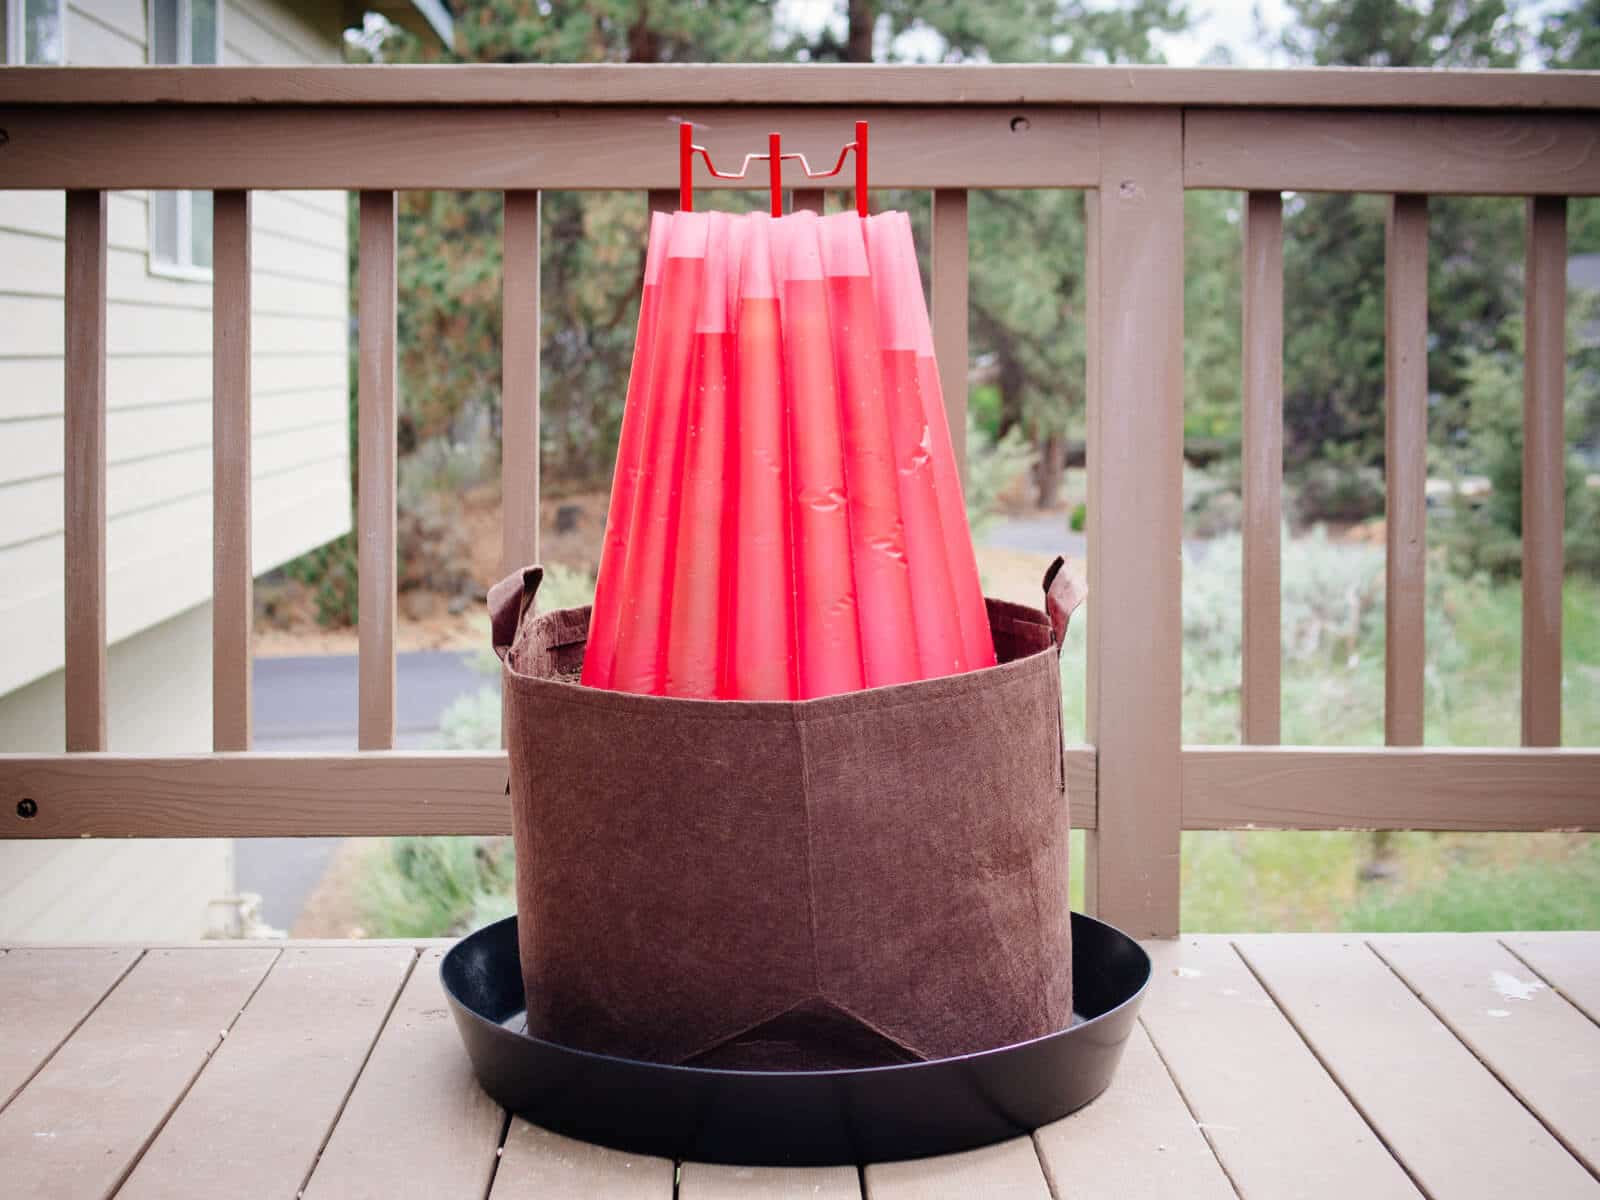
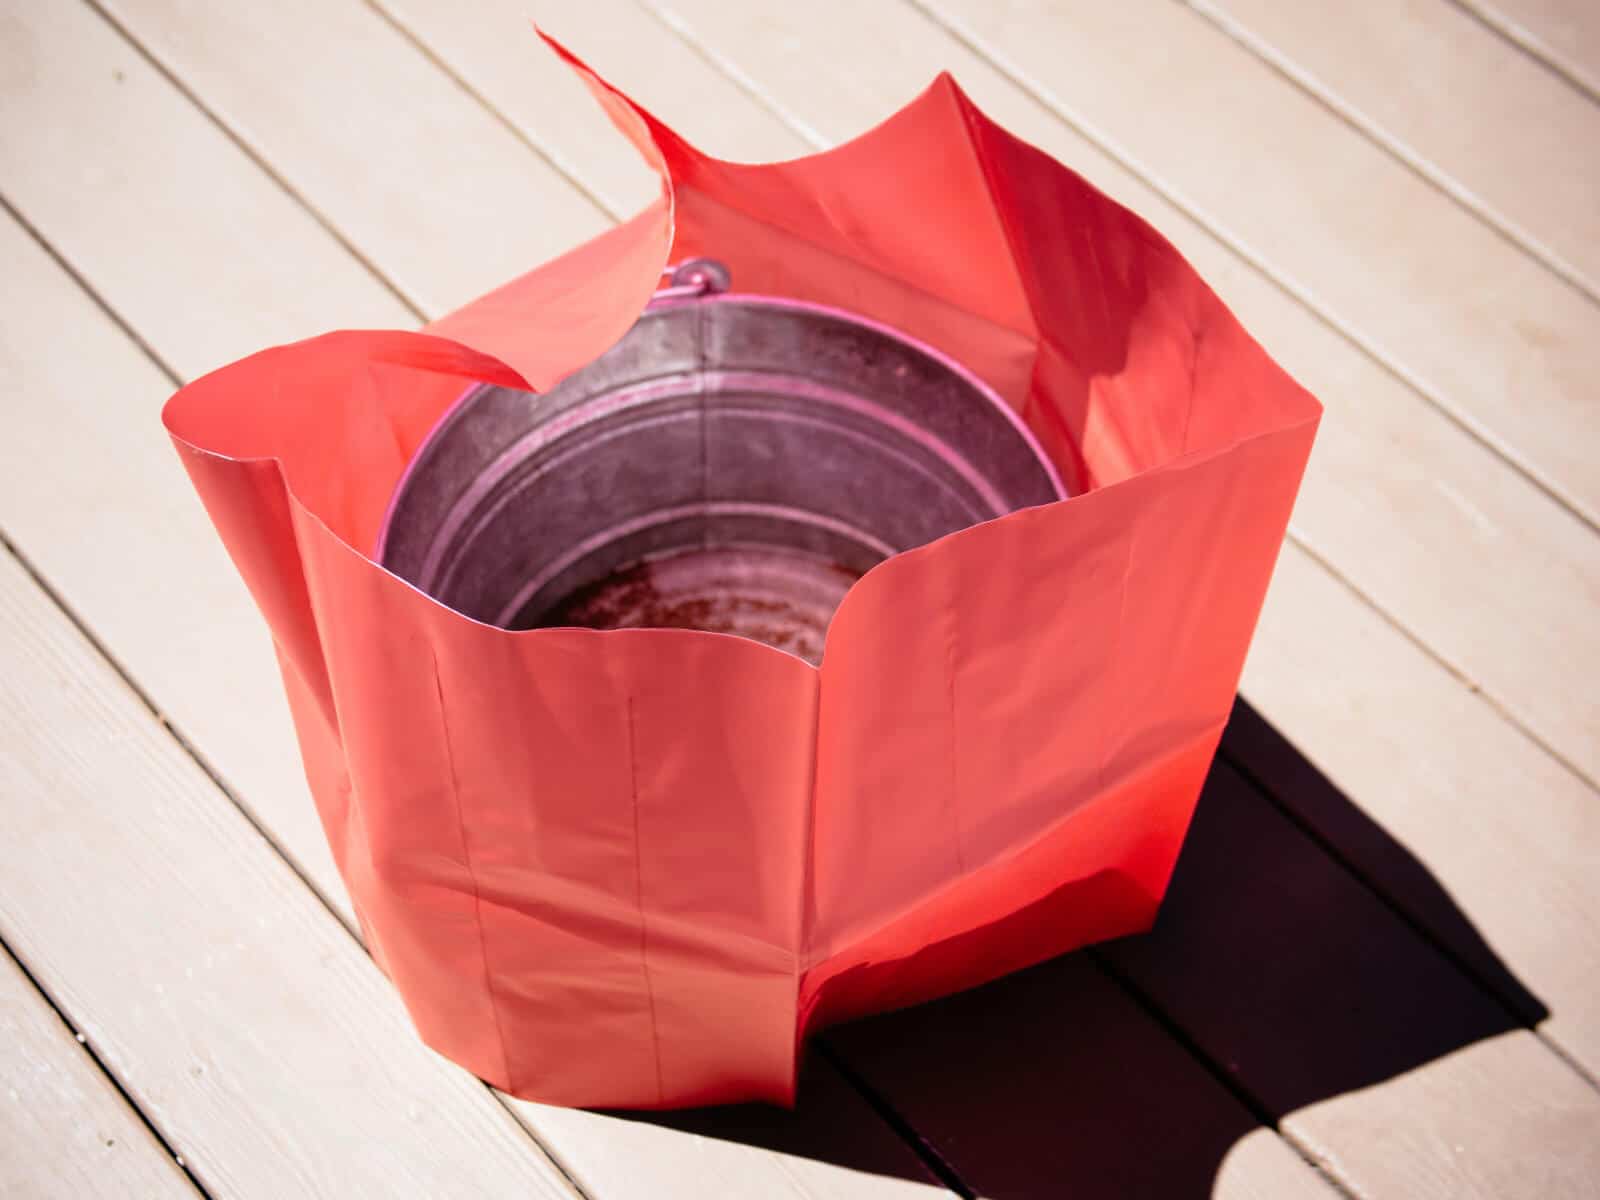
A tomato teepee is basically a large sleeve of heavy-duty plastic that’s sectioned off into long tubes. You fill the tubes with water and place the sleeve over the plant with the weight of the tubes supporting the teepee.
Quick tip
Place the tomato teepee over a bucket and partially fill the tubes with water until the sleeve can mostly stand on its own. Transfer the teepee to your container over the plant, then continue filling the tubes to the top with water.
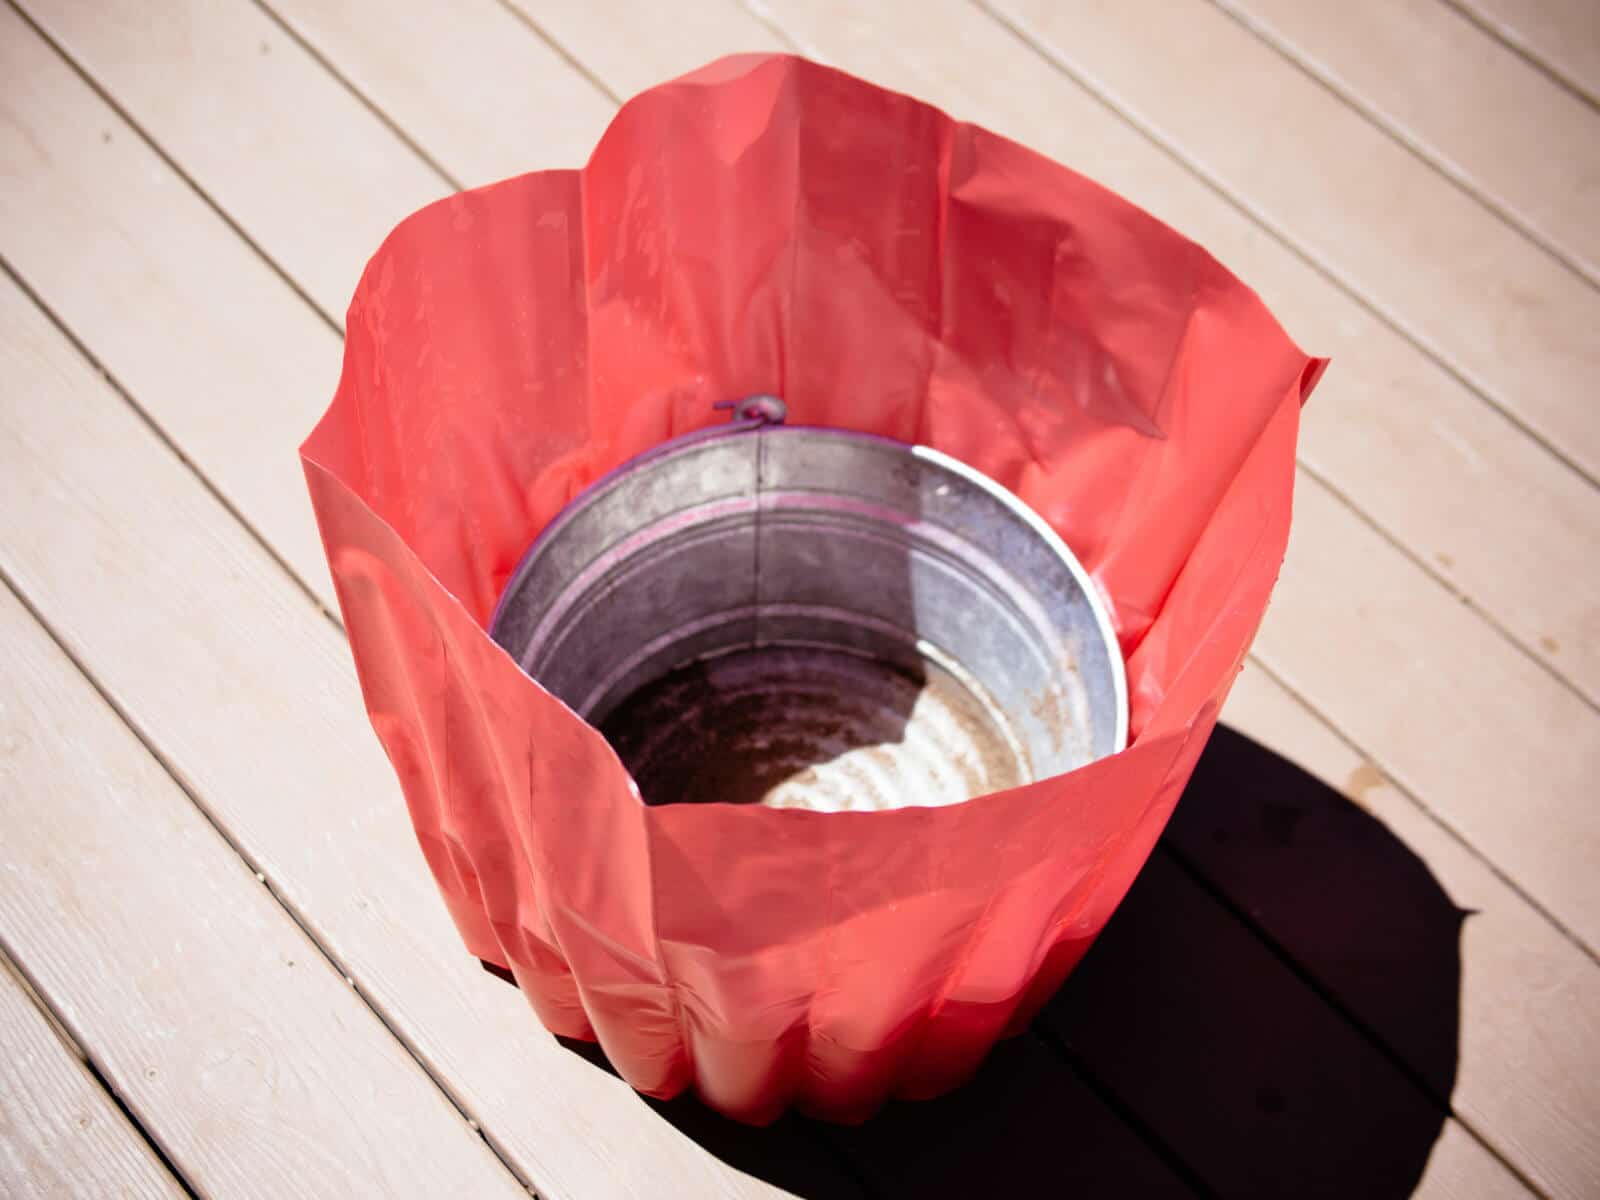
Water teepees act as miniature greenhouses, collecting heat from the sun during the day and radiating that warmth into the air at night.
The tubes do need to be topped off periodically as the water evaporates, but they’re surprisingly effective in colder climates and I highly recommend using them if you want to get an early start on the growing season.
I usually remove mine once my tomato plants are a few inches above the walls (or I’m certain all danger of frost has passed).
A simple way to remove the tomato teepee is to push all the walls in until water spills out the top and onto the soil.
Once the tubes are mostly empty, you can roll them down, lift them up over the plant, dry them out, and store them for next year. Then proceed with Step 10.
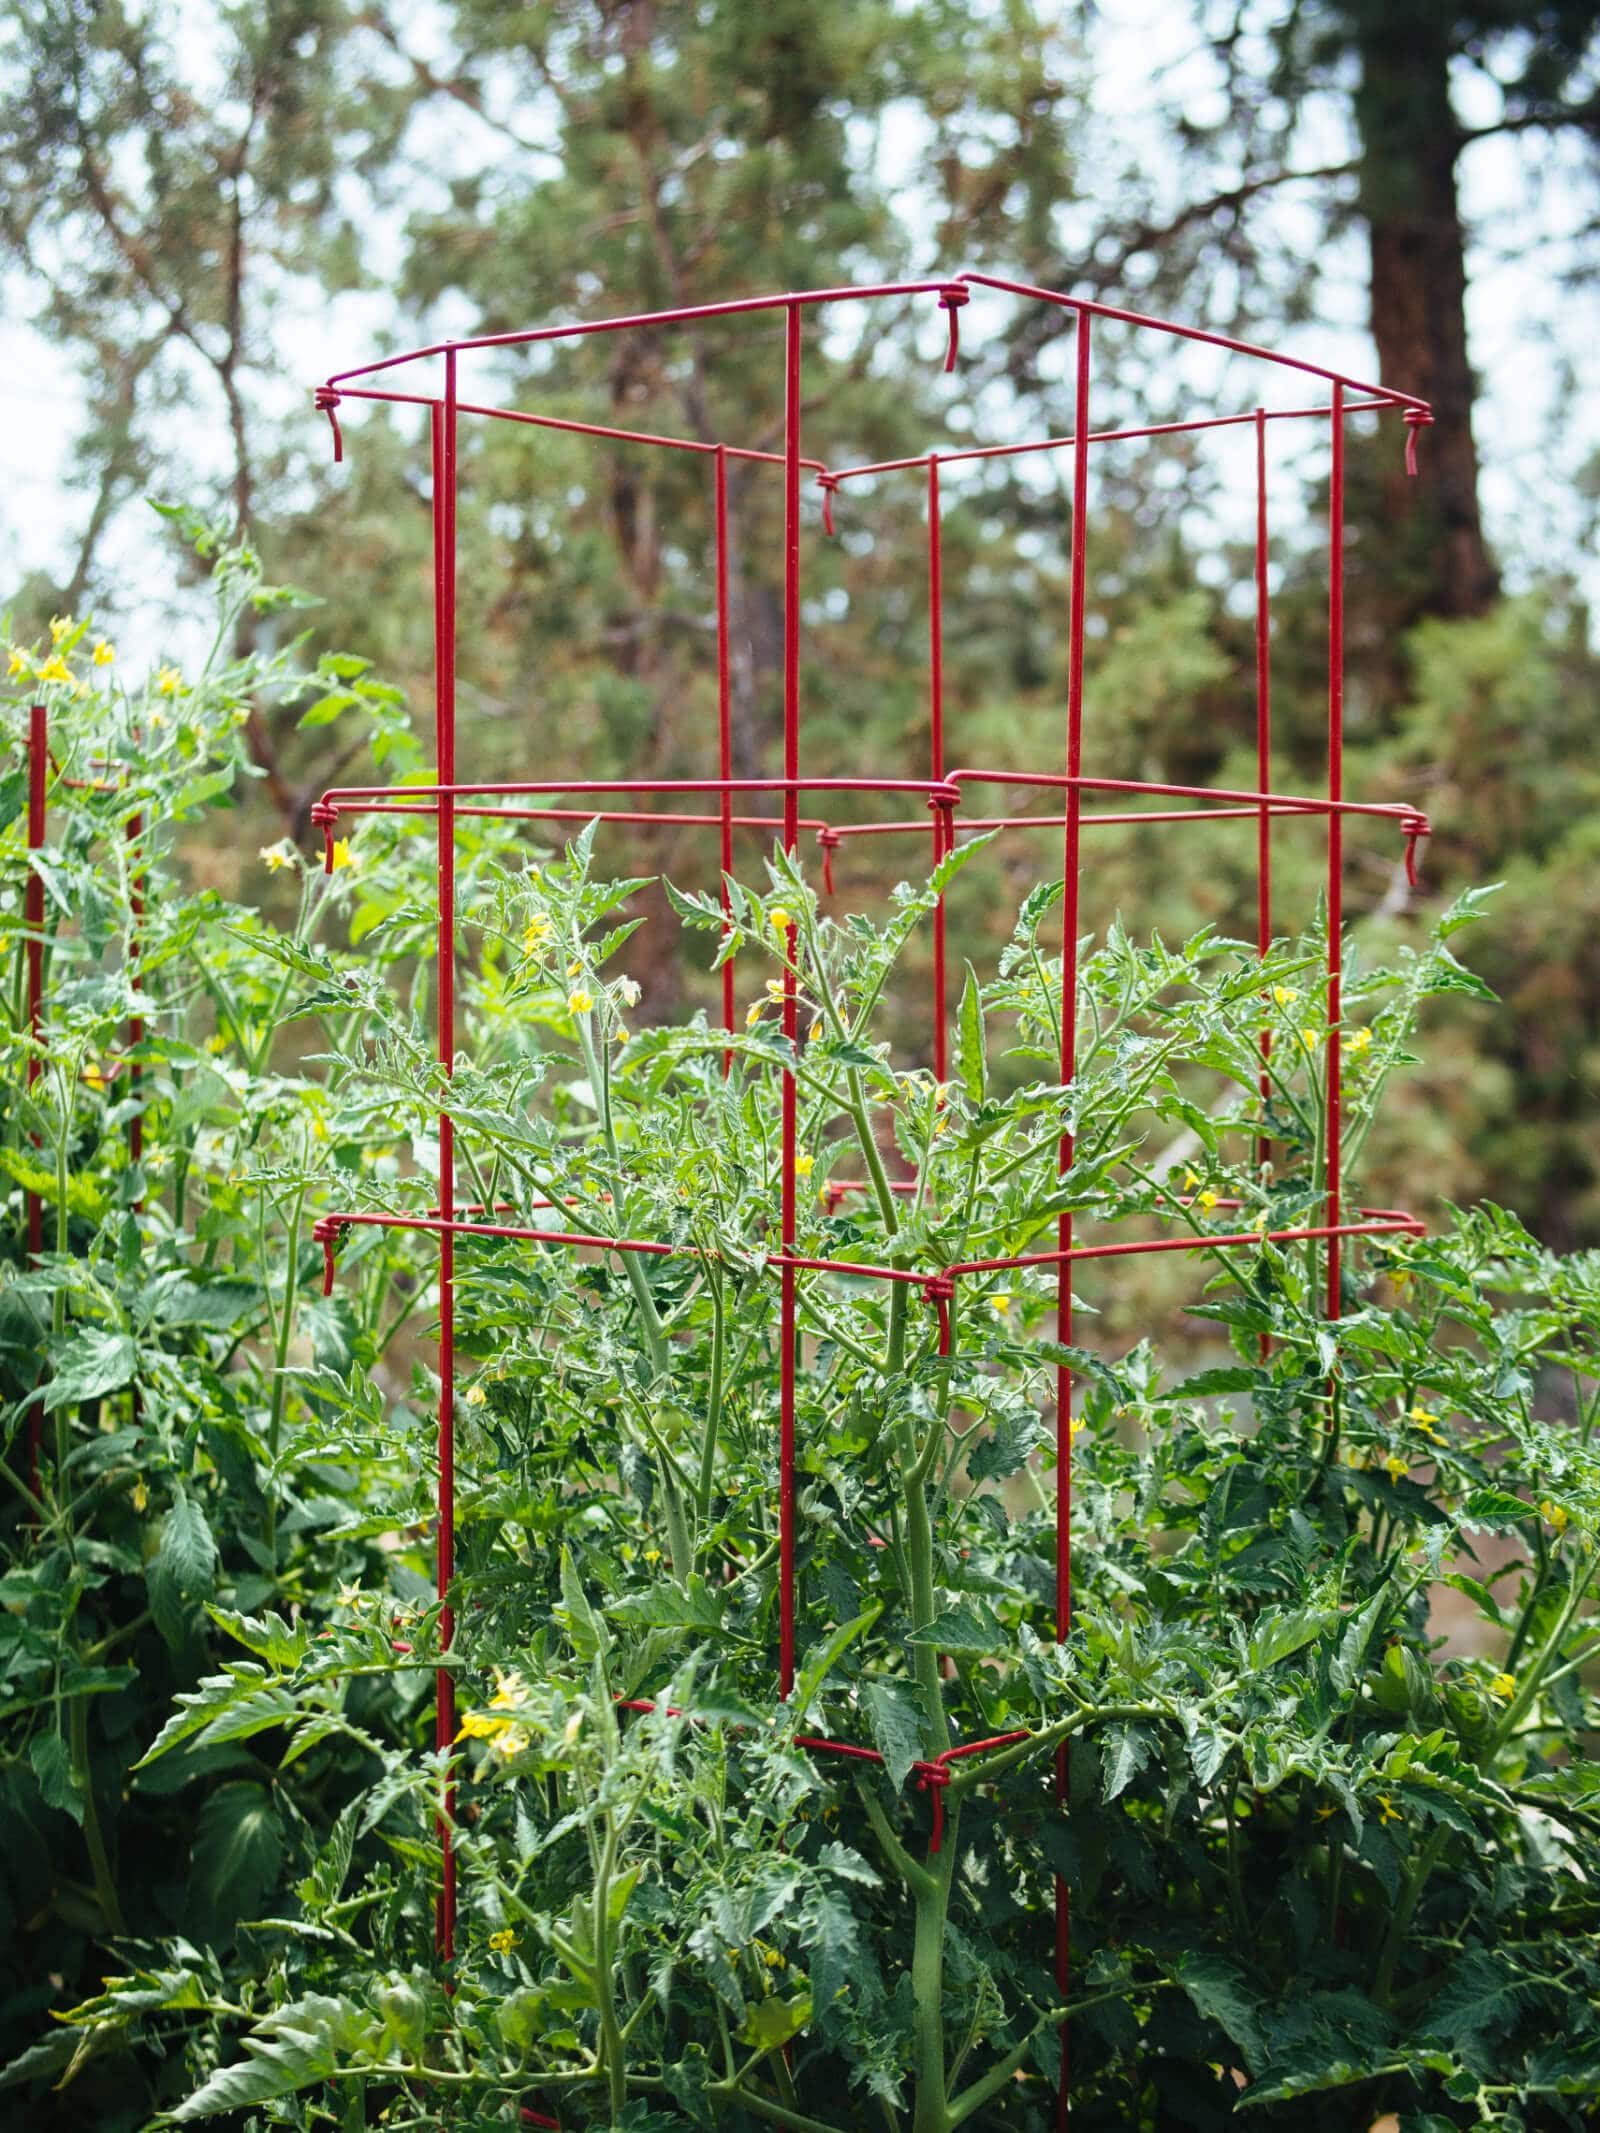
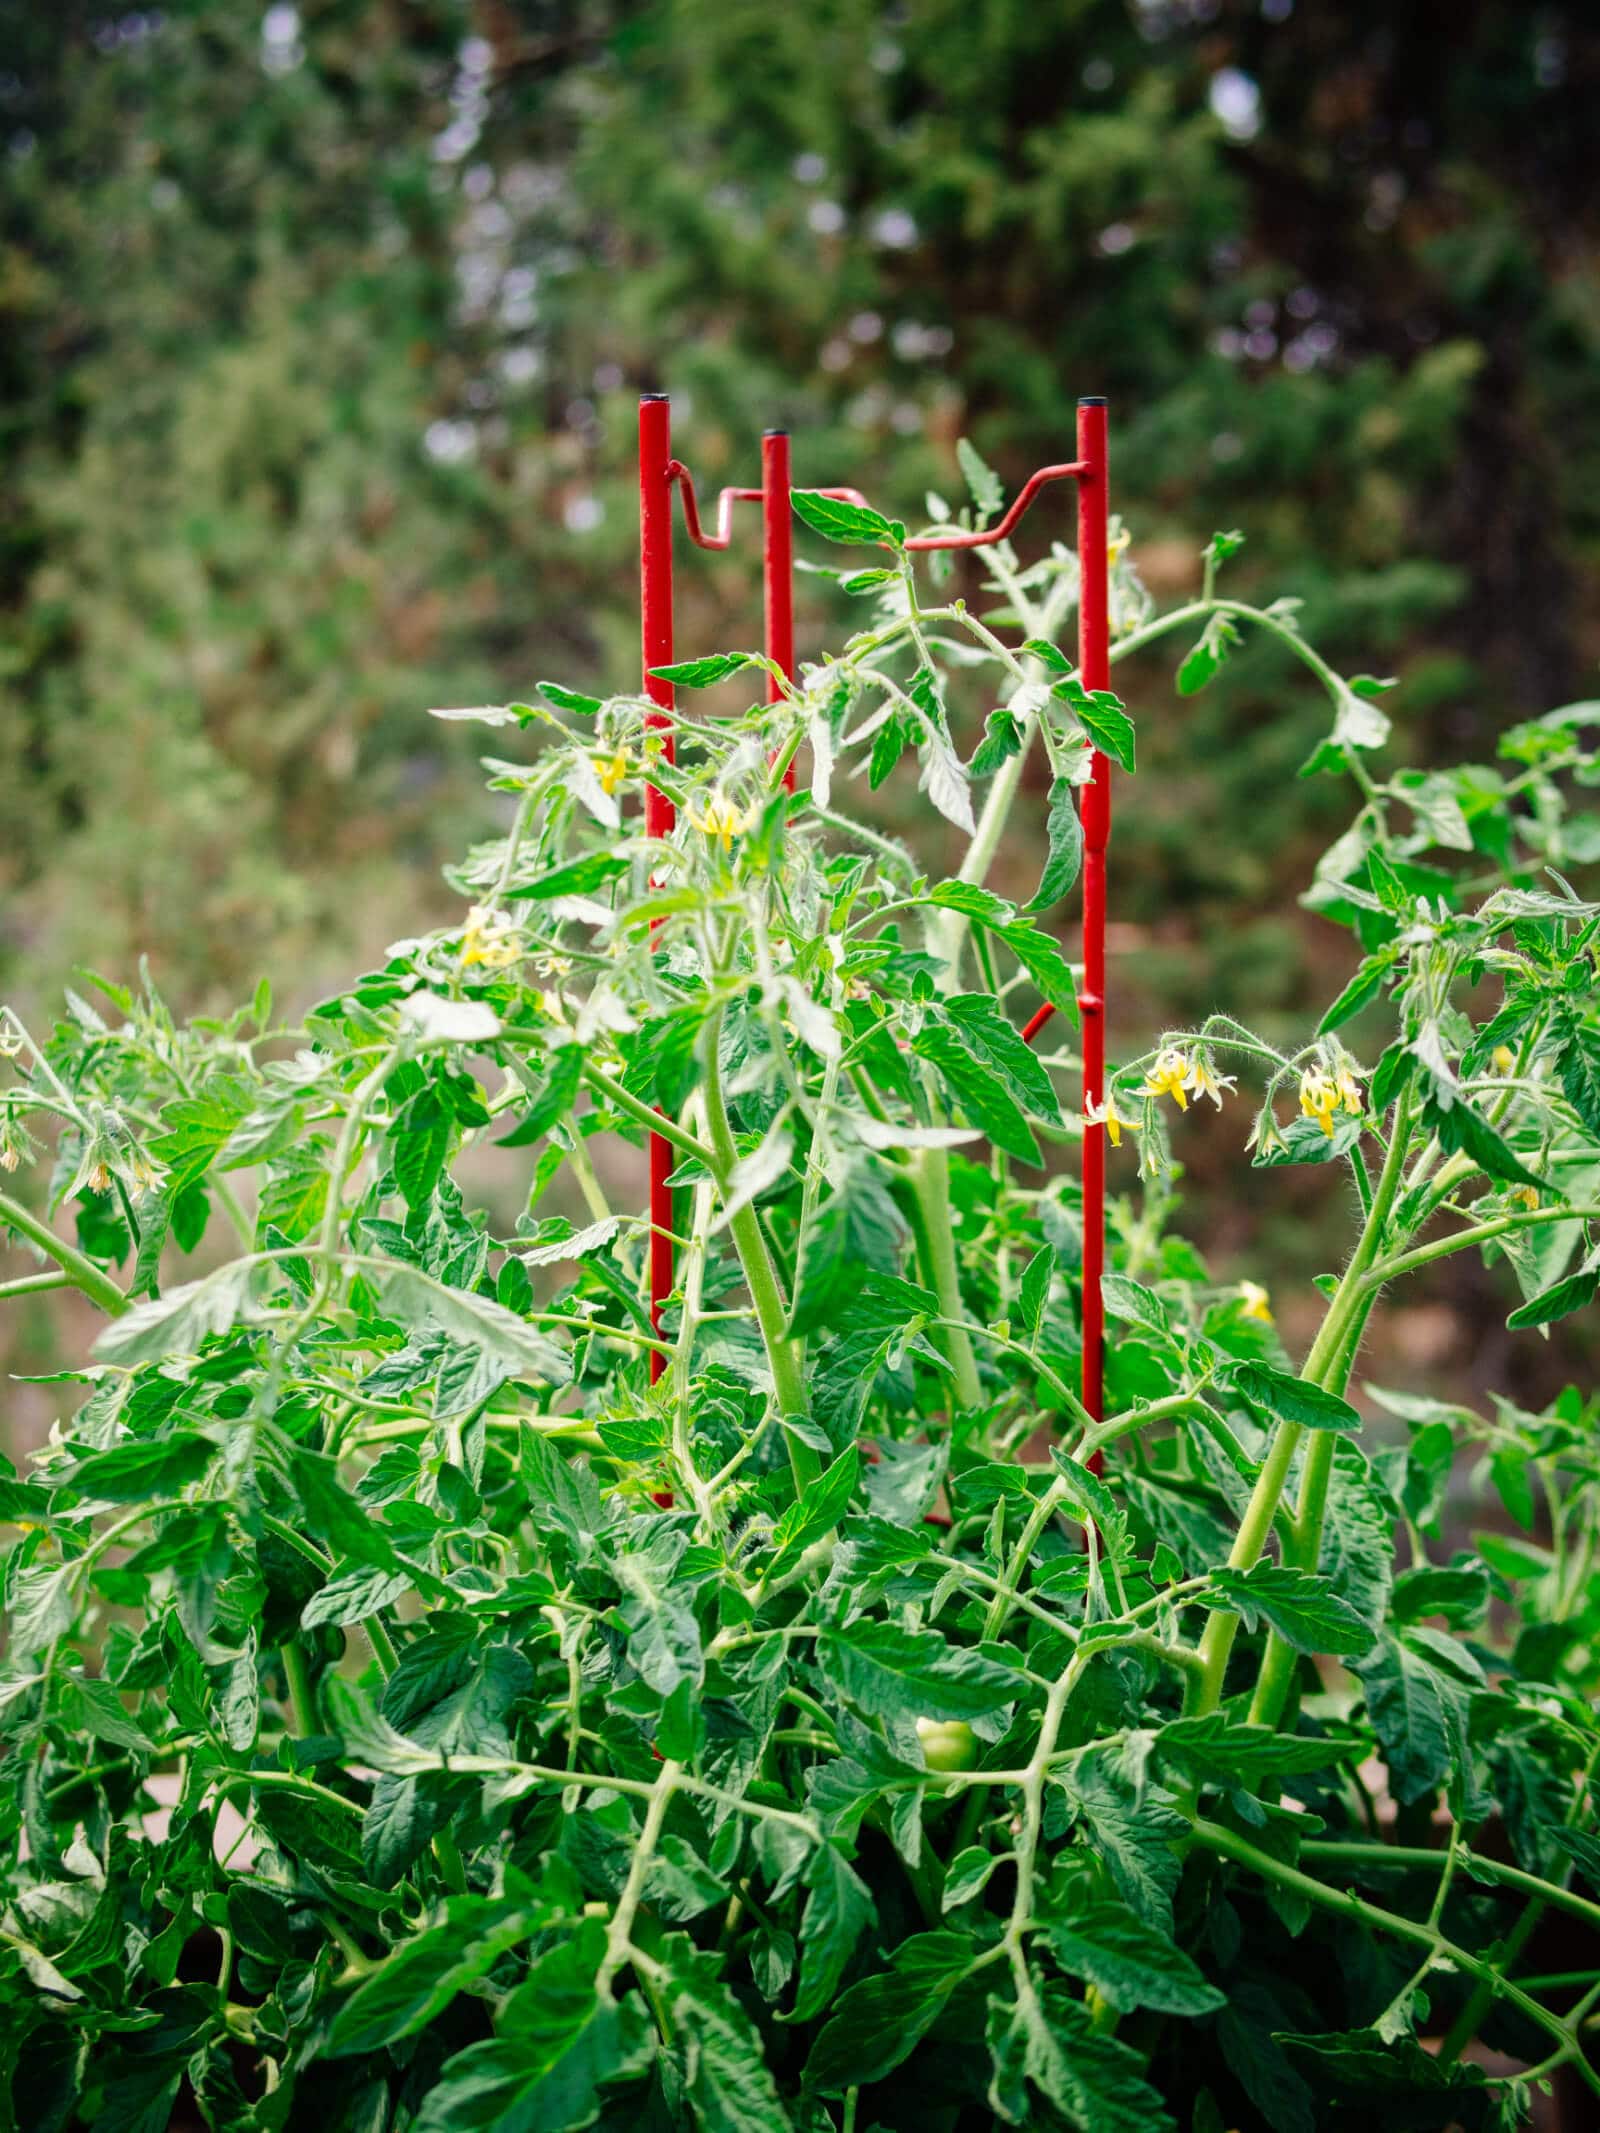
10. Add your support structure.
To reduce your chances of damaging the roots, add your tomato support at this stage before the plant grows too large.
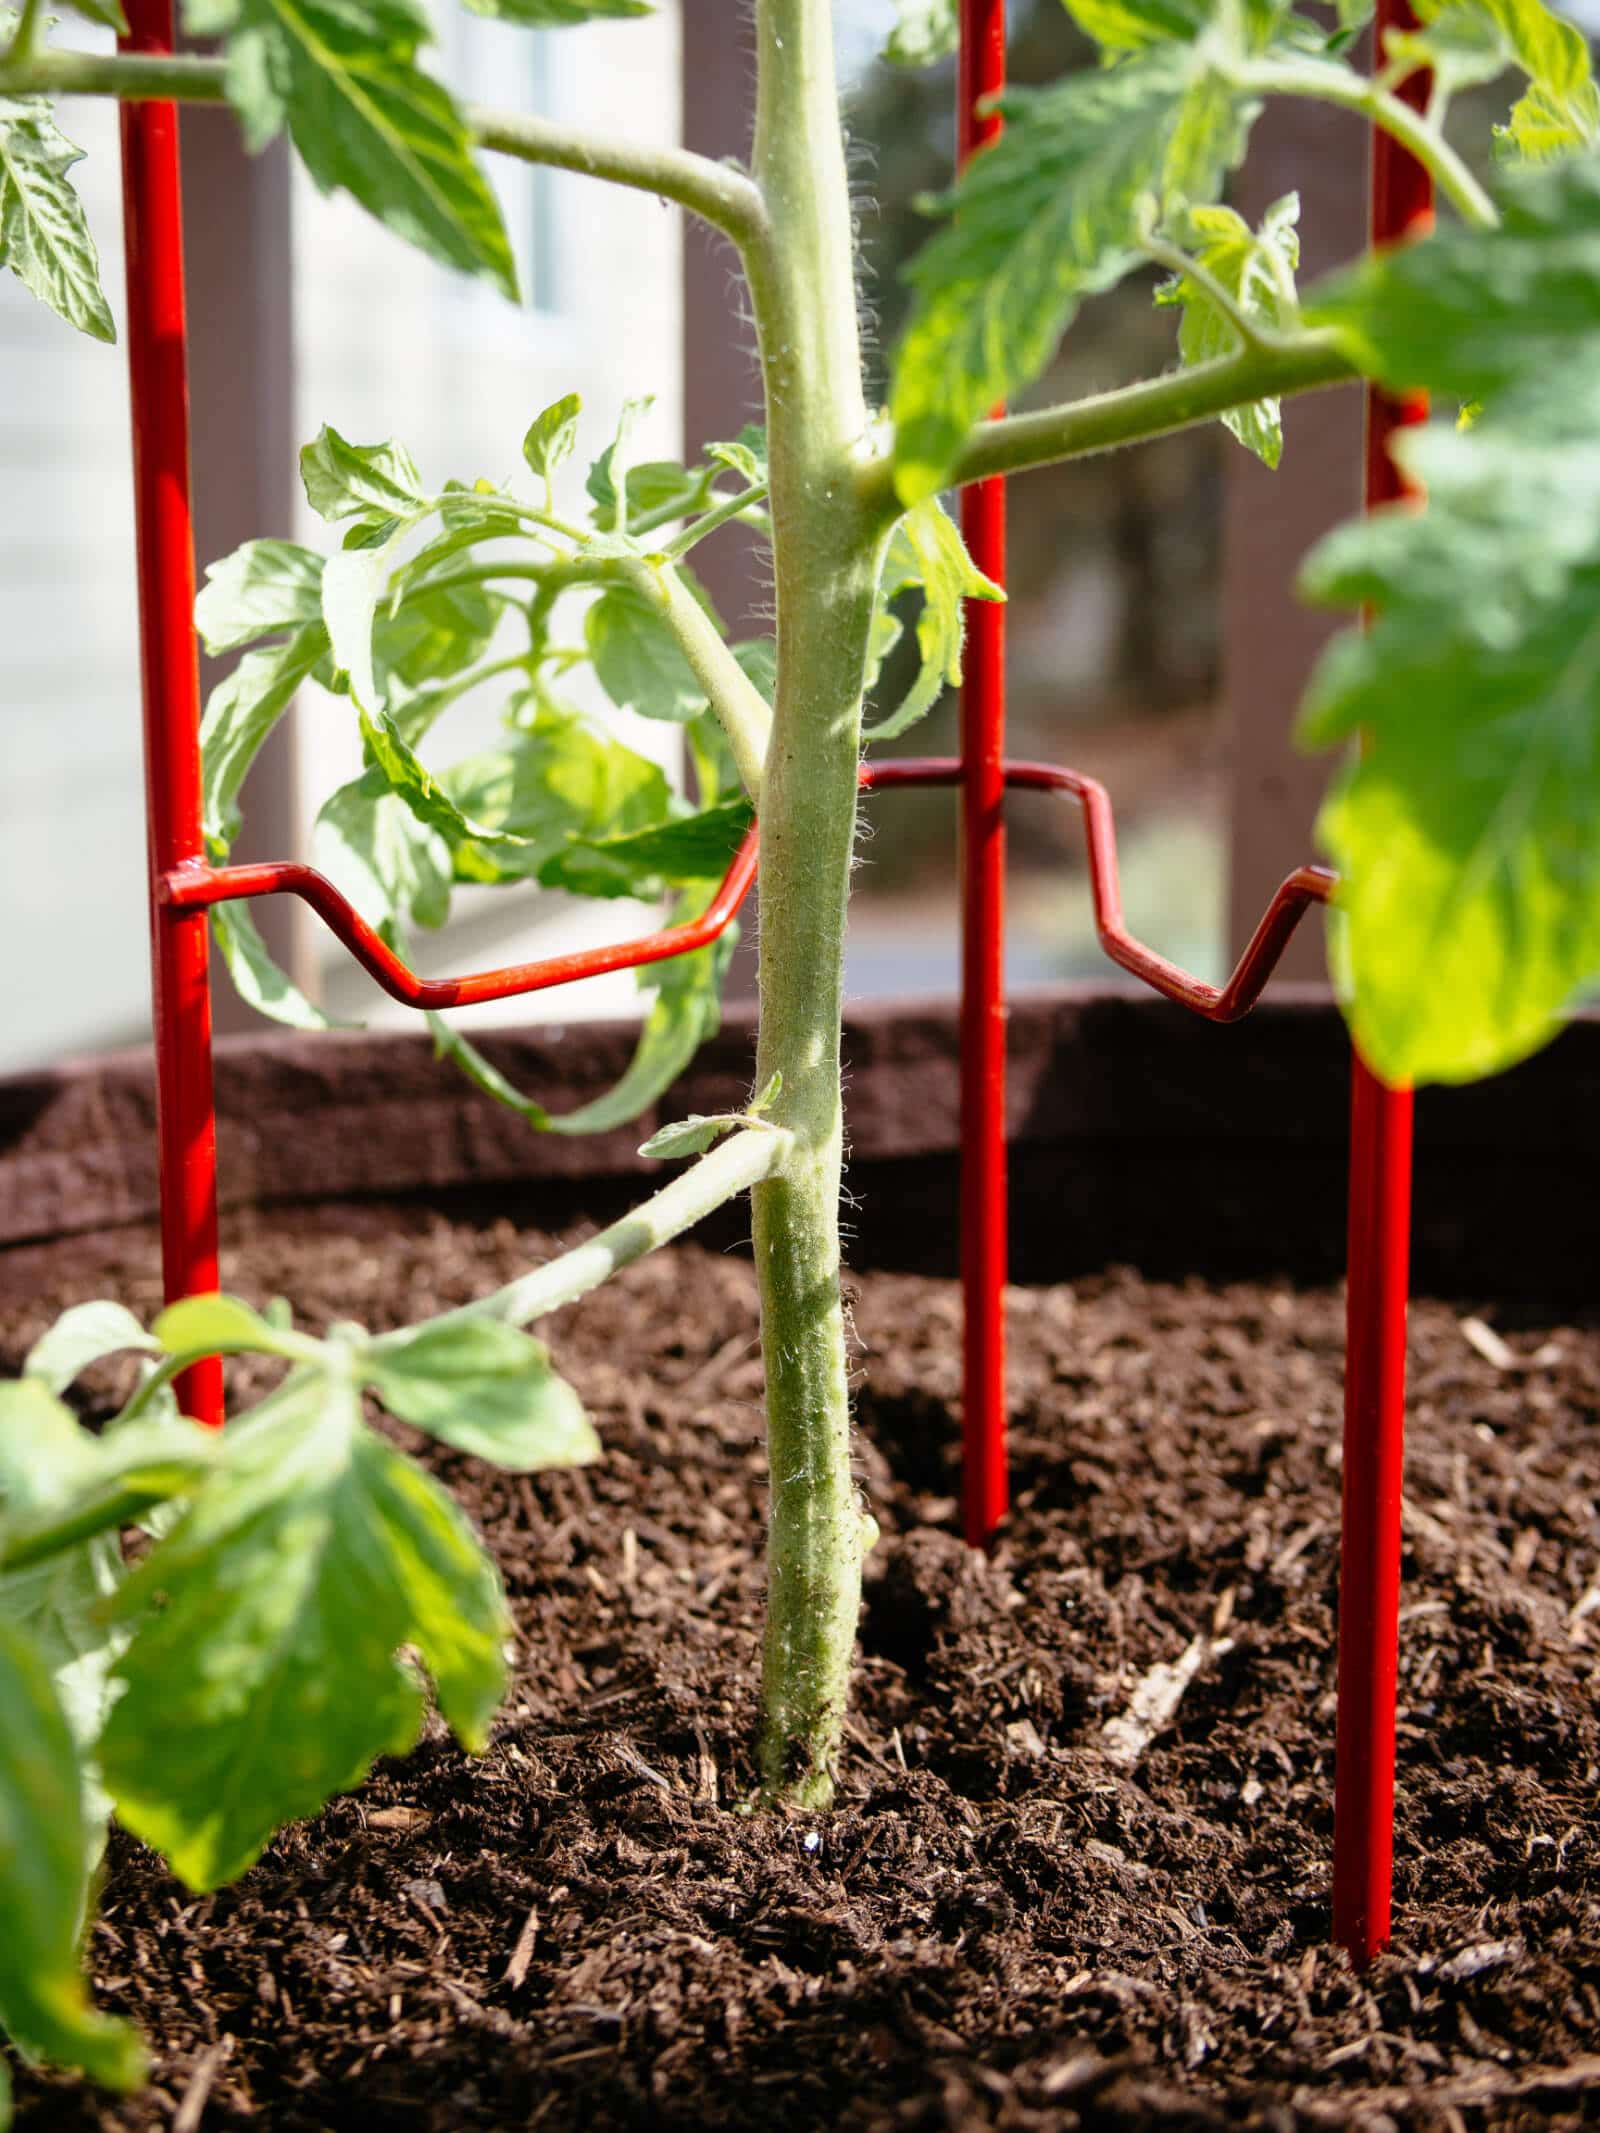
If you are growing determinate tomatoes, the metal conical cages that you find in most garden centers will suffice. But, I am generally not a fan of them for indeterminate tomatoes, as I find they’re too flimsy to support the long, sprawling vines.
My favorite tomato supports are these tomato ladders (essentially very tall, burly stakes) and square tomato cages (which can be folded down when not in use).
Both of these supports are strong, extendable, and durable (I’ve used the same ones for years and they still look good as new) and they’re also attractive, if you care about that kind of thing.
Quick tip
If you use a tomato ladder, you can stake your plant first and then place the tomato teepee over it, making things a bit more streamlined.
They’ve easily supported my container tomatoes that grew over 7 feet tall and are convenient to store away at the end of the season.
I’d say the cages are a little better at containing the vines than the ladders, as you can simply tuck your tomato branches back into the cage if they get too unruly.
With tomato ladders, you have to stay on top of pruning your tomato plants (if they’re indeterminate varieties), or clipping the vines to the stakes to keep them neat and tidy.
Whichever support you use, don’t wait until you actually need it before you install it. It’ll be that much harder to wrangle a mature tomato plant into a cage than to just have it in place early.
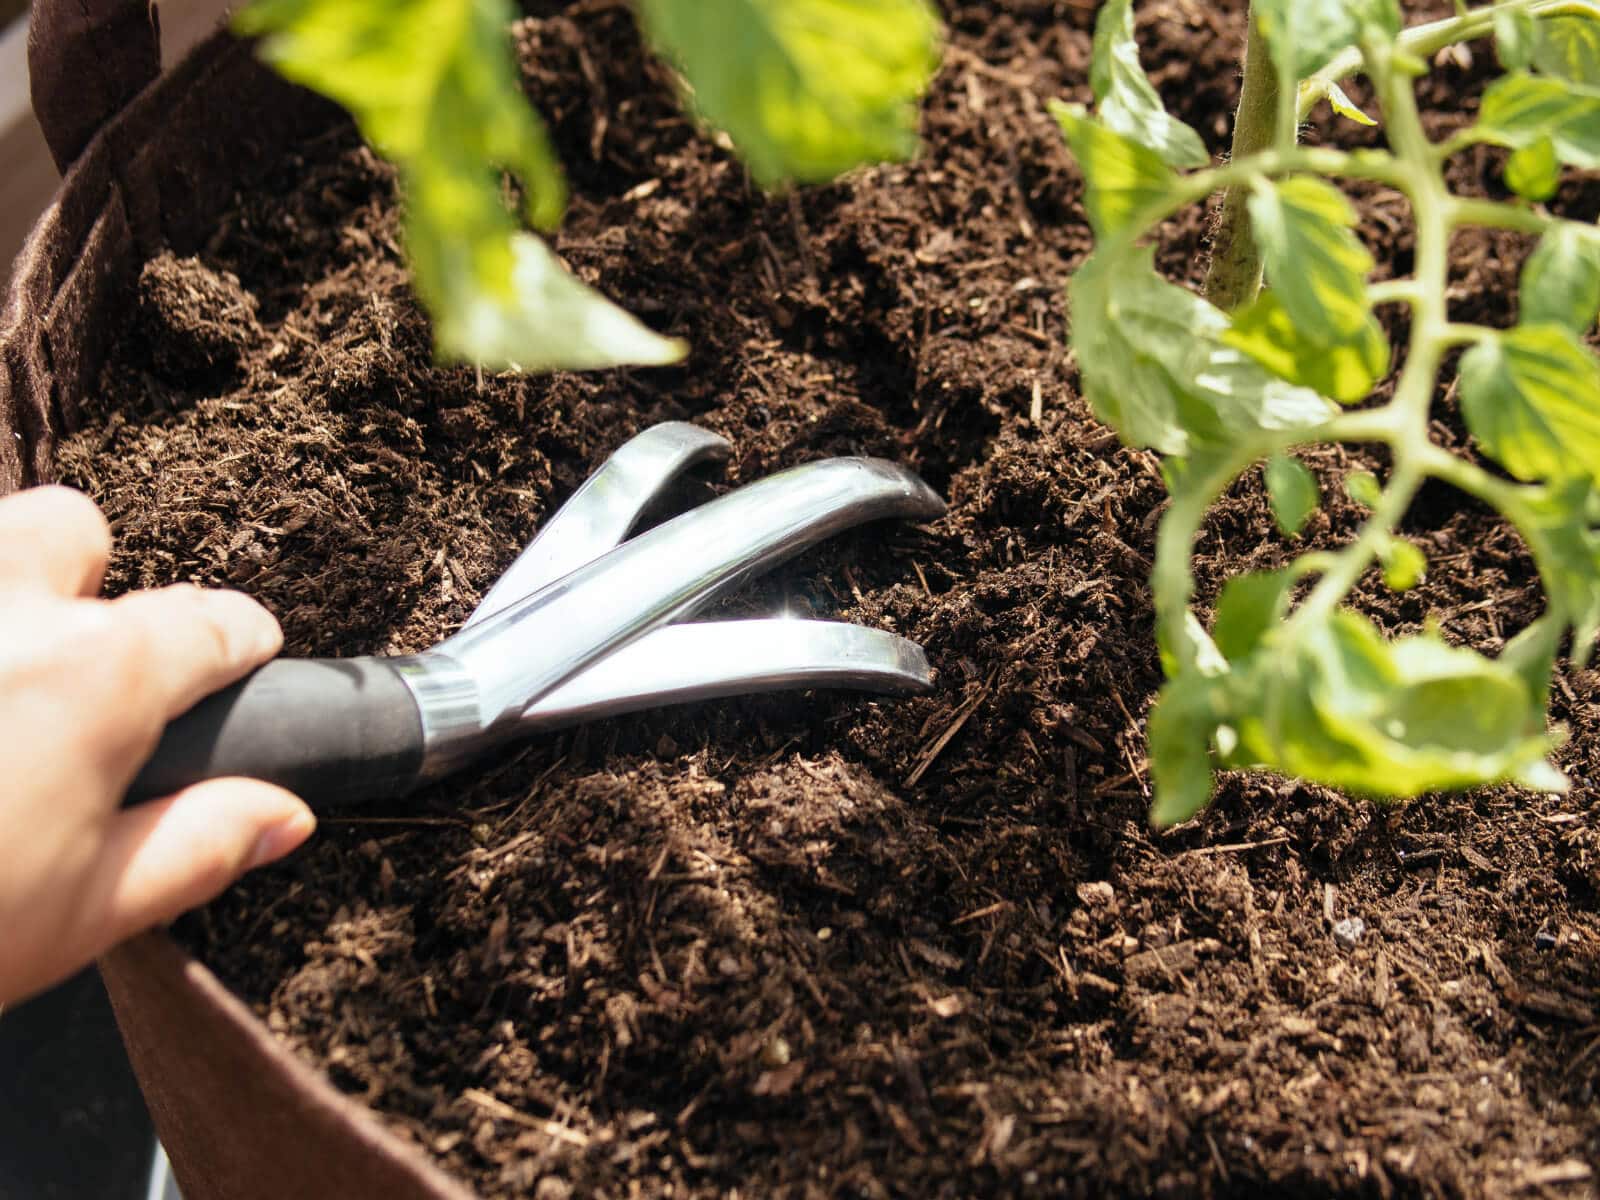
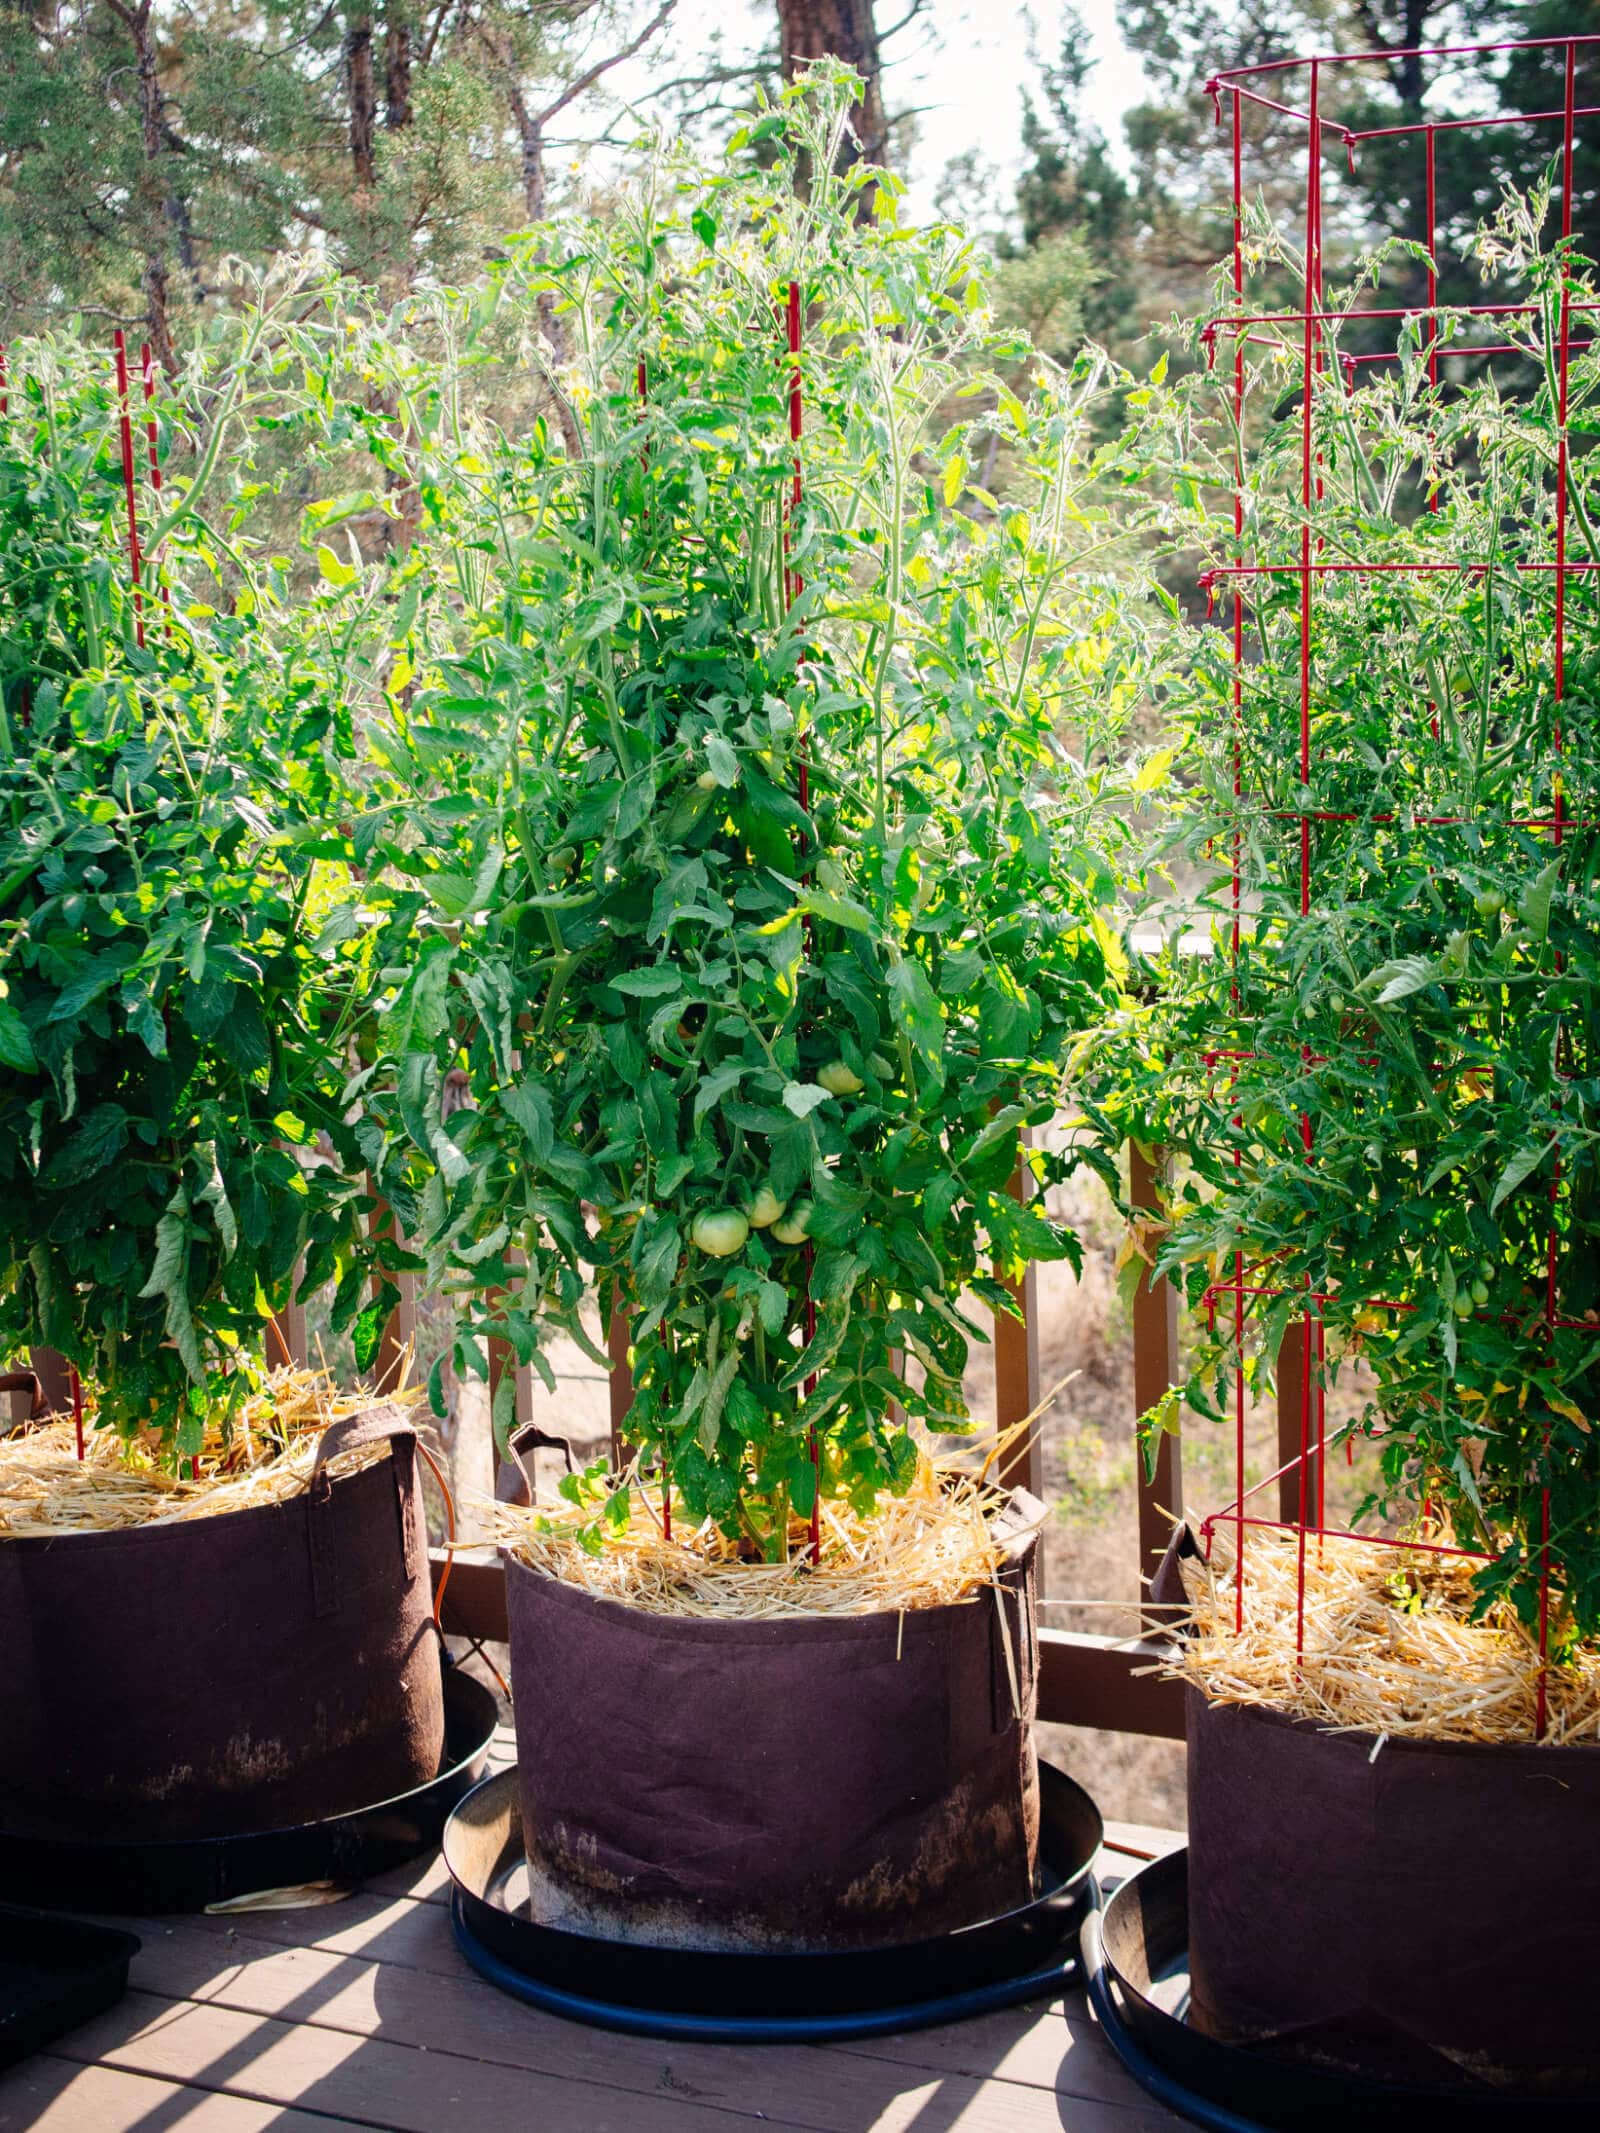
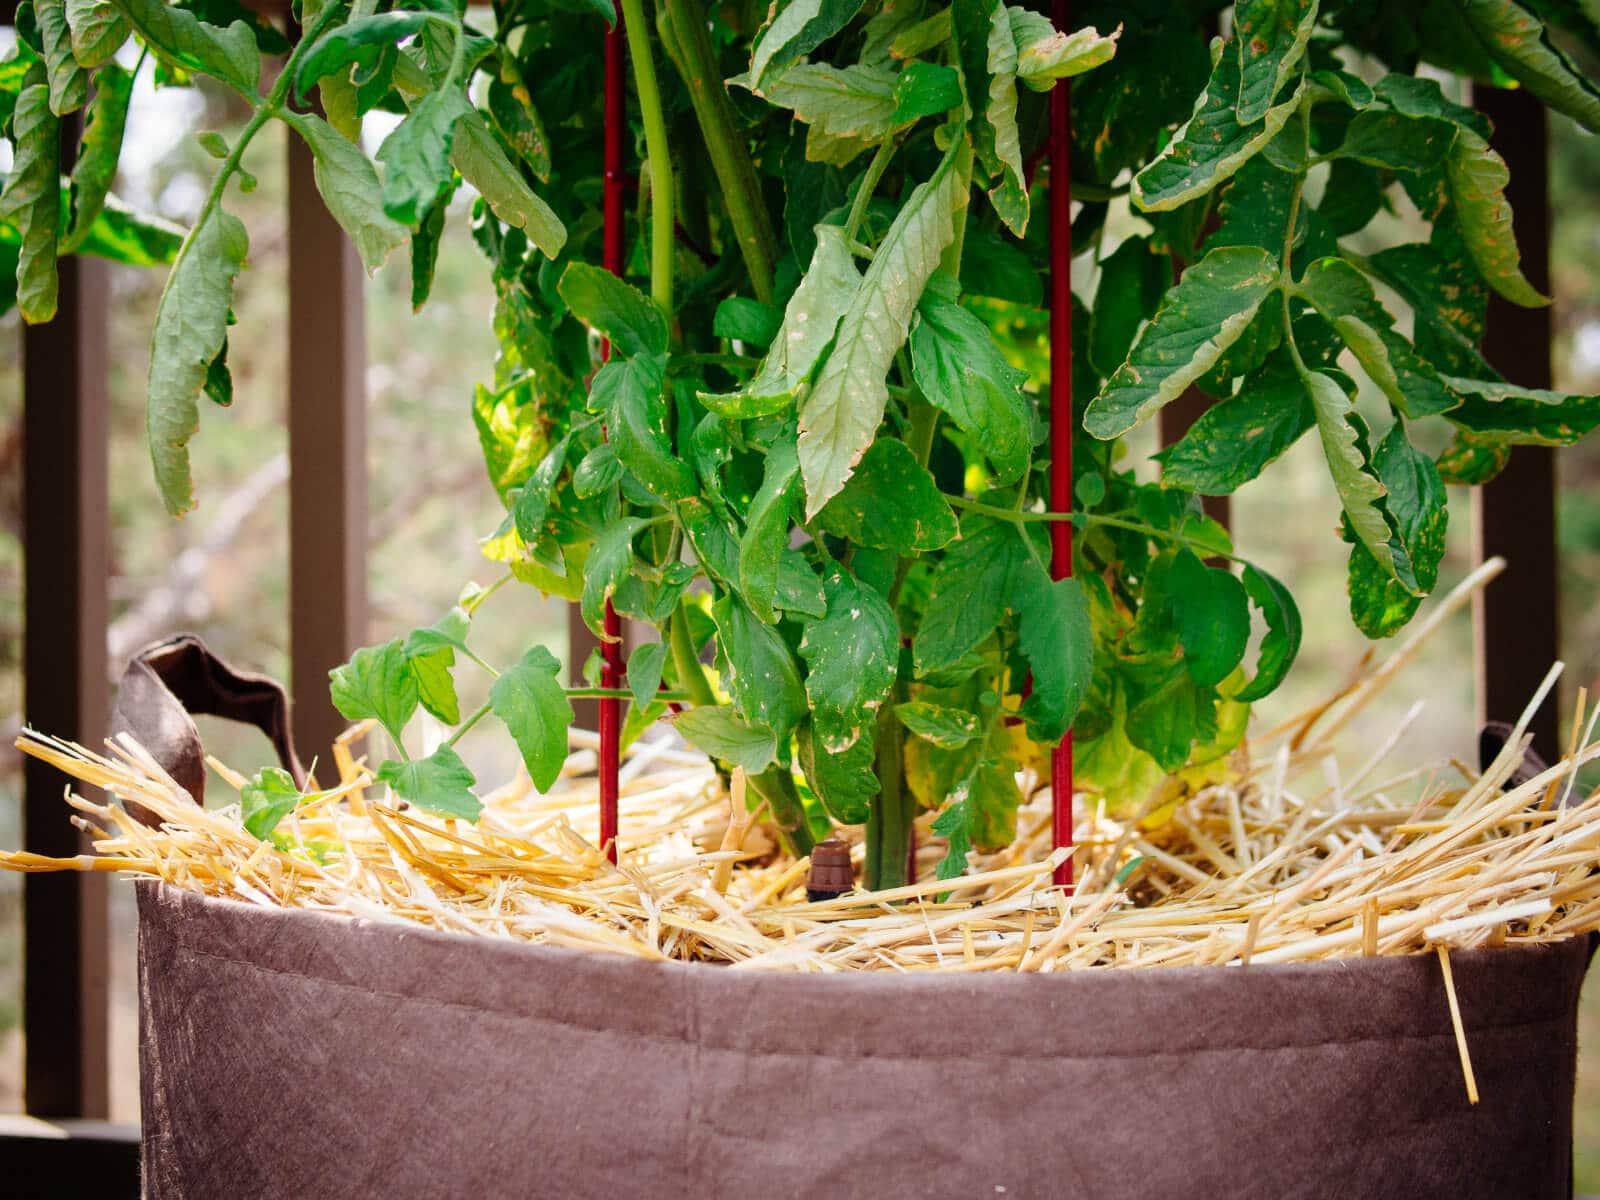
11. Mulch the soil.
Mulching is essential for any garden, but it’s especially important for container gardens as it helps retain moisture in the soil.
Use an organic mulch like straw (not hay, which contains seeds), shredded bark, or arborist wood chips to cover the soil by at least 2 inches, taking care not to bunch it up against the stem.
One substantial layer of mulch should last the whole summer, and the straw can be composted with your spent tomato plants at the end of the season.
12. Fertilize your tomatoes consistently throughout the season.
Even with all that good stuff that you put in the planting hole, your tomato plants will need another shot of nutrients about six weeks into the season.
I like to use an organic, slow-release granular fertilizer like this one, or a liquid fish and seaweed emulsion. Follow the package directions for proper application, and keep the fertilizer bag or bottle next to your plants so you’ll never forget to feed them.
Try to avoid high-nitrogen fertilizers, as you’ll end up with lots of lush green leaves, but no flowers or fruits.
How to Grow Tomatoes in Pots Like a Gardening Pro

You don't need a lot of space to grow tomatoes. You just need this step-by-step guide that shows you exactly which varieties to grow and how to set your plants up for success.
Materials
- 1 tomato seedling or start
- 10- to 20-gallon container
- Large heavy-duty saucer (a few inches larger in diameter than your container)
- 1.5- to 3-cubic feet of high-quality potting soil (depending on container size)
- 1/2 cup of organic all-purpose fertilizer
- 1/4 cup of fish meal
- 1/4 cup of bone meal
- 2 aspirin tablets
- Handful of crushed eggshells
- 1 tomato teepee (optional)
- 1 tomato support structure
- Organic mulch
Tools
- Trowel
- Garden snips or scissors
- Cultivator
Instructions
- Choose the right type of tomato. Determinate plants or indeterminate plants? Let your space and length of growing season guide you.
- Start with a strong and healthy transplant. Your tomato transplant should've been repotted at least once already and properly hardened off.
- Don't be shy with container size, and choose a fabric pot over a plastic pot. You need a minimum 10-gallon container for determinate tomatoes and a 20-gallon container for indeterminate tomatoes. Place a saucer under the container before filling it, and make sure it's in the spot you want it—otherwise it'll be very heavy to move later.
- Use high-quality potting soil. Spread about 3 to 4 inches of potting soil across the bottom of the container.
- Feed your tomato plant well. Once you add your potting soil, stir the following amendments into the soil: all-purpose fertilizer, fish meal, bone meal, aspirin, crushed eggshells. Then, spread another 2 to 3 inches of potting soil on top.
- Bury the stem of the tomato plant. Gently pinch or snip off the lowest sets of leaves until you’re left with a bare stem on the bottom one-third to one-half of the stem. Center the tomato plant in the pot and fill the remainder of the pot with more potting soil until it’s filled to the brim (just below the last set of leaves). Gently shake the pot to settle the soil and add more as needed. Top off the soil with 1/2 cup all-purpose fertilizer and lightly rake it in around the base of the stem.
- Water thoroughly and consistently. Water the root zone thoroughly until the soil is evenly moist. Water the plant in, wait about 10 minutes, water again, wait 10 minutes again, and repeat until water runs freely out the bottom of the pot. It will take upwards of 1 gallon of water to fully saturate the soil.
- Protect young transplants from frost with "tomato teepees." This is an optional step for cold climates. If nighttime temperatures are consistently below 45°F at the time of planting, fill a tomato teepee and place it over your seedling to protect against frost. Remove the teepee when the tomato plant is a few inches above the walls (or all danger of frost has passed).
- Add your support structure. To reduce your chances of damaging the roots, add your tomato support at this stage before the plant grows too large.
- Mulch the soil. Use an organic mulch like straw (not hay, which contains seeds), shredded bark, or arborist wood chips to cover the soil by at least 2 inches, taking care not to bunch it up against the stem.
- Fertilize your tomatoes consistently throughout the season. Start feeding your tomato plant about six weeks into the season. Use an organic all-purpose fertilizer and follow the package directions for proper application.
More tomato growing posts to explore:
- Grow Tomatoes Like a Boss With These 10 Easy Tips
- How to Grow Tomatoes in Pots—Even Without a Garden
- How to Best Fertilize Tomatoes for the Ultimate Bumper Crop
- How to Repot Tomato Seedlings for Bigger and Better Plants
- Why and How to Transplant Tomatoes (a Second Time)
- Planting Tomatoes Sideways: How Growing in a Trench Results In Bigger Healthier Plants
- Florida Weave: A Better Way to Trellis Tomatoes
- Conquer Blossom End Rot and Save the Harvest
- Can You Eat Tomato Leaves? The Answer Will Surprise You
- Why Tomato Leaves Have That Unique Smell
- The Power of Fermenting and Saving Tomato Seeds
- 4 Fastest Ways to Ripen Tomatoes in the Garden and Beat the First Frost
- The 30 Best Tasting Heirloom Tomato Varieties (By Color!)
- 83 Fast-Growing Short-Season Tomato Varieties for Cold Climates
- The Best Time to Pick Tomatoes for Peak Quality (It’s Not What You Think!)
This post updated from an article that originally appeared on May 23, 2019.


I’ve heard of using tums but not aspirin, what does that provide for the tomatoes?
great article, much appreciated.
However it assumes you know a few things.
I have one tomato plant that I was given. it’s in a little pot the size of a coffee mug on the kitchen windowsill. It’s now about 1.25M tall. I haven’t any clue what sort it is but I assume it needs to be moved into a big pot and put outside (I live in Sydney Australia). there are some shorter but thicker stemmed tomato plants that simply appeared in our lower lawn. I expect I should put those in pots too. I think that protection from Possums and Sulphur Crested Cockatoos will be the biggest Challenge.
Any specific advice would be a great help
Best Regards Simon
Assuming it’s a standard tomato variety (not a micro tomato), your plant will be happier and more productive if you put it in a larger pot and move it outside. The plants that are already growing outside in the lawn can stay there, unless you’re worried about critters damaging them. I used to have opossums in my old garden and don’t remember them eating tomatoes, but you never know!
Thank you Linda, I will try a fabric bag for my tomatoes on my deck…good advise on everything…
I was so happy to come across this tutorial when I finally took on the project of planting tomatoes. I live in a townhouse and my yard has never been an option to plant as it’s mostly patio. I was always told that deck pots don’t yield fruit. So I did everything you said to do. Put them in a 25 gallon cloth pot, fertilized them and gave them 8 hours of sun and Waaa Laaaa! We have tomatoes growing. We will see if they turn red in a few weeks. MD just got hit with 100+ temperatures so it’s a bit hot. We haven’t had any critters yet, but I may cover them soon as I’ve heard critters enjoy the juice from ripe tomatoes. Thank you!!!!
This is the best tutorial I’ve read during the 3 years I’ve been growing tomatoes- both in containers and in the ground. Not only could I identify things I did wrong, I could identify things I did right. Which is equally important I’ve been fairly successful but want to improve my skills.
My question is what type of soil do you use? I live in Illinois, home of the best clay and alkaline soil in the country. But even buying garden soil, I cannot get the ph below 7. I use a fertilizer for acid loving plants,and added Espoma’s acid amendment to the soil about a month before planting, but that takes a long time to have any effect. I’ve tried everything I’ve read without success. I’m clearly not doing something right, so any advice you have will be appreciated. Thanks.
Great article what is the best veggie to plant in or spring
I’m new in tomato farming and I need a lot of help
A clean Cheese cloth (no detergent fabric softener) are a better media. As soon as my seedlings are planted there are placed under lights. The heat helps with germination. Before they brake ground there head for light.
Hello! Thank you very much for the super helpful post!
Question. Can I use this same recipe to grow bell peppers in containers? Thank you!
Very informative blog. Very less people know about how to grow tomatoes in pots. This article is very much helpful and effective.
I plant my 12 tomato plants in 5 gallon buckets with four different varieties- Sungold cherry, Rutgers, Better Boy and Brandywine – all indeterminate varieties. My first year was 3 years ago and they yielded an average of about 7 lbs per plant. Last year I paid more attention to pruning suckers and also pruning the lower branches up to about a foot from the container. As a result, my harvest doubled. Allowing more air flow between the plant branches with pruning made for much healthier and productive plants. I noticed that your lower branches have brown on the tips and your foliage within the plant is very dense. Maybe try pruning as I did and you will get better yields. This year for the first time I started all my plants indoors from seeds (instead of transplants from a nursery) and its is amazing how much better the plants are! My tomatoes are already almost 6 feet tall and it is only July 17 and I am already getting several tomatoes. I had to make 8 foot tall tomato cages out of cattle panels to support them.
appreciate having all this information in one place! thank you:) I am wondering about somethng that seems contradictory. First, fish emulsion is recommended as a fertilizer but also we are cautioned against high-nitrogen fertilizers.
Please clarify!
Lush foliage and no fruit is so sad for us tomato growers.
Just use fish emulsion in moderation (following the instructions on the bottle) and you’ll be fine. 🙂 The problem is when people fertilize too much, use too many different fertilizers, or fertilize during very hot weather.
I live in zone 8 and have fabric pots for my tomatoes. After amending the soil how often do you recommend fertilizing? Our season is up through early October. I’m a beginner and found your site extremely helpful! I planted a heirloom tomato plant about 2 weeks ago it’s probably 18” tall. I want to transplant it to my new fabric pots would you advise?
Once you’ve amended the soil with fertilizer and transplanted your tomato, you don’t need to fertilize again until they start forming fruit. At that point, I suggest fertilizing twice a month until frost kills them off.
What a great article! Clear, concise, step by step; great pics, and info on exactly what you used; just what I needed. I’ll be referring back here often. Thanks so much!
You’re welcome Bernadette!
Thanks for sharing this post. I find it very interesting as well as informative. Please keep on sharing these kinds of posts in future also.
thank you so much
My tomatoes are doing pretty good thank to you. I have a small raised bed area and compost pill. I grew extra tomatoes and peppers in grow pots so I could have. a few. Any ideas if I can reuse the soil? Of not how to recycle it? It is so pricey!
My tomato plants are getting a lot of yellow leaves. I’ve cut them off but some fall off by themselves. They are in large pots and I water every other day. What can I do about this? They are very large with a lot of tomatoes growing on them.
A general comment about ads. I spent more time taping my foot waiting for content to load than reading content owing to all the ads. I know that is not your fault, but in general it is extremely annoying when trying to read content such as this.
This is about the best how-to article on tomato potting I have ever read. I will be using many tips “culled” from it. Thanks!
I was told at the nursery to pinch off the yellow flowers when the plants are small. At what point do I leave the yellow flowers on the plant? I think the flowers become tomatoes. Is that correct? Please advise.
Depending on a variety – some tomato plants don’t grow tall (cherry tomatoes), I wouldn’t pinch flowers as these indeed become the fruit. What you need to pinch are the little leaves that grow between the stalk and the branches (in between – a tiny little leaf), as these aren’t needed and by pinching them the plant will spend more energy into growing and baring fruit.
thanks for the great information. where do you find containers as large as 20 gallon, and what would be the approximate dimensions of them? how much soil mix will i need to fill a 20gal pot? thanks!
Hi Deb,
I found some great fabric containers up to 30 gallons on Amazon!
molto bello grazie
Good post, lots of critical info. Thanks! Used 15 and 20 gallon grow bags for tomatoes for the first time this year. Nearing end of season now. Do I empty bags and store? Need some end of season guidelines, please.
My question is this- one day I came to my celebrity tomato plant that had already started producing about 3 good sized green tomatoes but all of the very few leaves it had to begin with had all turned yellow. Not sure why. Here are my guesses as to why but would love your input
1- about two weeks prior at the advice of someone on you tube I poured a lot- like 1/4 to maybe 1/2 of baking soda at the bottom of the plant which is in a container. This seemed like a lot but this is what I was advised to do. I am wandering if that blocked the plants ability to take up nutrients and water. Before turning completely yellow the edges were brown on some which I read could be a sign of this. Or perhaps they got some disease or pest as I read there are many that present in this fashion
2- perhaps I over watered as I am new and was checking on them every day.
3- we are going through a heat wave with over 90 degrees for ten days so maybe it was heat stress
4- not enough nitrogen as even before this happened with the baking soda I had very few leaves growing on the plant
5- maybe it’s septoria? I think it’s called or some other fungal disease that presents with brownish/yellowing spots and then all leaves turn yellow and fall off.
Any ideas?
And any suggestions as to how to save my green tomatoes? Concerned about sun scald as they have very few leaves.
Should I try to repot the whole thing or is that too risky? All growth and new growth appears to be stunted.
Oh I also applied calcium nitrate- dissolved and watered it with this again due to you tube advice.. Not sure what I did wrong but would appreciate any experienced gardener who feels they have a good idea of the problem and possible solutions.
Shout I pick the green tomato and hope it ripens inside?
Thanks! Sorry for long post.
Yellow leaves could mean a number of things, including underwatering or overwatering, or nutrient deficiencies. Baking soda is typically used as a diluted spray for plants, so I’m not sure if you mean you just put 1/2 cup of straight baking soda in your container?
In any case, with temperatures in the 90s, your plants are likely heat-stressed (on top of possible injury from the baking soda), so I’d give them some shade in the afternoon and see if the green tomatoes start to ripen.
I’m not an expert but this sounds a little like nutrient burn to me. By adding that much baking soda (Sodium bicarbonate) and calcium nitrate to your soil you are adding a lot of salts and nutrients which can do a few things. It can change the PH of the soil which could potentially upset your plant. It could also add basically too many nutrients to the soil causing the roots to have a hard time finding nutrients they need (Nutrient lockout).
I would suggest just watering it normally for a bit without adding anything to help wash some of the that out and then give it something high in nitrogen until it has put on some leaves to suck up the sun and then switch your fertilizer to something with more Potassium when you feel your plant is healthy enough to start producing fruit. I would also take the current fruit off it so that your plant can put it’s energy into leaf growth.
Once it has some new leaf growth you can trim off any damaged leaves. Never trim more than a third of the plant at one time.
When it comes to fertilizer its usually good to pick a fertilizing schedule you like or follow the label of what you are using. In containers you can over feed. Experiments can be good to do be do them one at a time waiting to see results and know that you may loss that plant if the experiment goes badly.
Good luck. I hope that was some what useful for you.
Do try again! I’d skip the baking soda – too much baking soda- even it sprays can, as Tracey said, change the pH and it isn’t doing anything. Most of the voodoo we routinely practice on tomatoes is unnecessary. Soil science is complex and when we mess with one aspect without understanding all of it, we can just make things worse. If you’re buying a high-quality potting mix, the pH should be fine. Remember when you decide what to feed it that the plants aren’t eating it- the soil microbes are, and they will enable the plants to take up the nutrients they need – so lots of compost. Around here, it’s what we use for mulch, because the slugs love everything else. And sometimes things just go wrong, so don’t give up.
Hi, This is my first time planting anything so I decided on tomatoes. I have some in the ground but not many b/c I have stray cats that use it as a litter box. So, I put them in tall garbage pails and small pots. Anyway, they are determinant and I read that you aren’t supposed to prune them at all, but the leaves on the bottom look droopy. Also, are the roots as deep for a determinant plant as indeterminant? The soil is costing me so much money since I have so many plants. And I’m told not to prune the first flowers even though it would cause more energy to be put into the roots. Thoughts? So grateful!!!! Thank you!
You don’t need to prune them but you can remove the lower leaves if they’re dragging in the soil and staying wet (which can lead to fungal disease). Determinate tomatoes grow best in 10-gallon pots but ultra compact varieties can make do with 5-gallon pots (though they probably won’t be as productive). You also don’t need to remove the first flowers if you transplanted them by burying the stem deeper. You can read more about transplanting tomatoes here: https://gardenbetty.com/how-to-repot-tomato-seedlings/ and https://gardenbetty.com/why-and-how-to-transplant-tomatoes-again/
My leaves are turning yellow–Am I watering too much–some sources say to keep soil moist, others keep dry. My tomators are on a balcony in a pot.
Tomato plants don’t like to be waterlogged and they don’t develop well when watered frequently for short periods of time (as the roots tend to stay near the surface of the soil where all the moisture is). Give them a nice deep soak, then wait until the first 3-4 inches of soil feels dry before you water again. Depending on the size of your pot and your climate, you may need to water your plants 2-4 times a week in summer.
Should I do anything to keep my potted tomato plant from growing taller than 4ft. It’s almost taller than I am. Also it’s getting very full and I didn’t know if I needed to thin out the leaves. We also experienced our first blossom end rot but most of the fruit looks good. Thank you for your advice.
No, let your plant grow as tall as it wants! But make sure it’s well supported so the branches don’t snap (or become too top heavy for your pot). Thinning out the leaves is not necessary unless you have an issue getting enough air circulation between your plants.
I live in Phoenix, AZ and am just starting to learn about gardening. I realize it’s not the best time to start a garden when our temps are easily in the 100’s for the next 4 months, but I do have 4 potted plants I started about a month ago from a nursery. 2 tomato plants. I’m the heat of the day, should I move the tomato plants to the shaded patio? Literally is going to be 108 in a few days.
Yes, your tomatoes need shade in the hottest part of the day. They won’t flower (or fruit) when it’s consistently over 85ºF every day.
when is the best time of year to transplant the tomato plant and grow outside?
It depends on your climate. You can download a custom planting calendar here to enter your last frost date: https://gardenbetty.com/planting-calendar/
If you use Walls-o-Water (as shown in my post), you can probably transplant tomatoes now if you’re anywhere south of zone 6. I’ve successfully used Walls-o-Water down to a low of 28°F (with daytime temps in the high 50s-low 60s).
This is fabulous and so timely. We’re moving this summer and won’t get into our new place until mid-August….. I’m determined to have a few vegetable plants for the rest of the season. It’ll be a short one, but I still want to try (and succeed)! Thanks for posting!
You’re welcome! I’m in the same boat. Still haven’t transplanted tomatoes (nearing mid-June) but I already know I’ll get a good growing season by putting them in pots rather than in the ground. You have so many more options that way!