
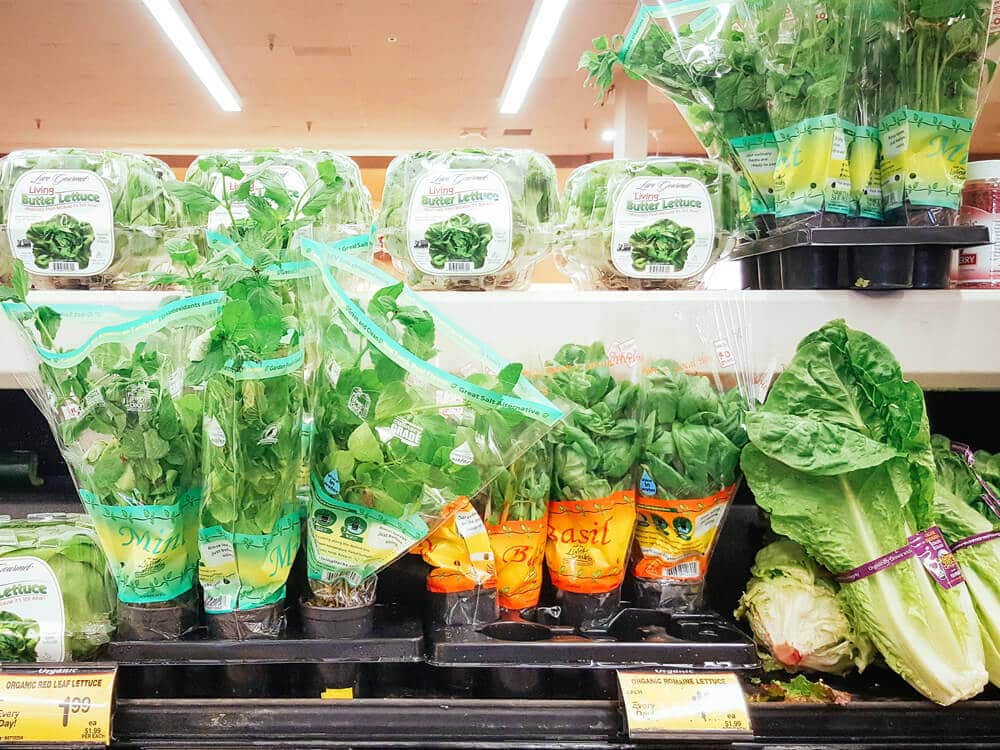
In early spring, before my basil plants have grown big enough to harvest, I usually buy them as “living herbs” in the supermarket. You’ve seen them in the produce aisle: the fresh herbs in little pots with their roots still attached.
The logic behind these living herbs is they stay fresher longer than the cut sprigs sold in clamshells. I’ll sometimes keep mine on the windowsill for up to three weeks, pinching off a stem here and there while I’m cooking.
For most people, however, the herbs have already keeled over by this point. Living herbs are produced with the ordinary consumer in mind, so they aren’t meant to last more than a week or two.
So maybe it’s the gardener in me who can’t resist “saving” an herb. Since I continually pinch off the basil each week, it keeps growing and growing until it’s obviously unhappy in its tiny plastic pot.
Rather than composting the tired, overgrown basil, I usually try to extend its life by transplanting it in the garden. I can raise several new basil plants this way and get more bang for the buck out of something that’s supposed to be disposable.
Sometimes, I don’t even need to start seeds or buy “proper” basil starts from the nursery because I’ll get so many from a single living herb purchase!
Planting a supermarket herb and giving it a second life is actually quite easy, but there are a few steps you should take to ensure success in the garden. And these same tips work for other living herbs as well—such as rosemary, thyme, sage, and mint—as long as they came in a pot of soil or were hydroponically grown (where the cuttings still have roots attached).
So before you stick a supermarket herb in the soil, here are five things you should know.
Tip #1: Supermarket herbs should be transplanted soon after purchase.
To increase the chances of your herb surviving, it should be moved into a larger pot or into the ground the week it’s brought home. (It also wouldn’t hurt to harden off your herb for a few days first, especially if it’s going straight from a fluorescent-lit grocery store to direct sunlight outside.)
Supermarkets aren’t watering or fertilizing these herbs the way a nursery might while they’re sitting on the shelves. They’re counting on quick turnover, so once the herbs start to look a little ratty, they’re tossed out (similar to how unsold fruits and vegetables are discarded).
Since these herbs are typically grown in a sterile potting medium that’s devoid of nutrients, and placed in an indoor environment with terrible lighting, you’ll want to transplant the herbs into well-amended soil at home and give them plenty of sunshine to help them thrive.
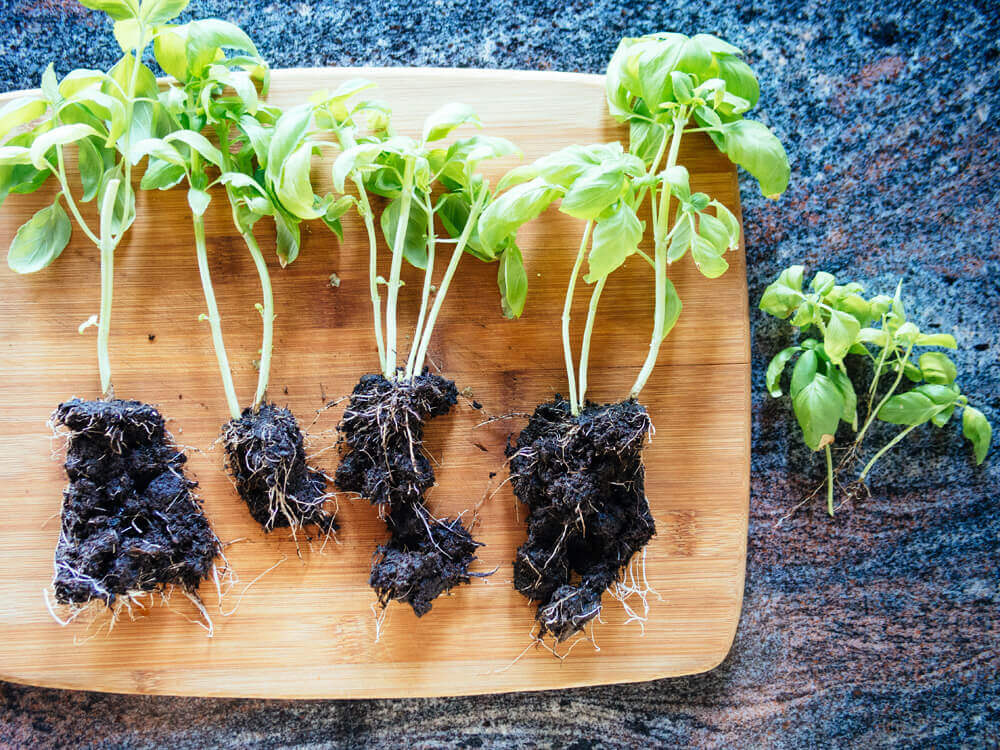
Tip #2: Supermarket herbs are planted intensively.
Since they go to market as seedlings, supermarket herbs are seeded thickly and grown close together so it looks like you’re getting a full-grown plant. (When in fact, what you’re buying is likely half a dozen little plants clumped together.)
The seedlings compete for space, light, and moisture as they grow, often struggling as their roots become severely rootbound. (If you’ve ever dealt with leggy seedlings, you know how it goes.)
Because of this, supermarket herbs won’t do well if you just take them out of the pot and put them straight in the ground (or into a larger container). You need to divide them first.
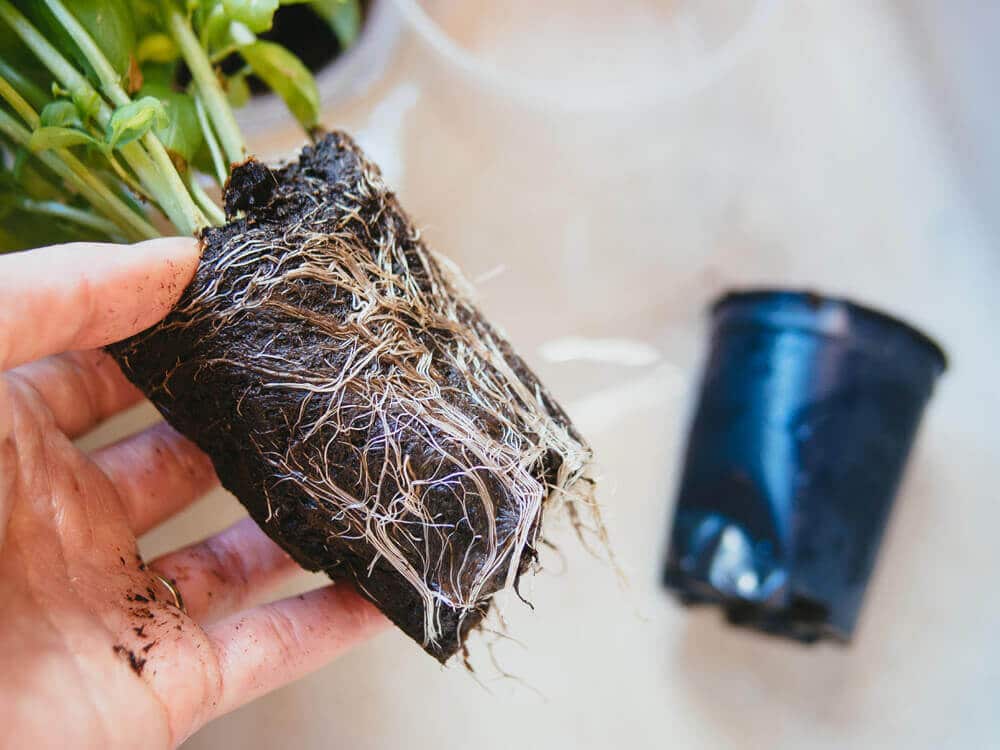
Tip #3: Supermarket herbs should be divided before transplanting.
To keep your plants healthy, gently prod the root ball apart with your hands or cut them with a clean pair of shears. I usually leave two to three seedlings per transplant, and remove the weaker ones as the plant matures.
Don’t worry too much about separating the roots evenly—as long as each clump has some nice long roots attached, it has a good chance of surviving. (Besides, you won’t do anymore damage that’s already been done here.)
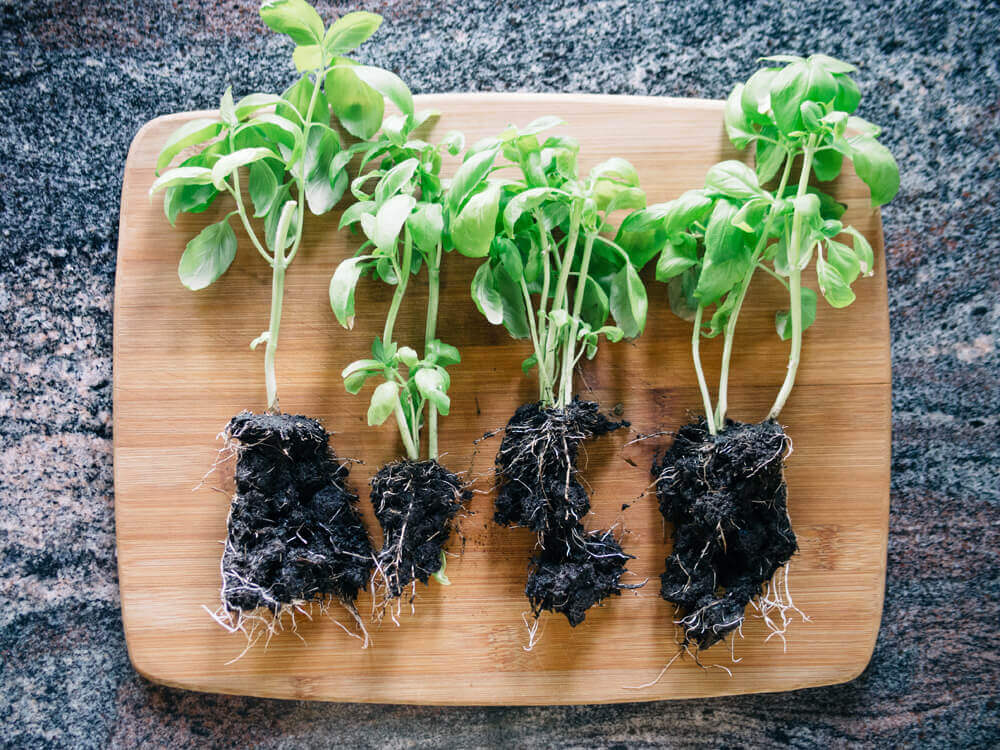
Tip #4: Thin the divisions as needed.
Remove any tiny seedlings by snipping them off at the base of the stems. These seedlings will never be able to survive in the shade of their taller neighbors. But don’t throw them out—use them in a salad as microgreens!
Related: Gardening Quick Tip: Eat Those Thinnings
If you’re so inclined, you can even try rooting these basil babies in a glass of water to make even more new plants. Basil roots quickly and easily in water, and once your seedlings have a small mass of roots a couple of inches long, you can pot them up in soil or transplant them outside.
Tip #5: Bury the stems of basil seedlings and water well.
Just like you do with tomatoes, plant the basil up to its lowest set of leaves (even removing the last set if it’s starting to yellow) to encourage roots to form along the stem. Keep the basil well-watered (but not water-logged) to reduce the effects of transplant shock.
Read more: Here’s Why Your Basil Has Black Spots on Its Leaves
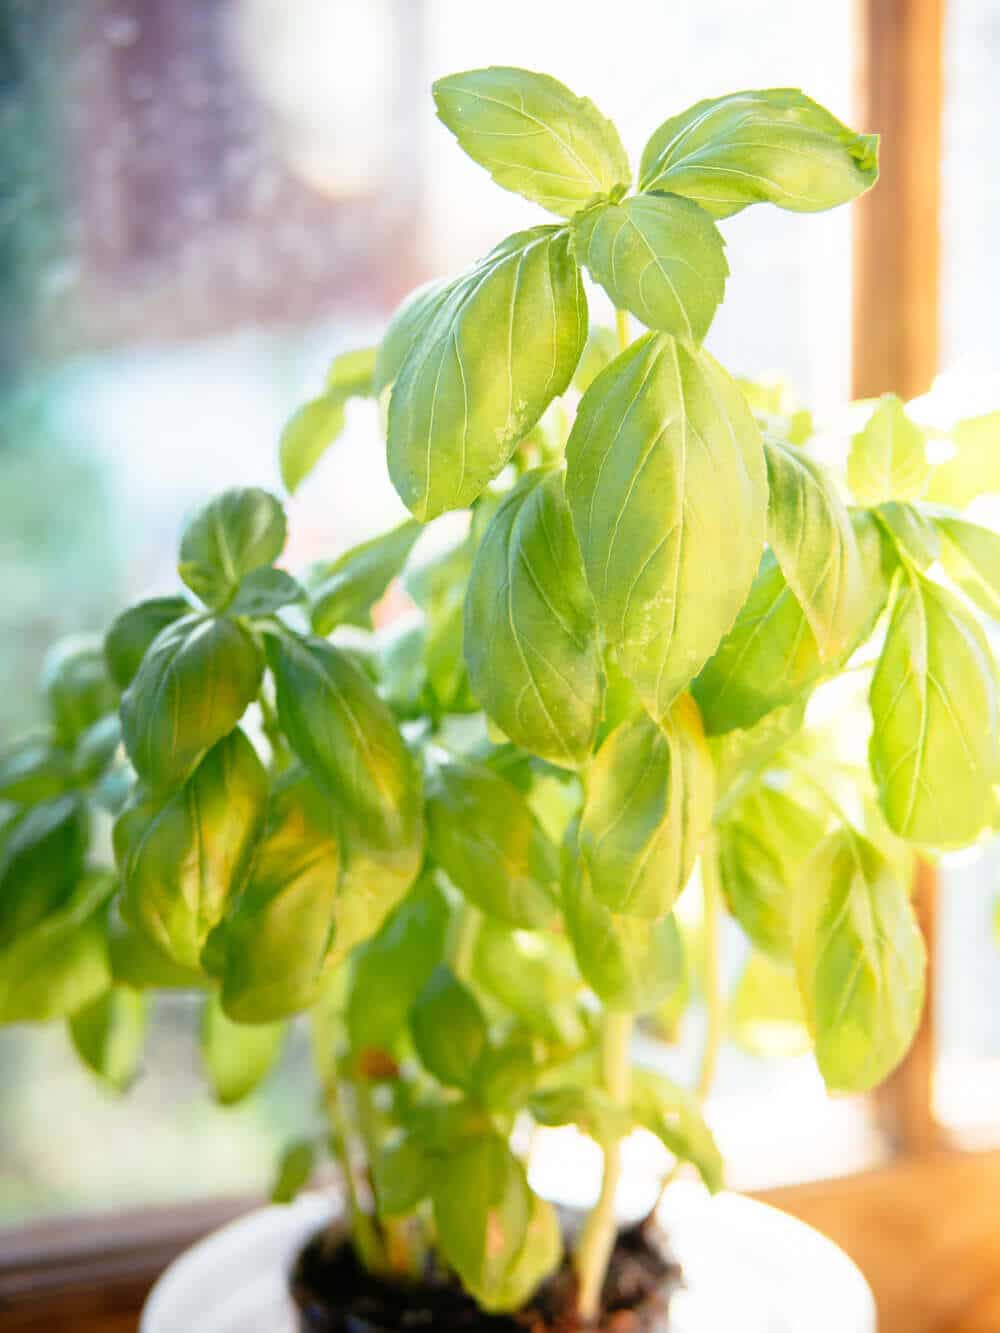
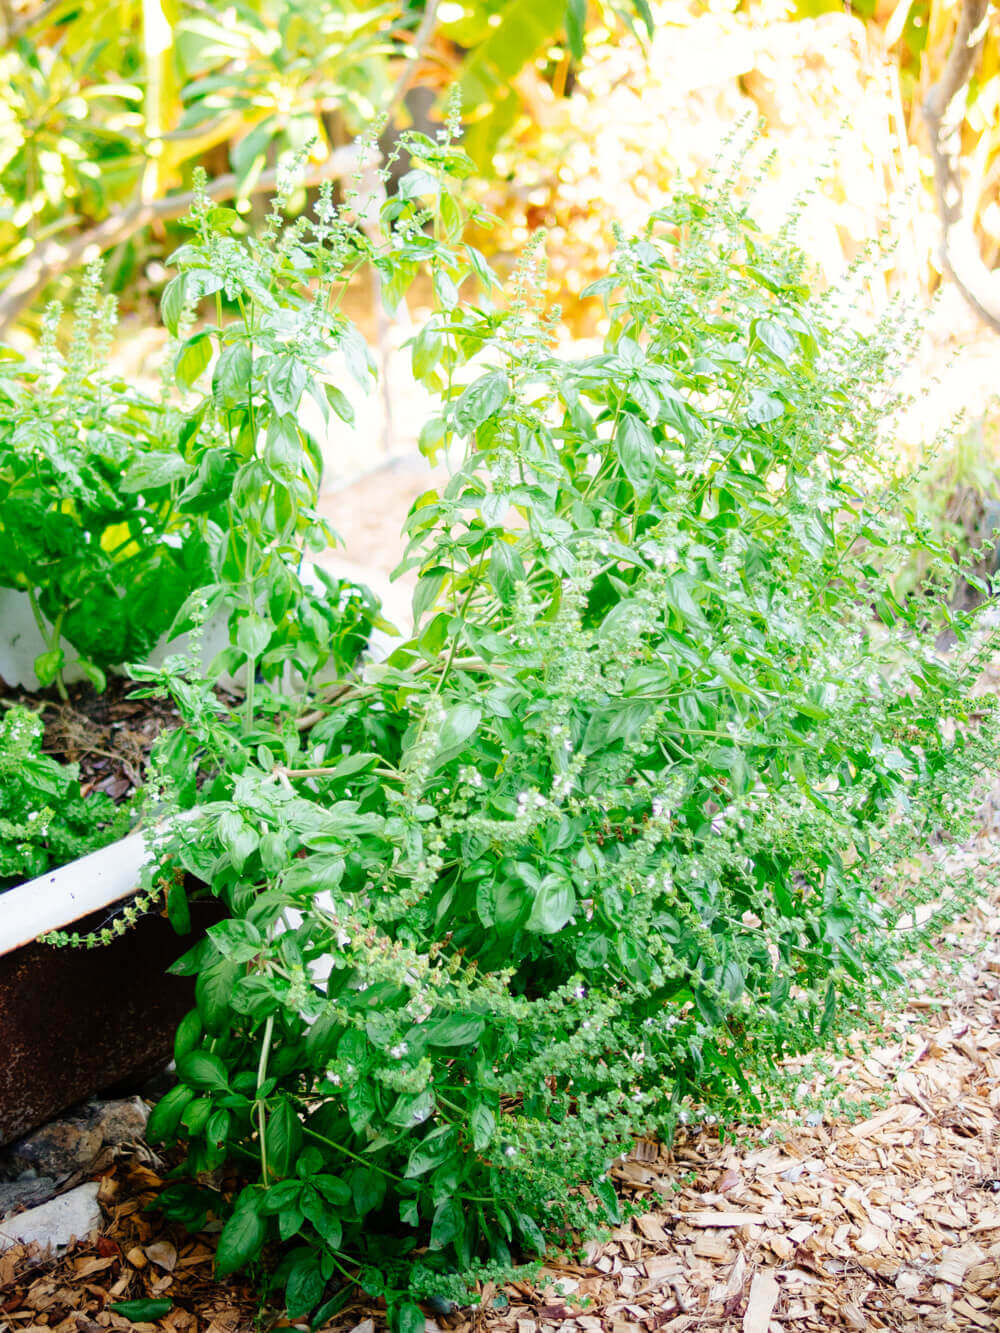
It may take a few weeks for the basil to bounce back, but once it does, there’s no reason it couldn’t look like this by the end of the season! (And yes, this three-foot-tall sweet basil started from a sad little supermarket herb just months before!)
Common questions about growing living herbs
Can you plant living herbs outside?
Yes. Once your supermarket living herb has been divided, you can pot up the individual clumps to keep as indoor herbs, or transplant them outside in your garden (preferably after a week of hardening off to reduce transplant shock).
Can you plant hydroponic herbs?
Some supermarket living herbs are hydroponically grown—that is, they come with all their roots attached, but no soil. Usually this is because the soil has been washed off before being packaged to sell.
Hydroponic herbs can go straight into potting mix or garden soil if the roots are well developed. But if the roots are short and the seedling seems weak, place it in a glass of water for a week or two until new roots emerge to help support the plant.
Can you grow herbs from grocery store cuttings?
Absolutely! Supermarket herbs that are sold as sprigs or cuttings (in flat clamshells) can be propagated easily at home if you want to start a few new plants.
Woody herbs like basil, rosemary, sage, oregano, thyme, and mint can be rooted in water as long as the cutting is from new green growth. (Older brown stems won’t sprout roots as easily this way.)
Give the sprigs a fresh cut across the bottom, then place them in a glass of water until new roots emerge. Change the water every few days (or when it starts to look murky) and transplant the seedlings once their roots grow a couple inches long.
Can you regrow living lettuce?
Hydroponically grown lettuce usually come in clamshell packages with their roots still attached. (Butter lettuce is commonly sold this way.)
Just like you do with supermarket living herbs, you can revive a head of living lettuce by placing it in a bowl of water to hydrate the roots. Pick some of the outer leaves to eat, remove the wilted or less lively ones, then plant the whole head of lettuce in a pot of fresh potting soil to keep it growing.
How to make your herbs last even longer
- How to Preserve Basil the Easy Way
- 3 Best Ways to Freeze Parsley, Cilantro, Chives, and Other Herbs
- How to Dry Oregano (and Other Herbs) Fast—Use the Oven!
This post updated from an article that originally appeared on May 8, 2017.
View the Web Story on how to transplant living herbs from the grocery store.


Hello, I also like to add a little sprinkle of organic blood fish & bone in the planting hole. This will provide the plants with all the necessary nutrients for the growing season.
Whenever I repot supermarket herbs they flop. Any suggestions?
Make sure they have enough water and sunlight (and were healthy to start—if they were already limp and sad, potting them might not help).
Would this work for coriander too? Also struggle to keep coriander alive
Do you buy coriander with its roots still attached? (I’ve never seen this in my local stores.) If so, then yes, you can transplant it the same way.
Thank you for this!! Is this also the case for potted supermarket parsley?
Yep! 🙂
This is so helpful thank you, I want to keep my herbs in individual pots but I’m not sure what size pot I should plant each separated one into, I’d like to get a decently large bunch of each herb. Can you advise on pot size? What happens to them in winter if they are in pots outside?
They will grow as large as the pots they’re in, so you can start with smaller 4-inch pots and then keep going up a size or two as long as you have the space. Basil is hardy to zone 9-10 so it needs to be brought indoors if temps drop below 50°F consistently.
This was very helpful! I am a fairly experienced gardener but I struggle with starting herbs!! I decided to try propagating some store bought herbs for a head start. Thanks for these tips!
You’re welcome!
After watching multiple videos and reading multiple articles pertaining to this subject, your philosophy was definitely the best one in my mind. Now, we have 23 single basil plants as companions to 24 tomato plants in one of our mini-farm rows. Thank you so much.
You’re welcome! I’m so glad my site has been helpful for you!
Hi Linda,
Growing herbs at home is a very good idea. Using fresh herbs from our garden, gives amazing flavour to any dish. I have always grown herbs from seeds, and they have come out very good. I have never thought of growing from living herbs. Thanks for sharing this wonderful idea with us. It’s really very helpful!
You’re welcome! Have fun with trying this!
Gardening Plants is always a good idea to decorate our surrounding. This is really the one by which people can get more aware of gardening and can easily do it by following some simple tips.
LOVE this! I will definitely be trying this out on my next Trader Joe’s run!
This is really informative! I have never thought to transplant my living herbs! Usually I just plant them from seeds!
I usually start my herbs from seeds as well, but this gives those living herbs a second chance!
Linda, I LOVE that you’re spreading the word about how to grow plants. AND you mention in the article that plants are “supposed to be disposable.” They aren’t. As a gardening advocate, I am sure you know that just because some people treat perennial (or even many annual)plants as something to be discarded, that is…unwise. MANY herbs are “perinnial,” which means you can grow them once and they’ll live for not “months” as you mention, but years. Even in colder climates, you can grow and plant oregano, thyme, lemon balm, all types of mints, rosemary ,(in some places) outdoors from either a grocery store-cutting, as this article suggests, or from seed. And once you plant them ONCE, they’ll live and reseed…pretty much in perpetuity, provided that they have the right growing conditions (amount of water, light, etc.) And with “annuals” like basil, all you have to do is grow them in a pot and bring them inside for the winter (when it is colder than 50 degrees Fahrenheit) to live on a sunny windowsill. Which is to say: as a gardening guru, I’d love to see you speak to the fact that plants are not meant to be disposed of. They are living things. They can provide both food and great joy for years, if you take the time to learn how to care for them in all seasons.
It is lovely to see how much care you give to something that as you say was grown to be disposable. I personally hate that attitude to plants. This post reminds me of the coriander plant that I brought home from a shop – it died within three days. That is the quality you get from shops 🙁 The fully grown plant looks wonderful, I should try growing some basil from seeds.
Basil is very easy to start from seed! I sow a handful every spring (usually from a variety pack) and they sprout within a week. It’s fun to see what ends up growing. 🙂
love.love.love. this article…