
Don’t be fooled by this hardy perennial vegetable. It’s neither from Jerusalem, nor an artichoke. And even though it looks like a sunflower (which it is), you grow it for the edible tubers underground.
Jerusalem artichokes have so many good things going for them, it’s surprising they’re not grown more often.
The masses of sunflowers draw pollinators to the garden all summer; the tubers are tasty, highly nutritious, and available all winter; and this is as easy as it gets for a food crop—unfussy, virtually pest-free, adapts to all soils, and comes back year after year.
The plants have just one drawback (for some people, not all), which I’ll get to later.
But overall, Jerusalem artichokes (which you may also know as sunchokes, sunroots, earth apples, wild sunflowers, or topinambour) are a unique food crop you should definitely grow this year.
What are Jerusalem artichokes?
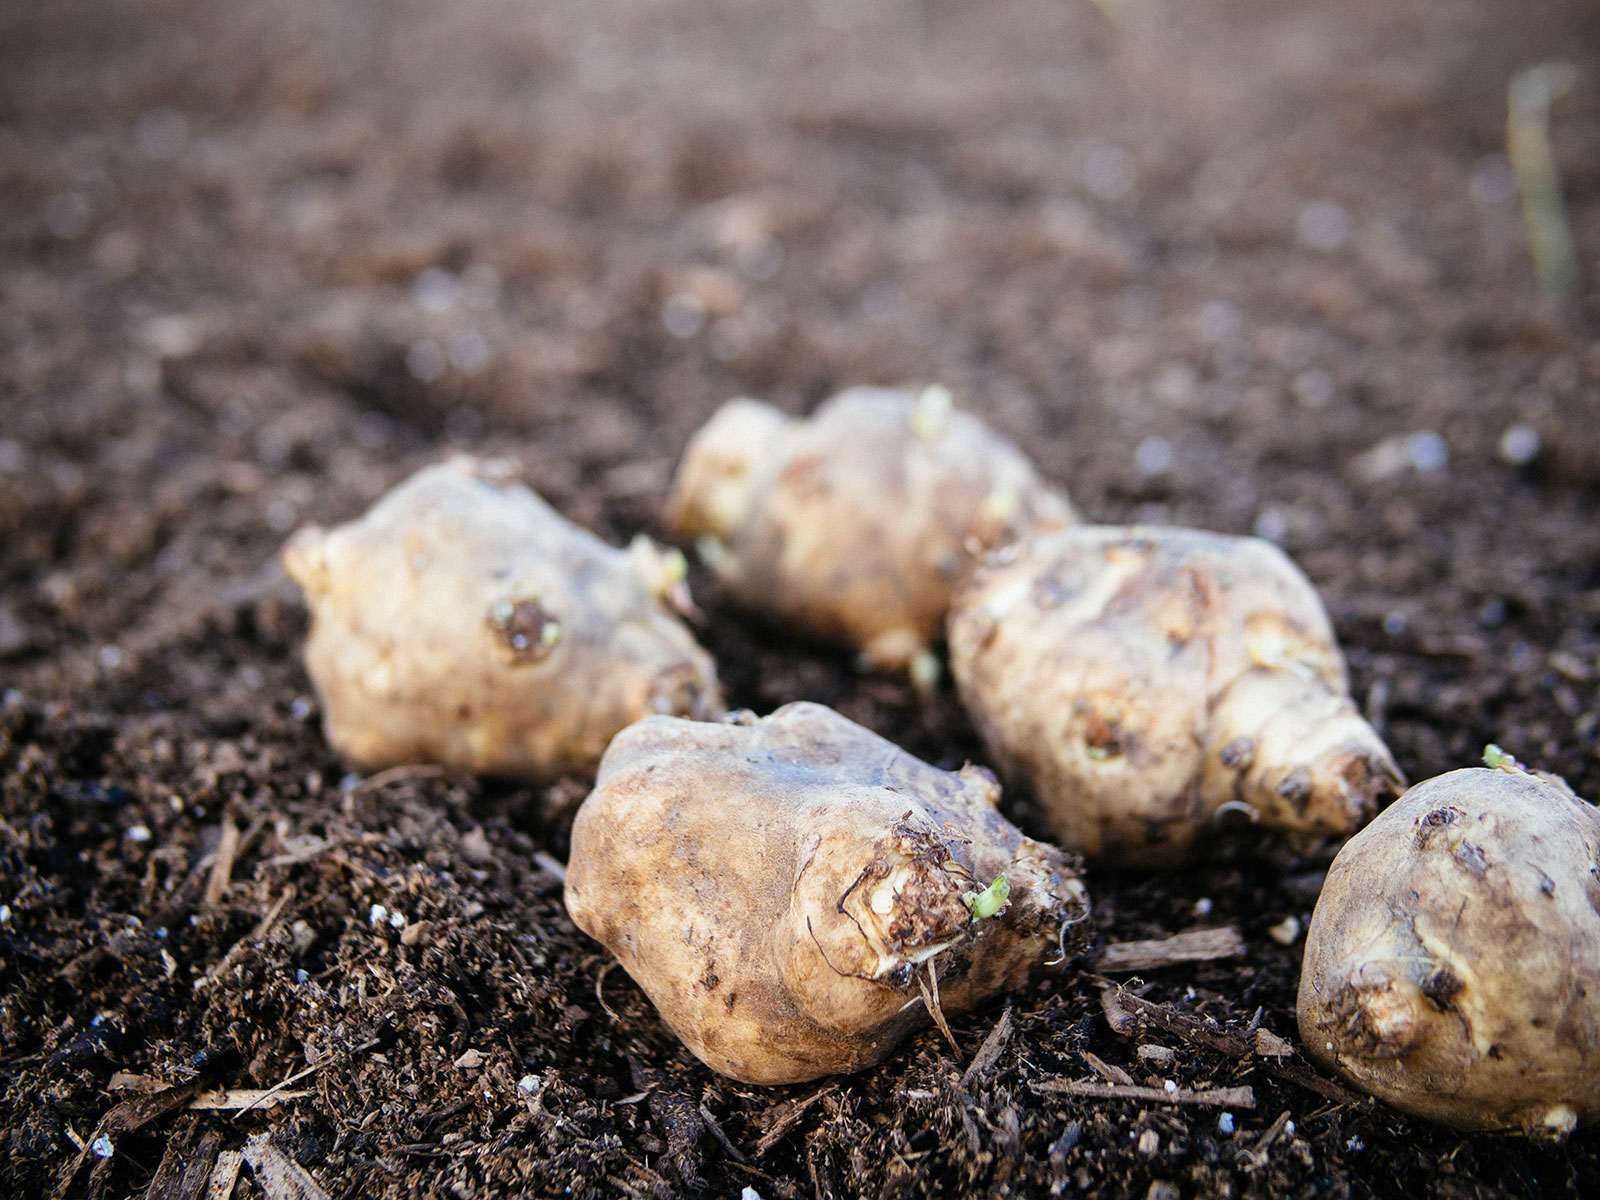
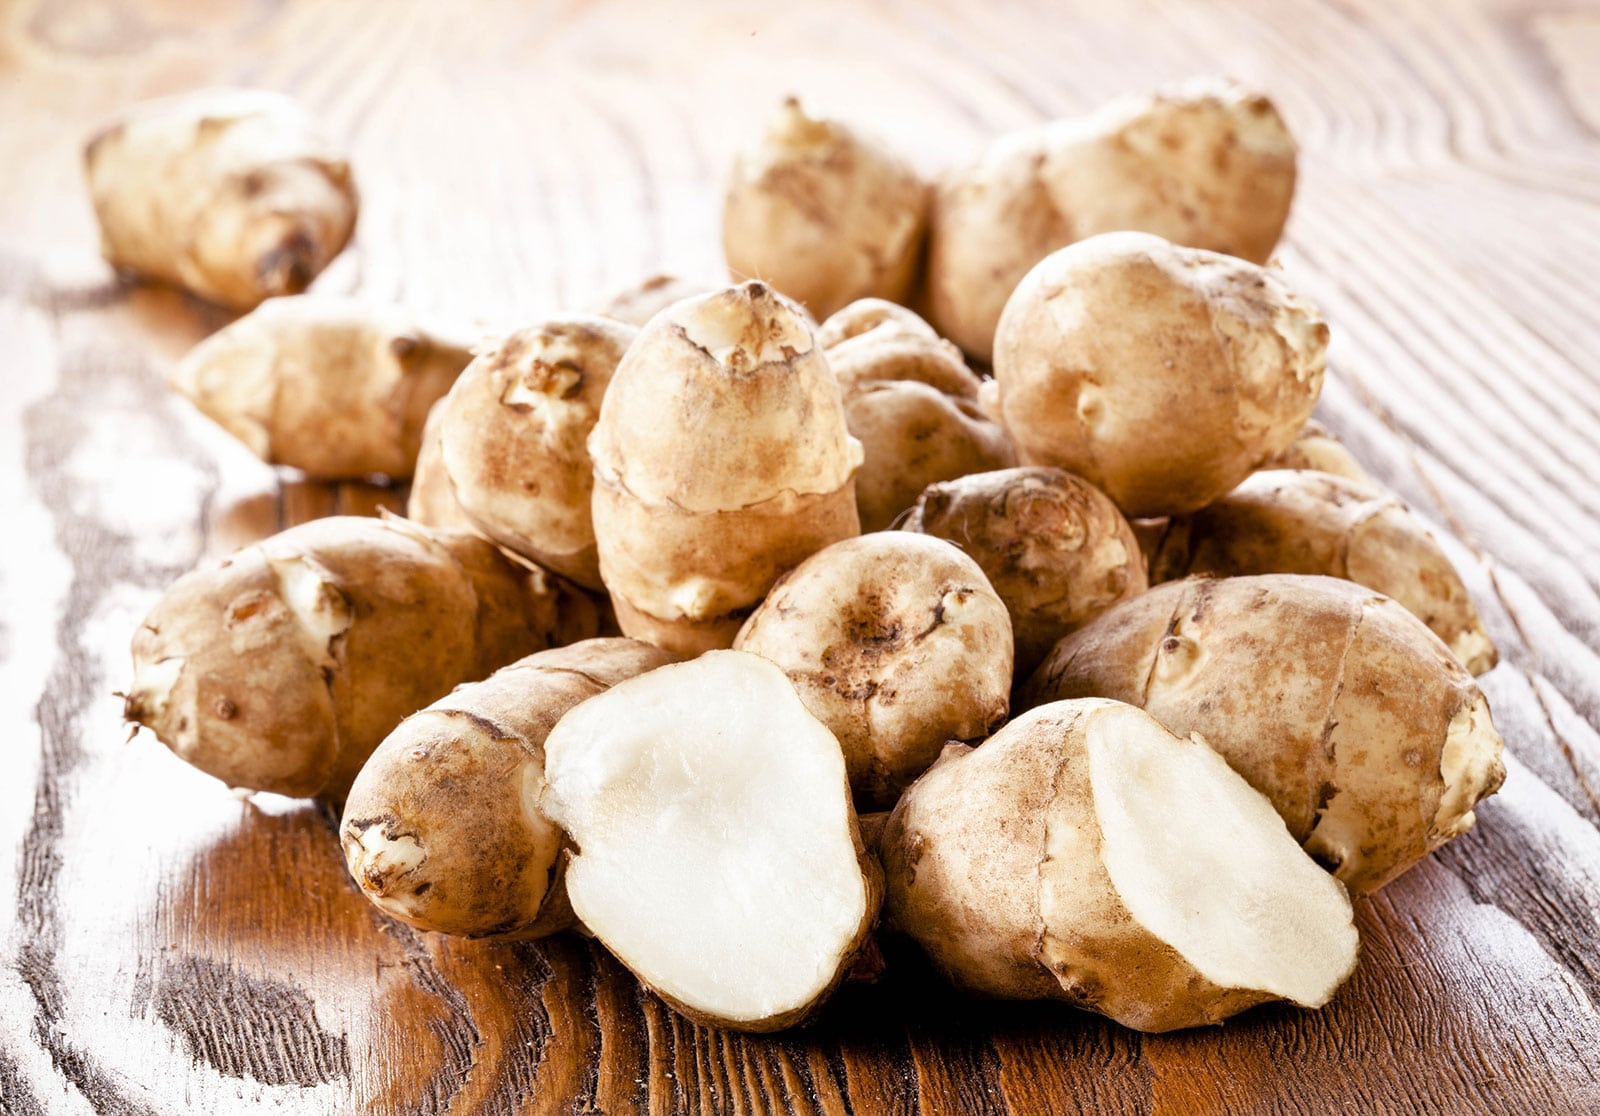
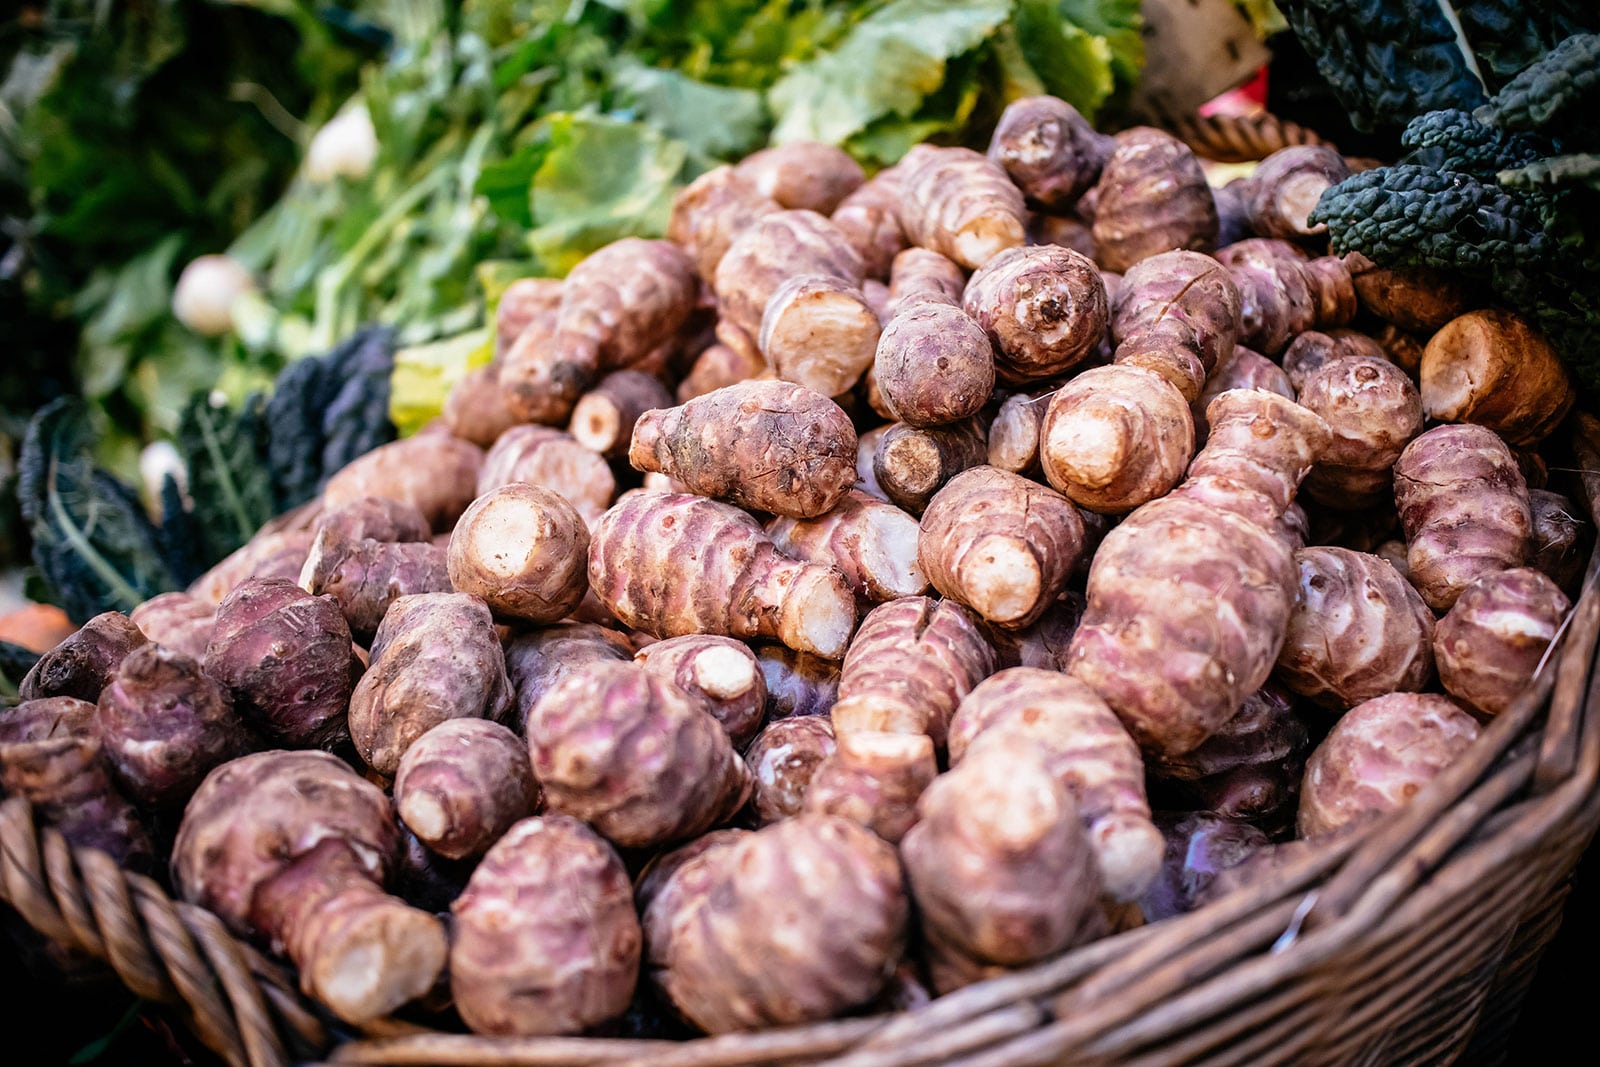
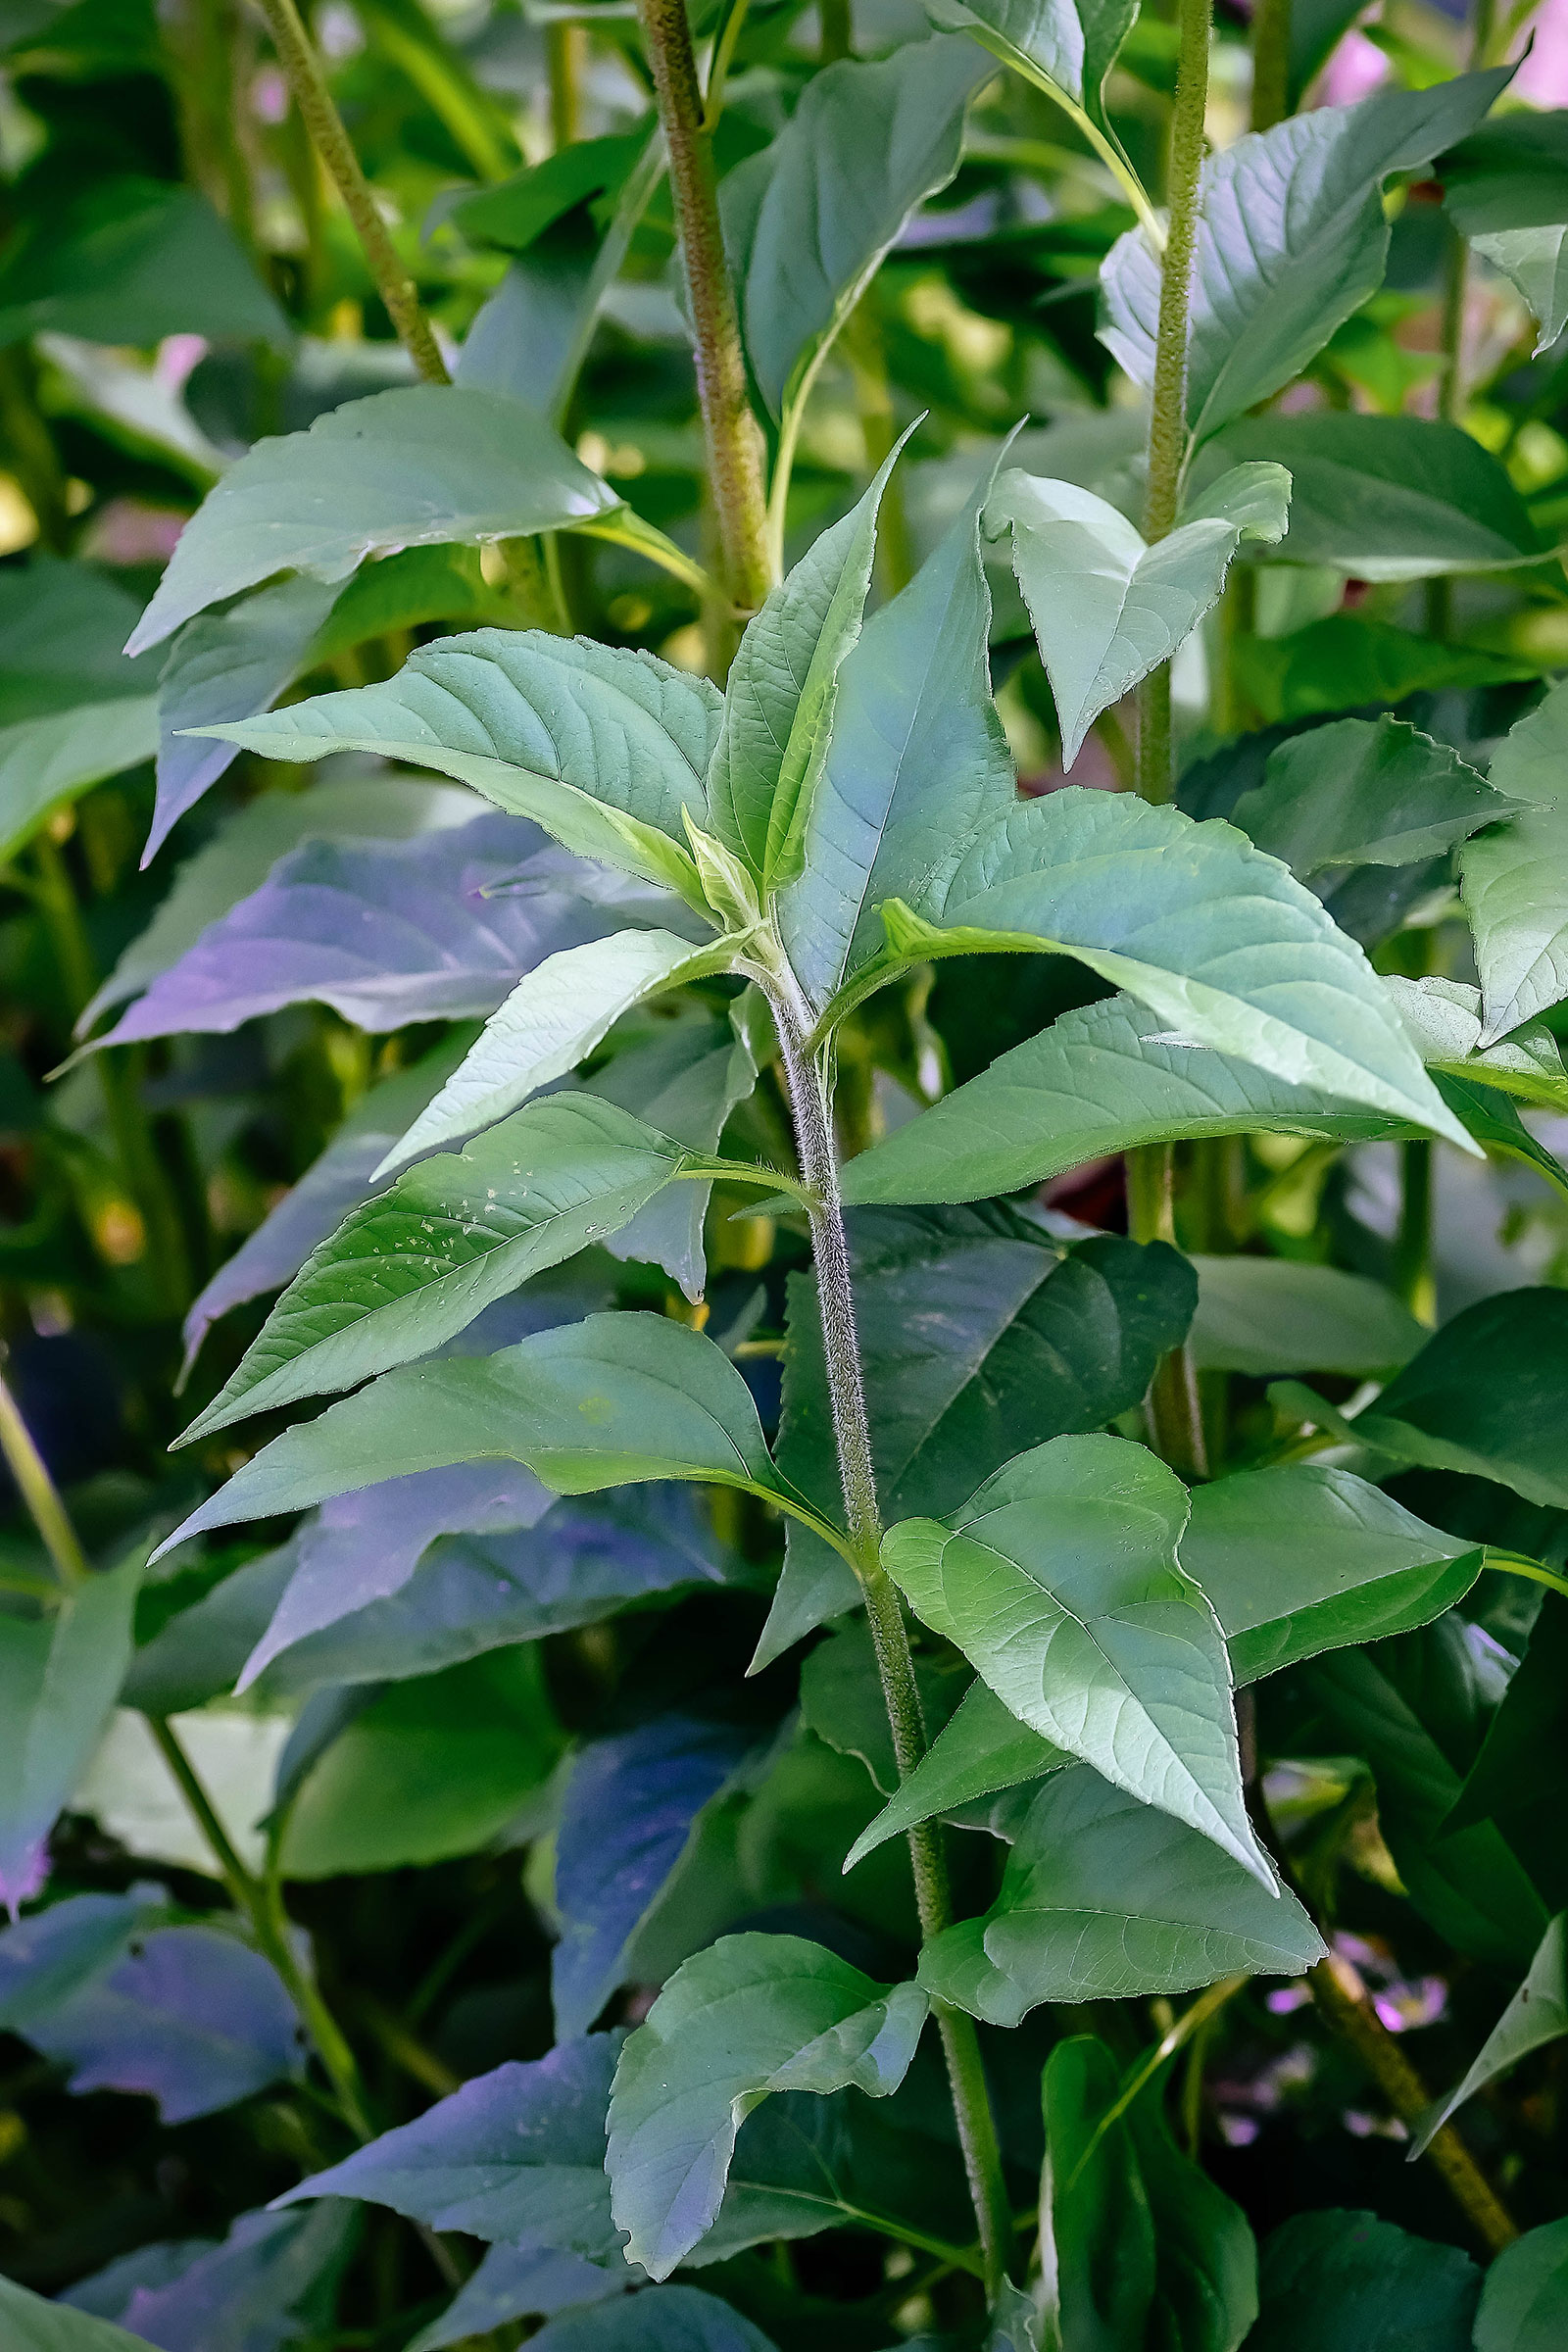
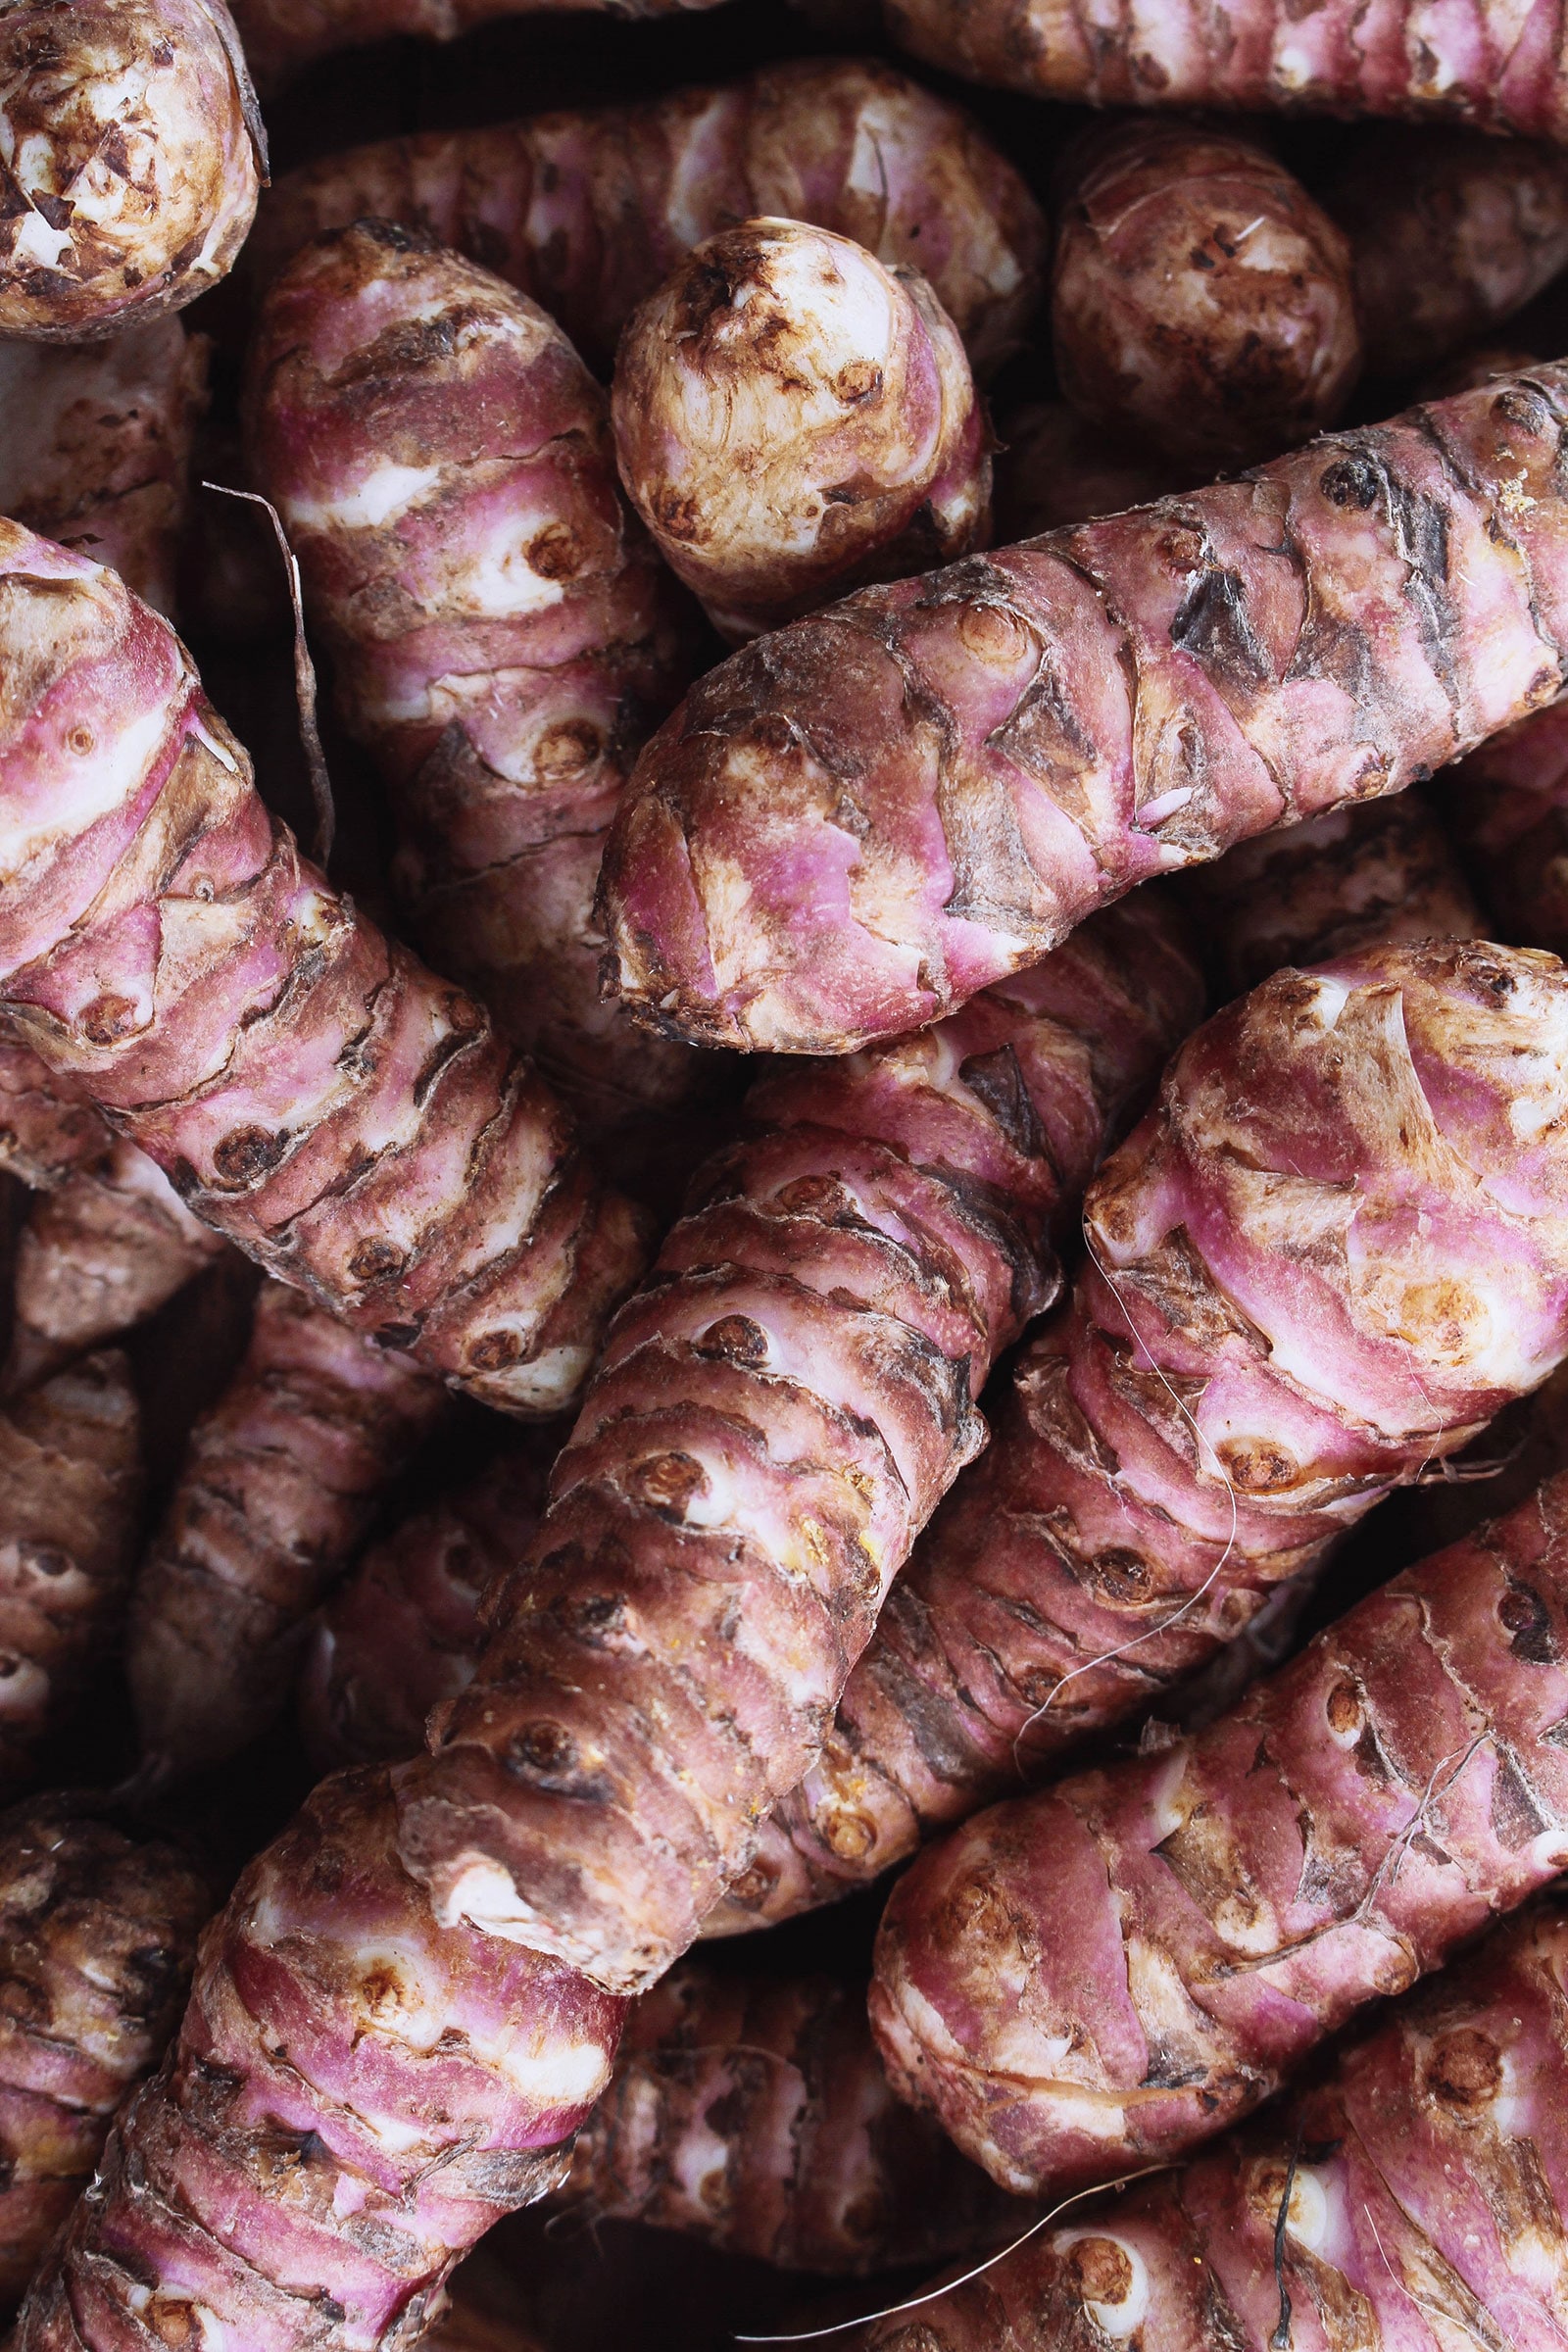
The knobby tubers are actually the edible roots of a native North American sunflower species, Helianthus tuberosus, and a member of the Asteraceae family, which includes other edible flowers like artichokes and dandelions.
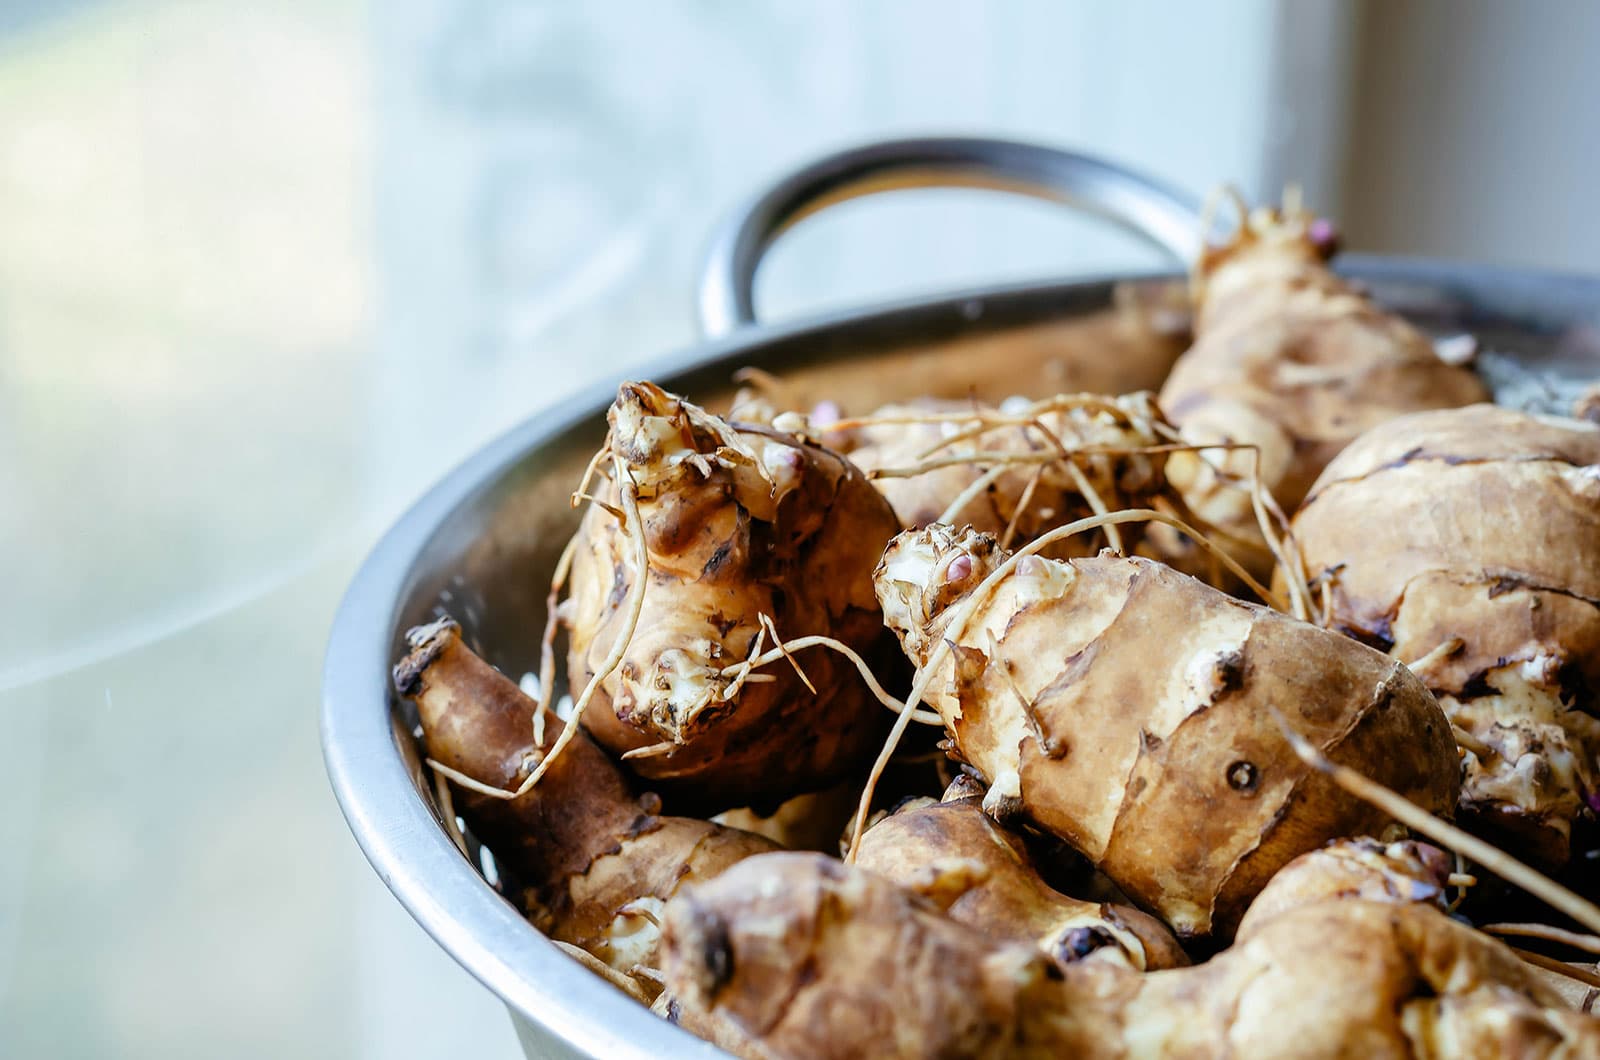
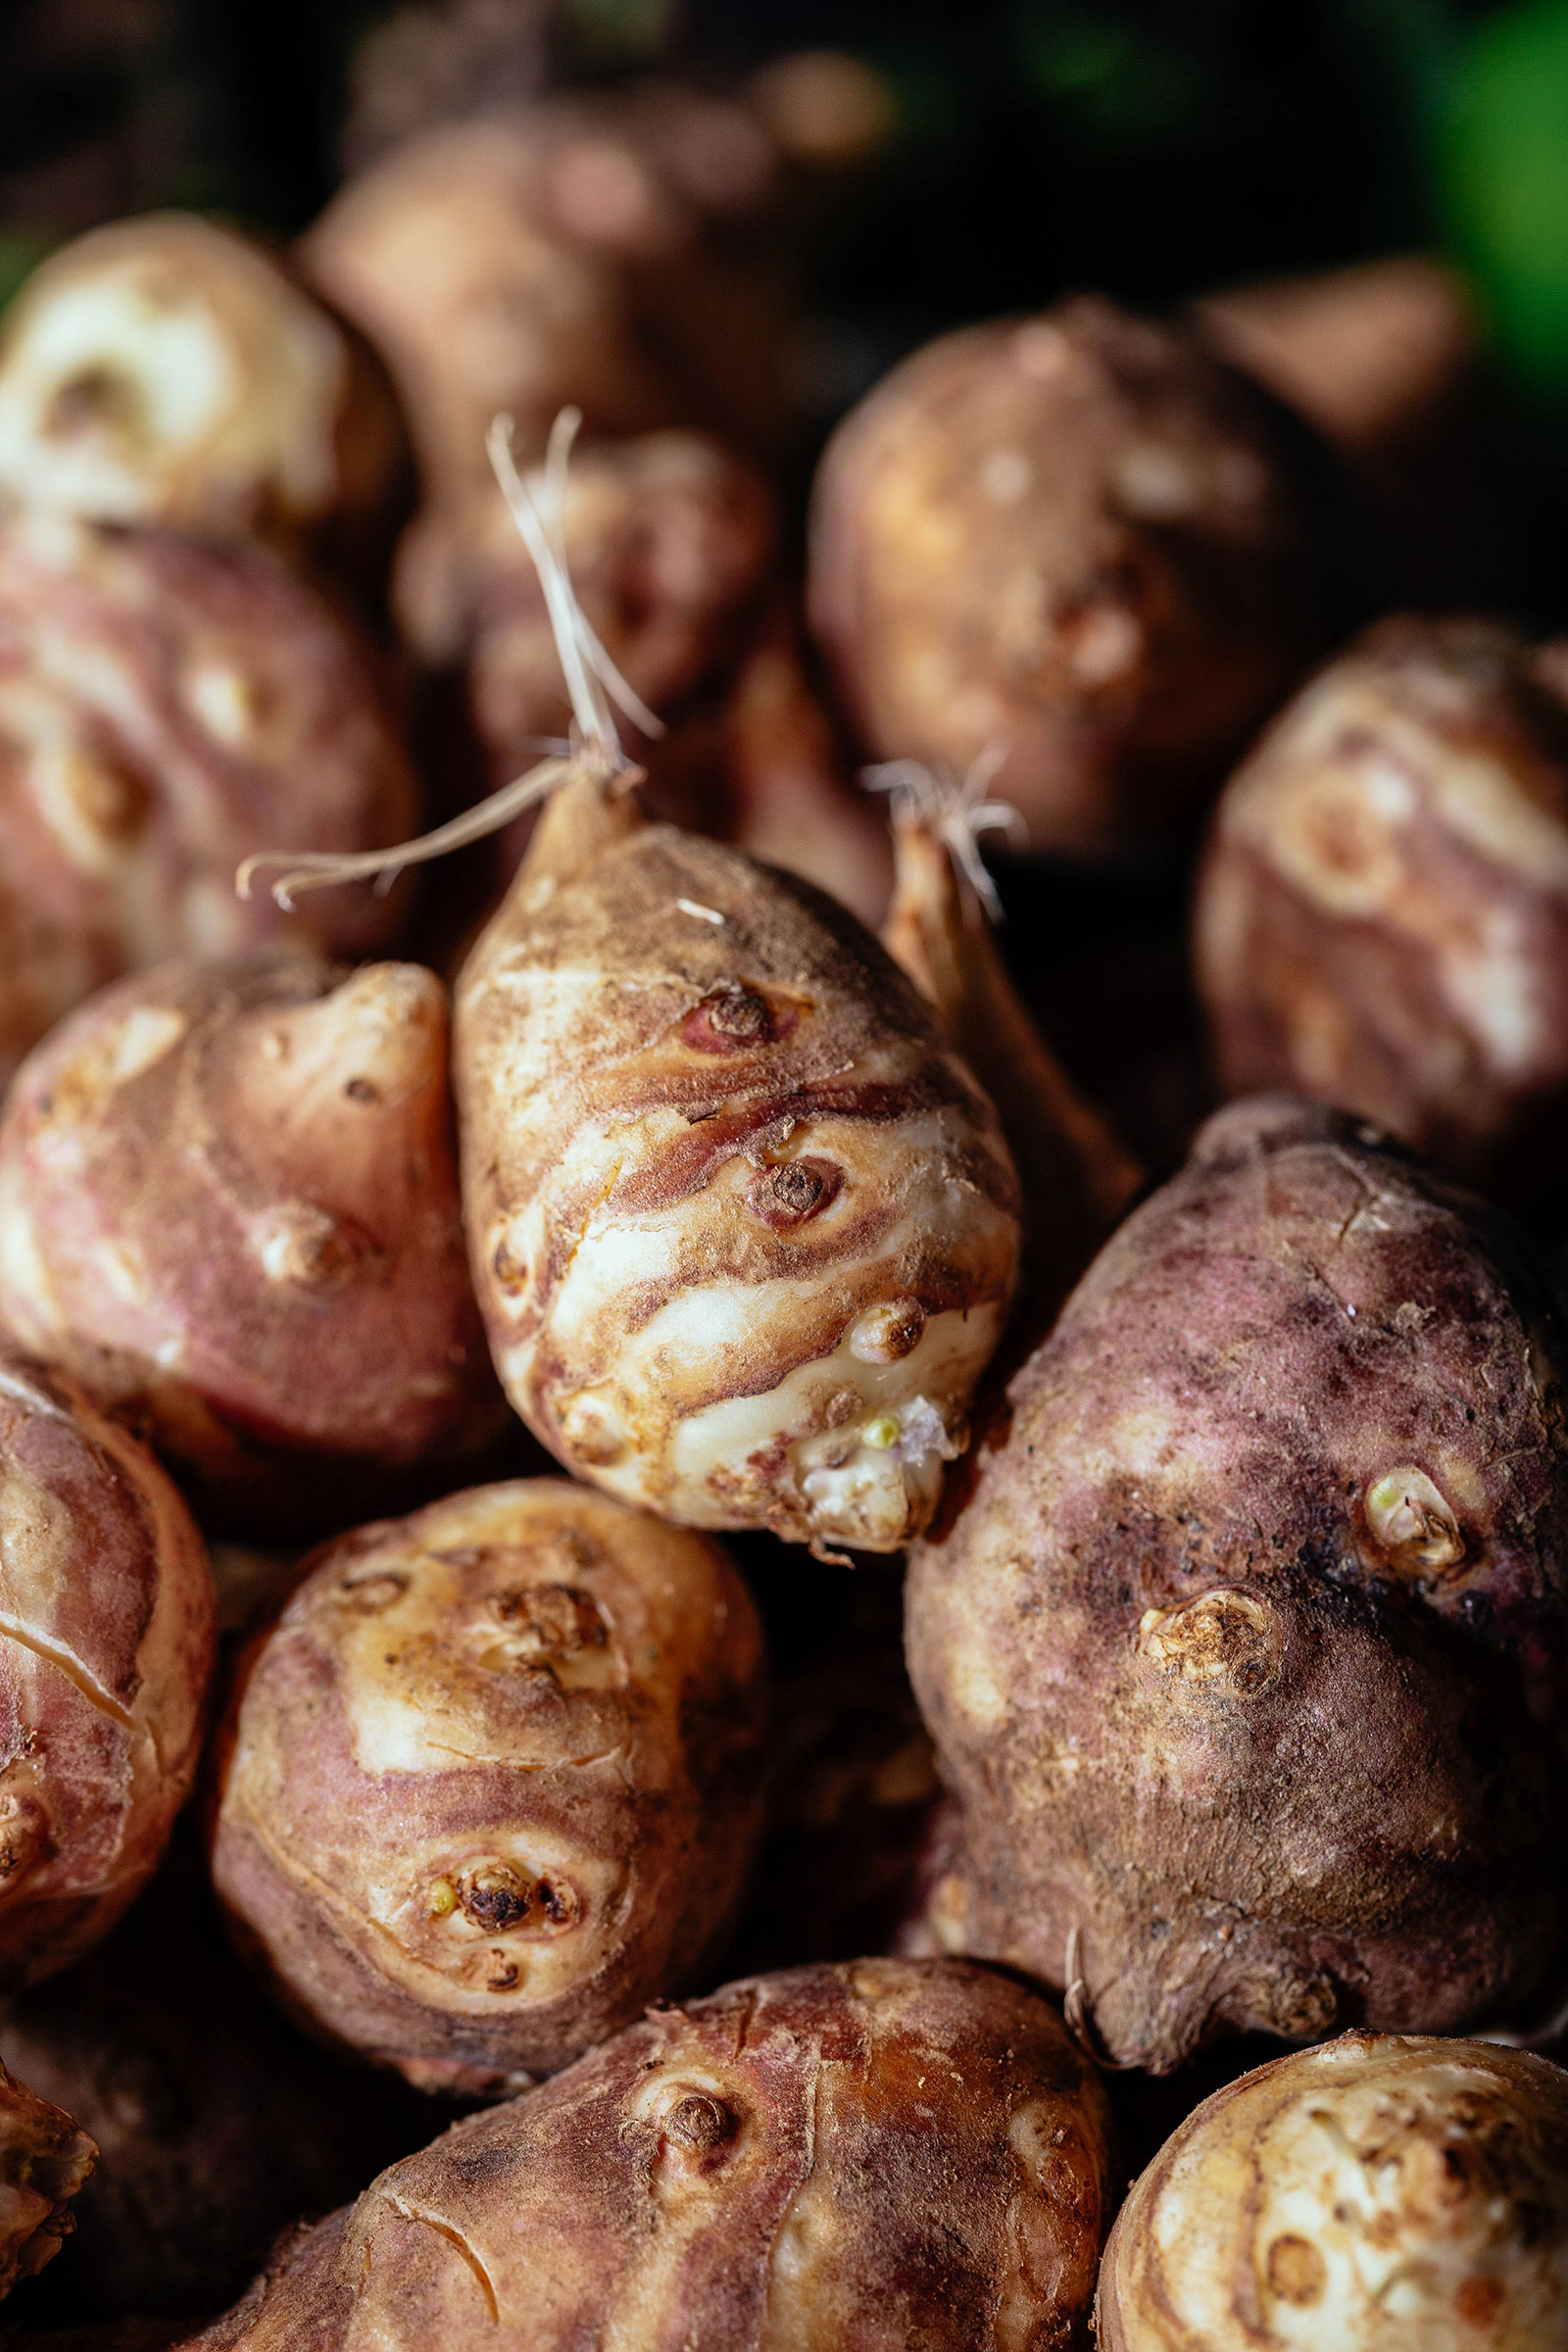
Most Jerusalem artichokes are white to tan in color, but a few cultivated varieties are deep pink to burgundy.
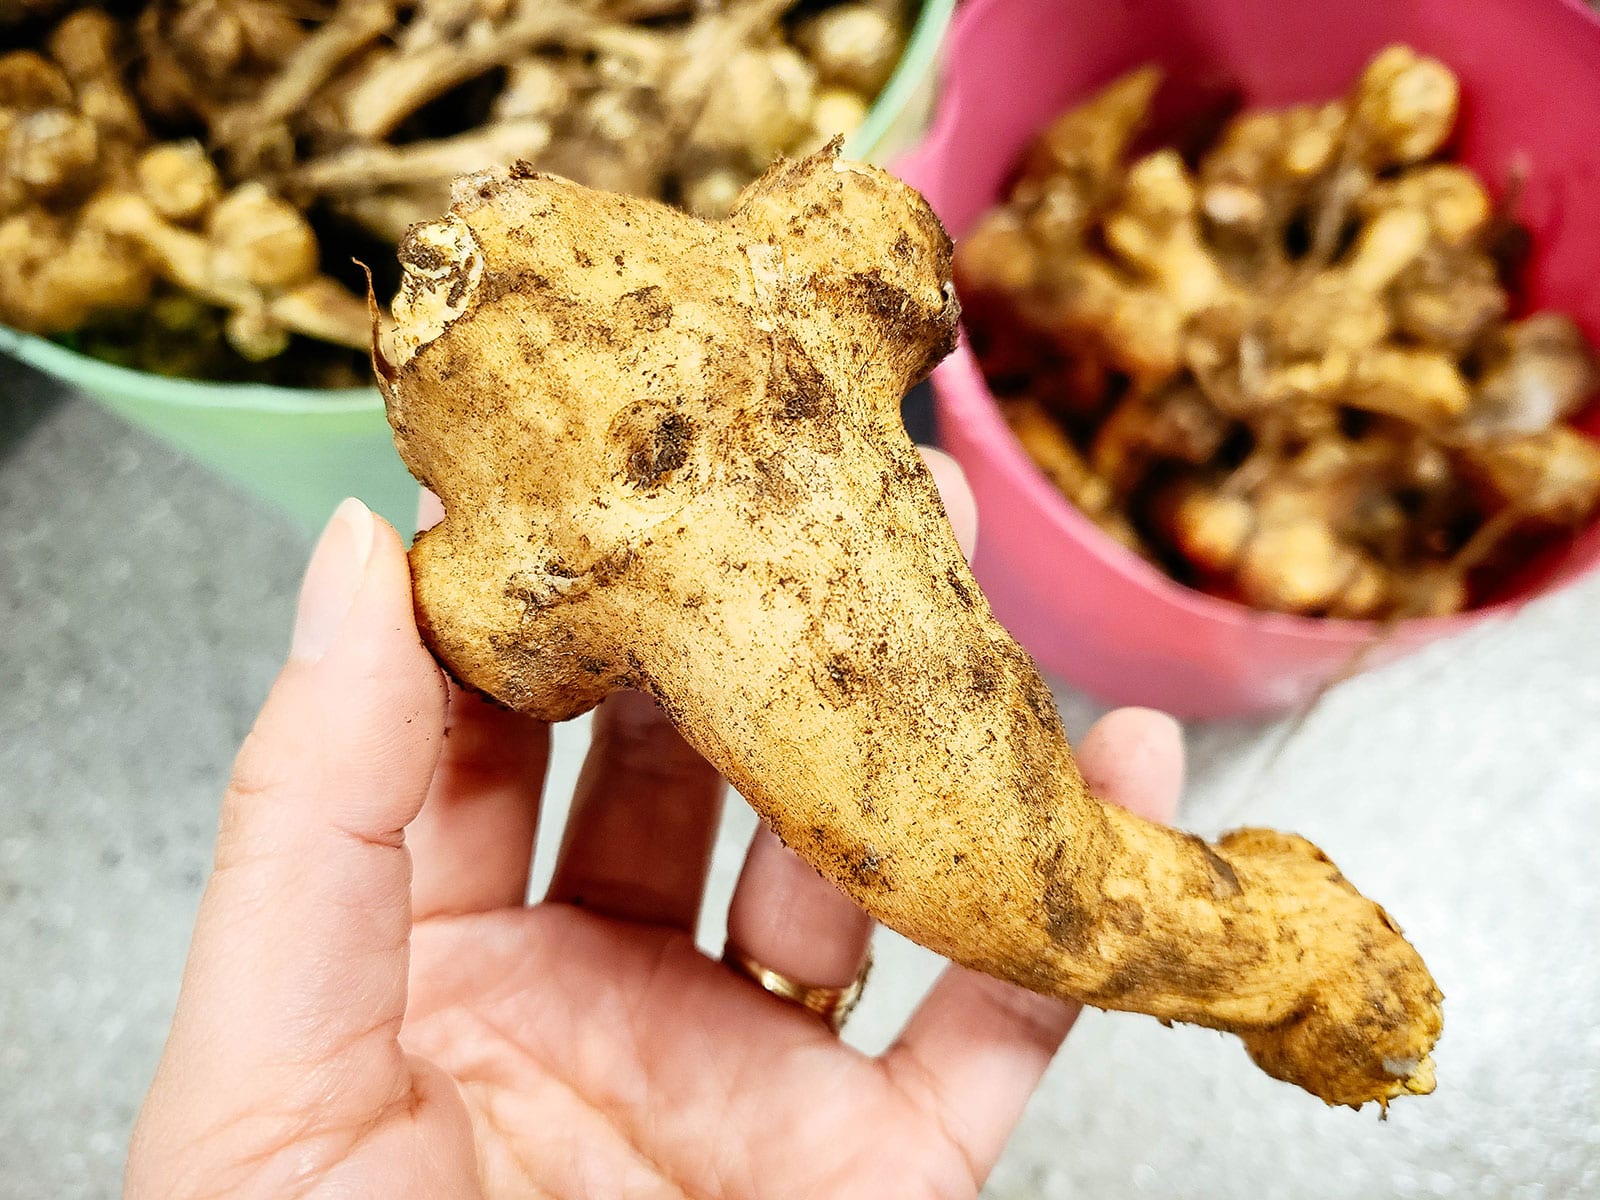
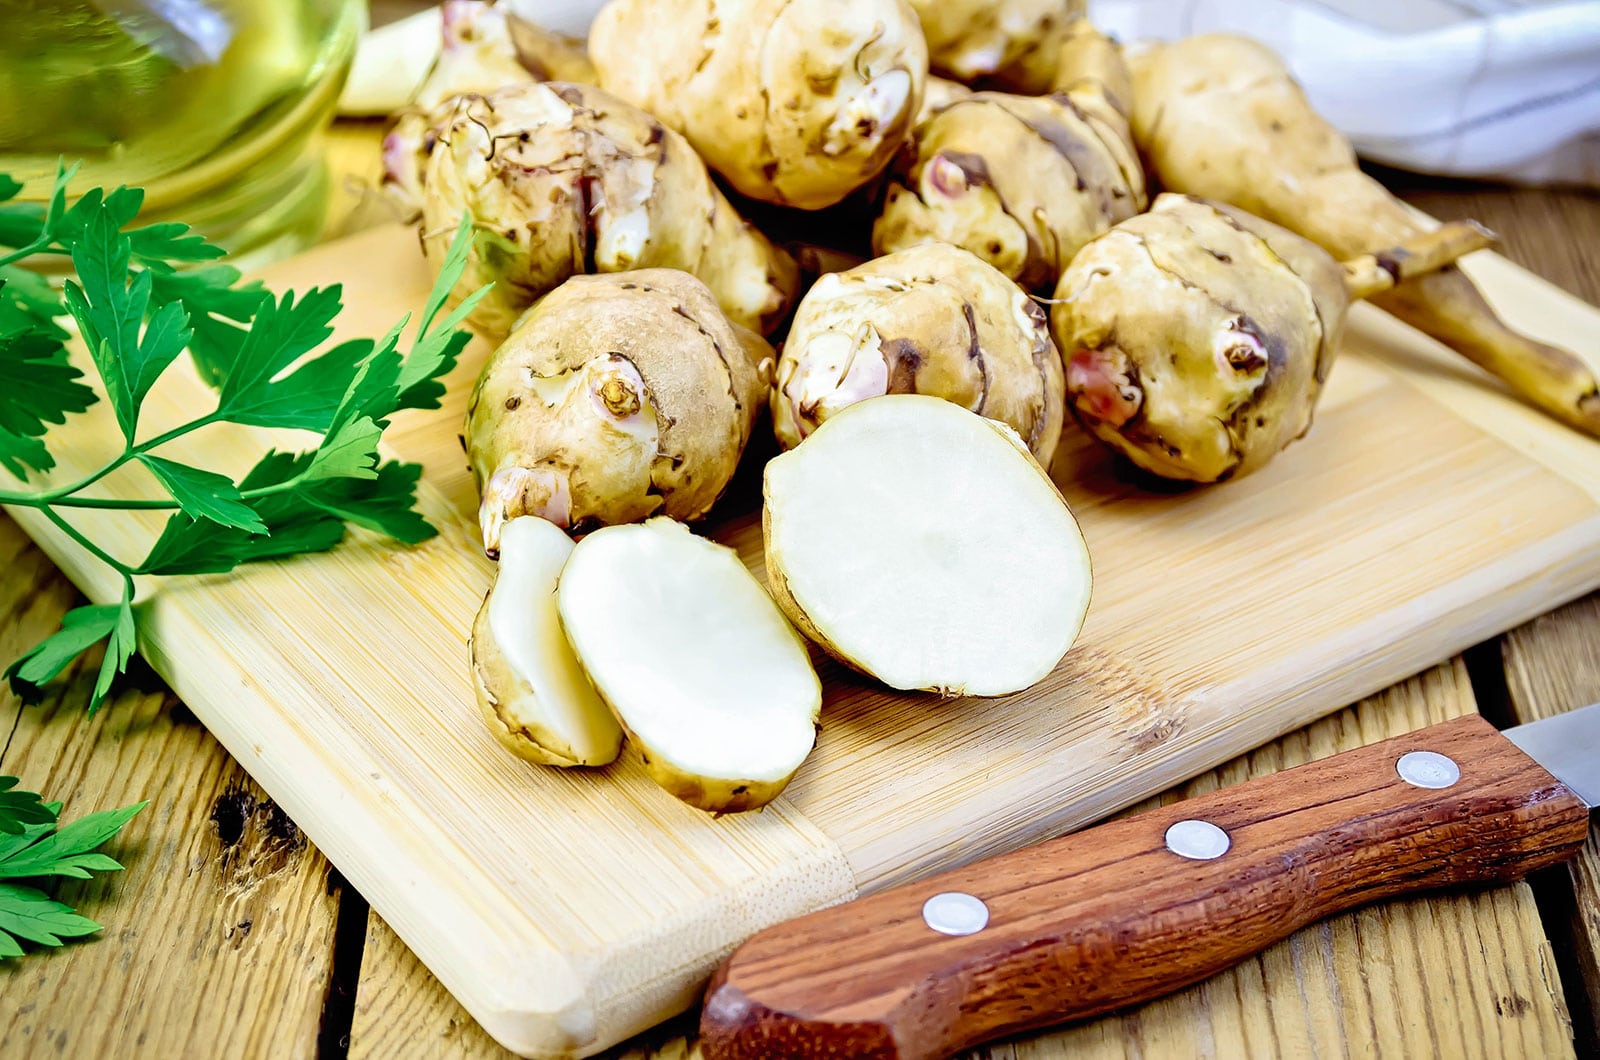
The tubers look like a cross between potatoes and ginger root, but with a crisp, jicama-like texture when eaten raw; a rich, starchy texture when cooked; and a flavor that varies slightly among different varieties, from mildly artichoke-ish to nutty to earthy.
When cooking, the Jerusalem artichoke is treated like a potato: you can roast it, bake it, saute it, mash it, or add it to your soup. It’s a soft, slightly nutty alternative to potatoes, with fewer calories and a lower glycemic index.
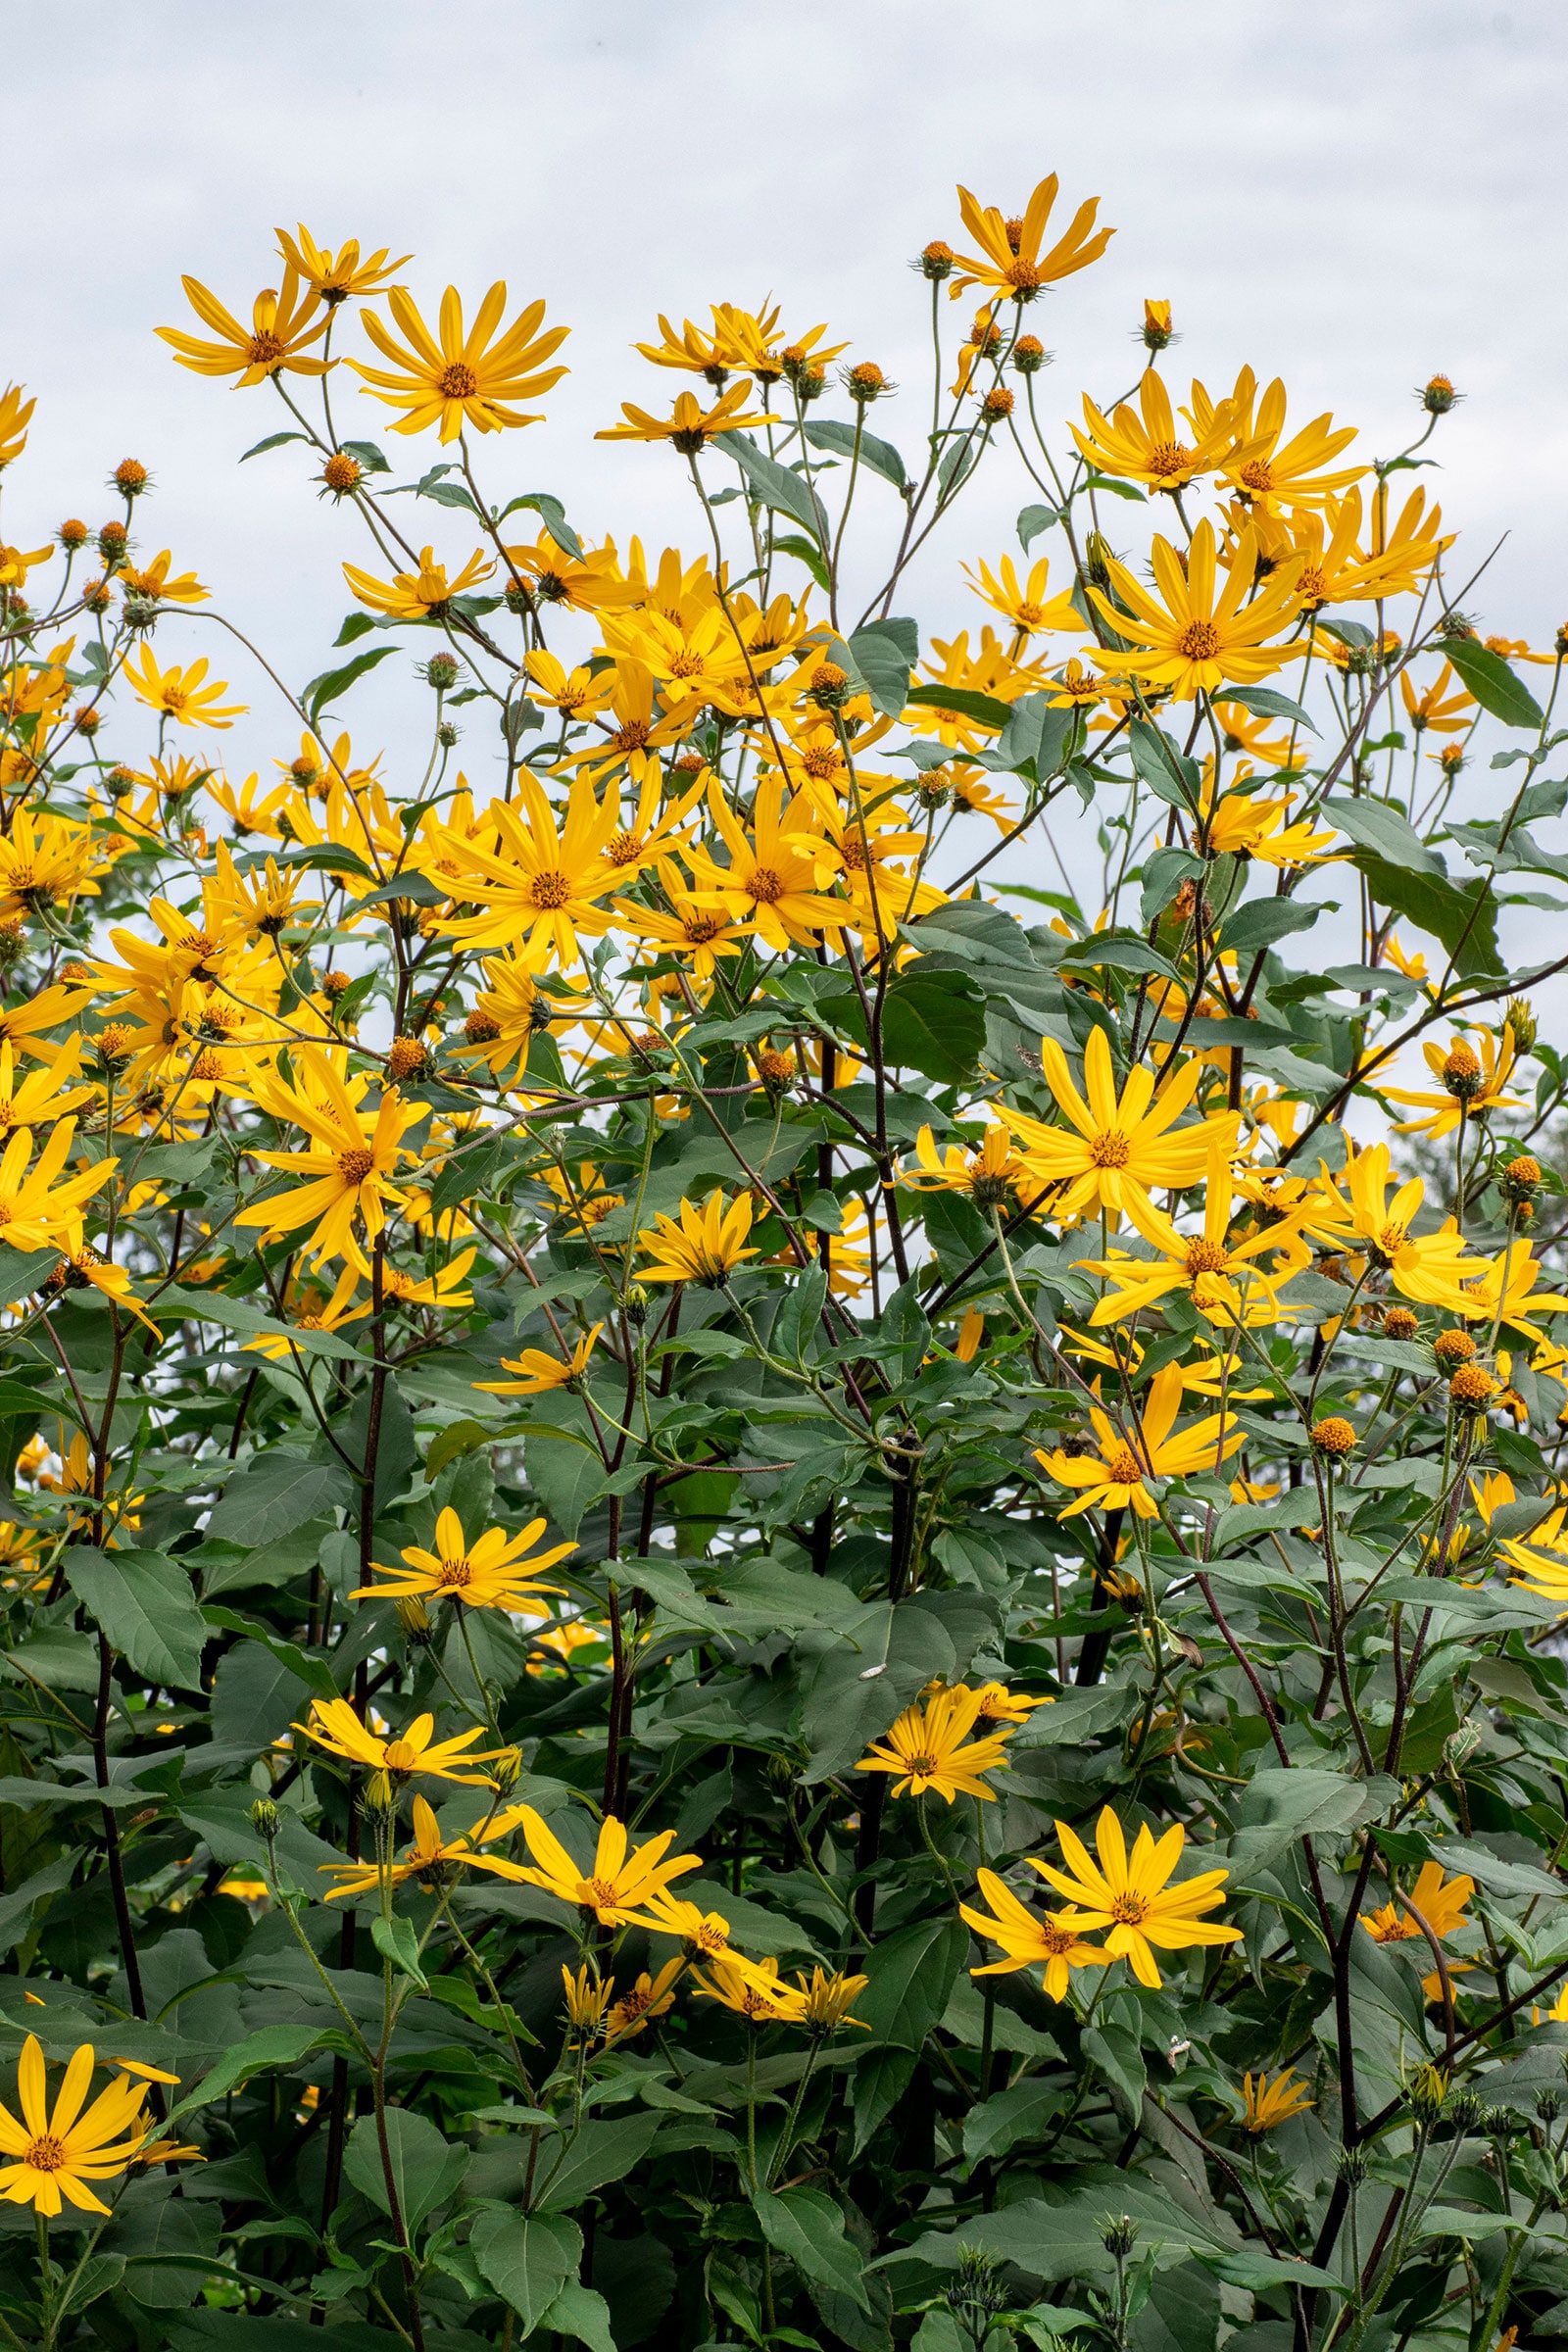
As a perennial plant, it thrives in zones 3 to 8. All summer long, it produces thick, sturdy stems that can grow over 10 feet tall above ground, while forming fleshy tubers below ground that can be dug and harvested in fall.
Most plants produce loads of cheerful yellow flowers in late summer to early fall, but I’ll say that in my Zone 5 microclimate, my own (very healthy) plants rarely flower before I get around to harvesting them.
And that’s okay! A lack of flowers does not affect tuber development at all.
Where to get Jerusalem artichoke tubers
You’ve probably seen Jerusalem artichokes in the grocery store and never paid much attention to them. Sometimes they’re sold as individual tubers, and sometimes they’re sold by the pound in plastic bags or cellophane-wrapped packages.
These sunchokes are usually unnamed, and you can simply buy them from the grocery store or farmers’ market and plant them in your garden. Their season is from fall through early spring, so you’re not likely to find them after April.
Related: How to transplant “living herbs” from the grocery store and make more plants
However, some seed catalogs now carry superior selections of sunchokes that have characteristics unique to that strain. They vary by root shape, skin color, and maturation time.
For example, Stampede is a very prolific, winter-hardy, early-maturing variety with round, crisp tubers weighing 1/2 pound each.
Dwarf Sunray is a more compact variety with smoother, thin-skinned tubers that don’t require peeling. (I chose this variety for my own garden because it produces masses of tubers around a central stem, so I don’t have to dig around so much to find them. This one is a great choice for containers as well as smaller beds where you want to control their spread.)
And if you’re looking to add some color to your meals, Red Fuseau is a stunning cultivar with its large magenta tubers.
Not all of these tubers look the same or taste the same, but the taste is somewhat similar across all varieties, and their flavor sweetens after frost.
Quick Tip
When buying tubers to plant, choose varieties that have very short, 4- to 8-inch stolons (runners that the tubers grow on).
Short stolons (such as those on Dwarf Sunray) cluster the tubers close together around the stalk, right at the root ball. This makes harvesting super easy since you can pull up the stalk and collect all the tubers at once.
Other varieties might have stolons that reach more than a foot, so the tubers spread in all directions and you have to go digging for them in the soil, making them easy to miss (and more likely to spread uncontrolled).
Disclosure: If you shop from my article or make a purchase through one of my links, I may receive commissions on some of the products I recommend.
Here are a few online sources where you can buy Jerusalem artichokes to plant:
- Yumheart (this is where I purchased my Dwarf Sunray tubers)
- Hudson Valley Seed Company
- Peaceful Valley Farm & Garden
Jerusalem artichokes are popular in permaculture gardens, so you might even be able to get some tubers from a fellow gardener after they harvest.
You don’t need more than a few tubers to get started, since the crop multiplies so easily… Some people might say too easily, as it can take over a garden bed if not harvested every year.
Jerusalem artichoke is a very enthusiastic perennializer if you don’t keep up with it, to the point of being almost invasive.
Don’t let that scare you off though. Just go for varieties with short stolons, give the plants plenty of space, remove the flower heads before they go to seed, and make sure you harvest as many tubers as possible to keep growth in check. (If you’ve ever grown potatoes, you know how it goes.)
For my family of four, I planted five tubers and that’s plenty to go around with enough to share.
Planting Jerusalem artichokes
Jerusalem artichokes can grow almost anywhere, but they’ll do best in full sun and well-drained soil with a lot of organic matter.
New plants can be started anytime in late winter to early spring (as long as the soil is workable) for a fall harvest. Optimal soil temperature for planting is between 50°F and 60°F and they need an 18- to 20-week frost-free growing period to produce a good-size crop.
You can also plant tubers in fall and let them overwinter (they’ll start growing in spring). If you live in a warmer region, it’s even possible to plant tubers in fall for a spring harvest.
Read more: Download this custom planting calendar based on your last and first frost dates
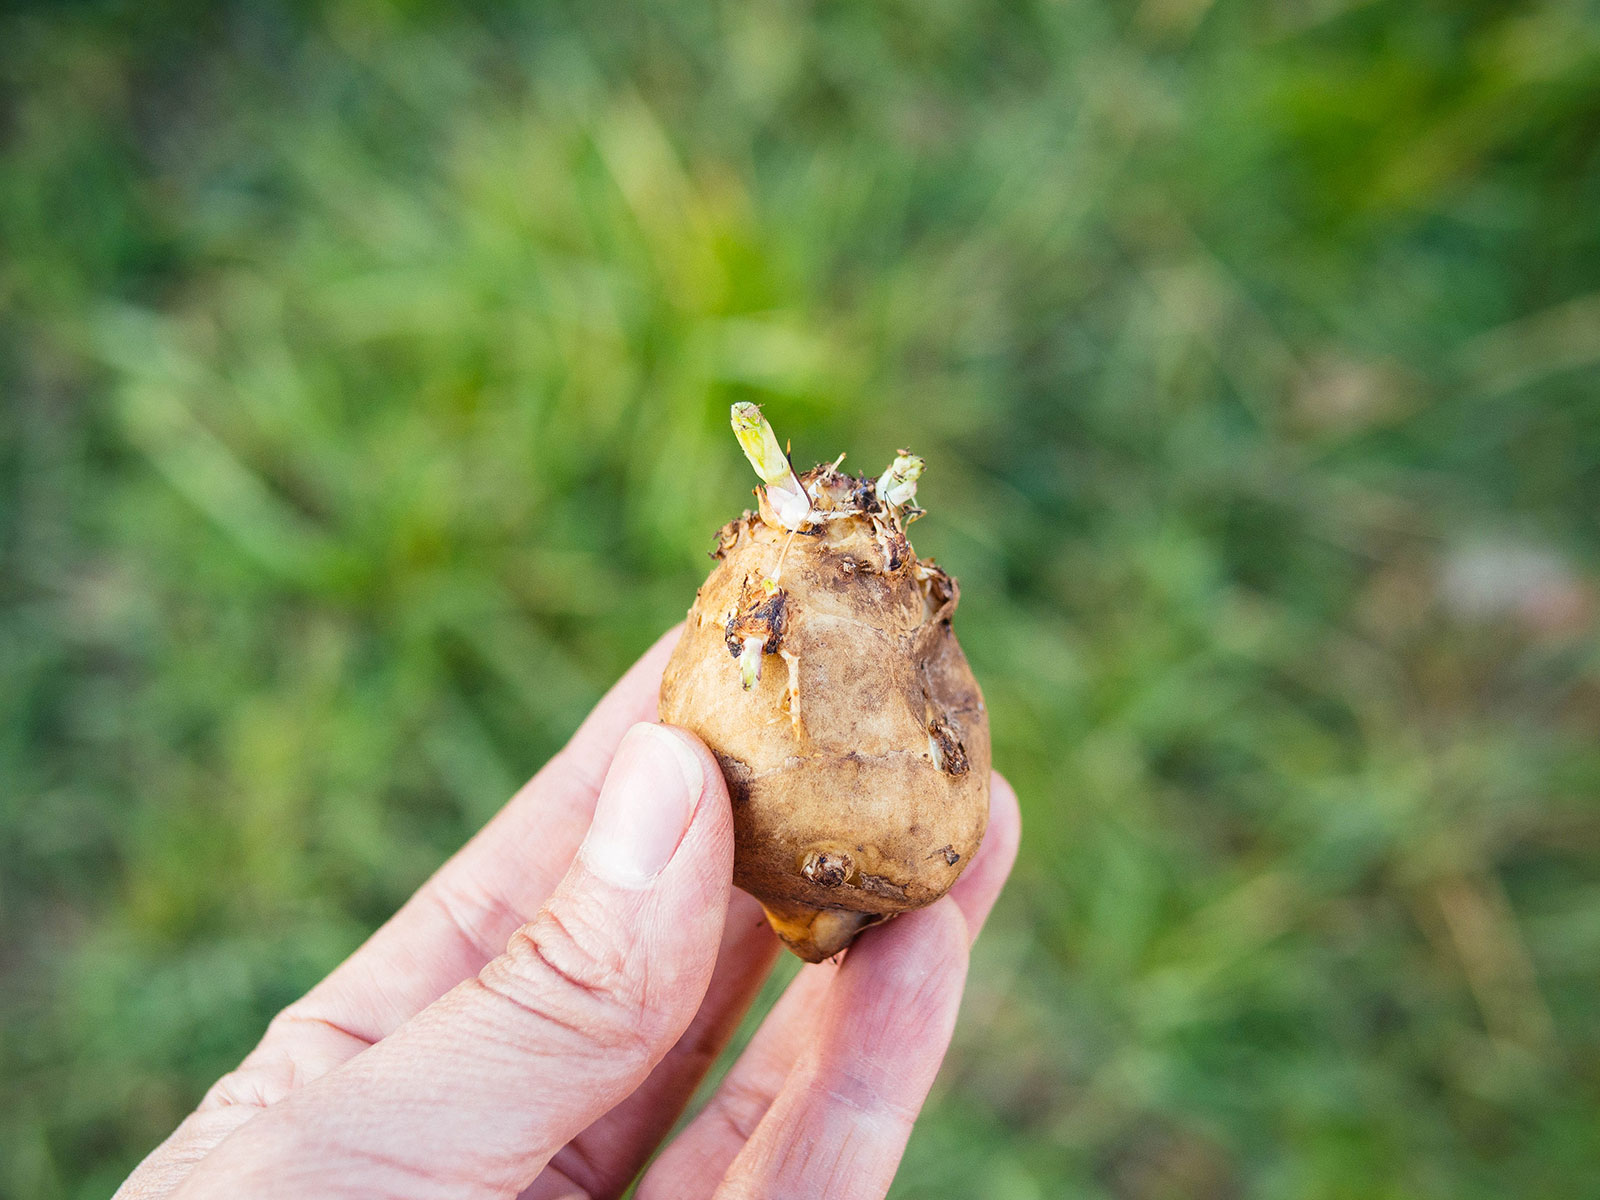
You can grow Jerusalem artichokes from whole or partial tubers, as long as each tuber or section has at least two to three eyes (growing nodes) per piece. They lose moisture quickly when they’re not in the ground, so don’t let the pieces dry out before planting.
The tubers can be planted in any direction, but if yours has already started sprouting, plant them with the sprouts pointing up. Be gentle and try not to break them off as you plant them in the ground.
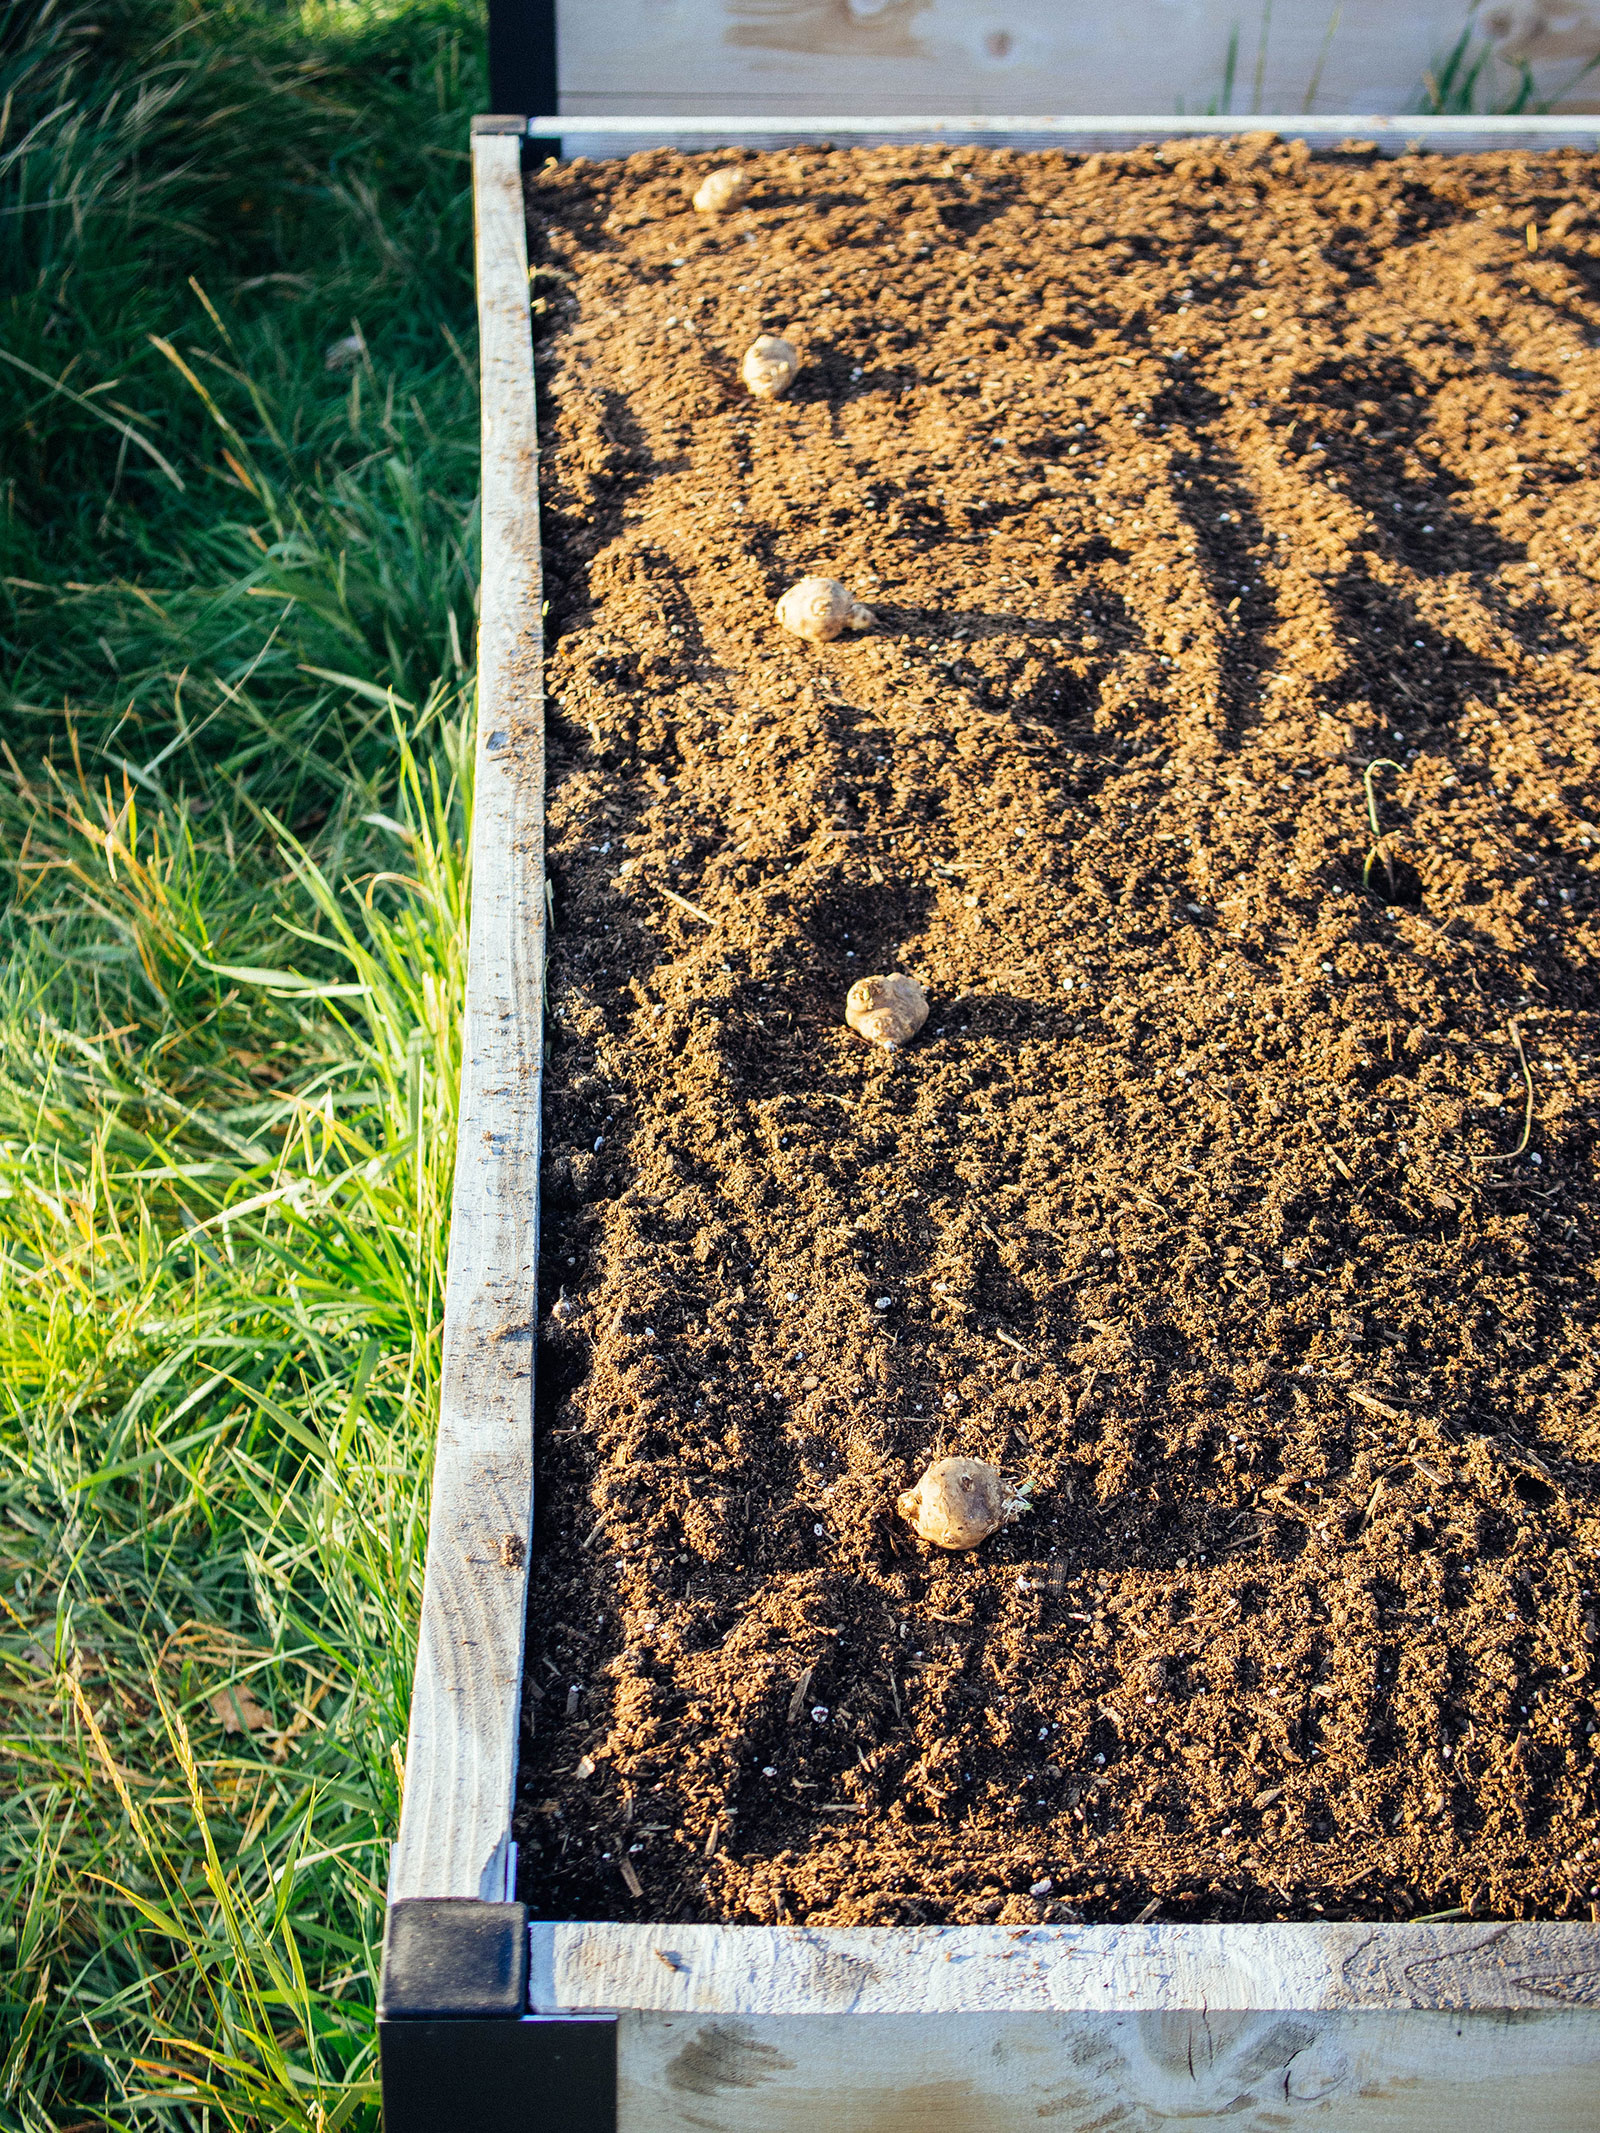
- Create a trench 4 to 6 inches deep in well-amended soil. (I recommend adding compost and kelp meal to the soil before planting.)
- Plant the tubers 12 to 18 inches apart.
- Backfill the trench with soil and keep the soil evenly moist until the tubers sprout.
- Mulch the bed with 2 to 3 inches of organic matter.
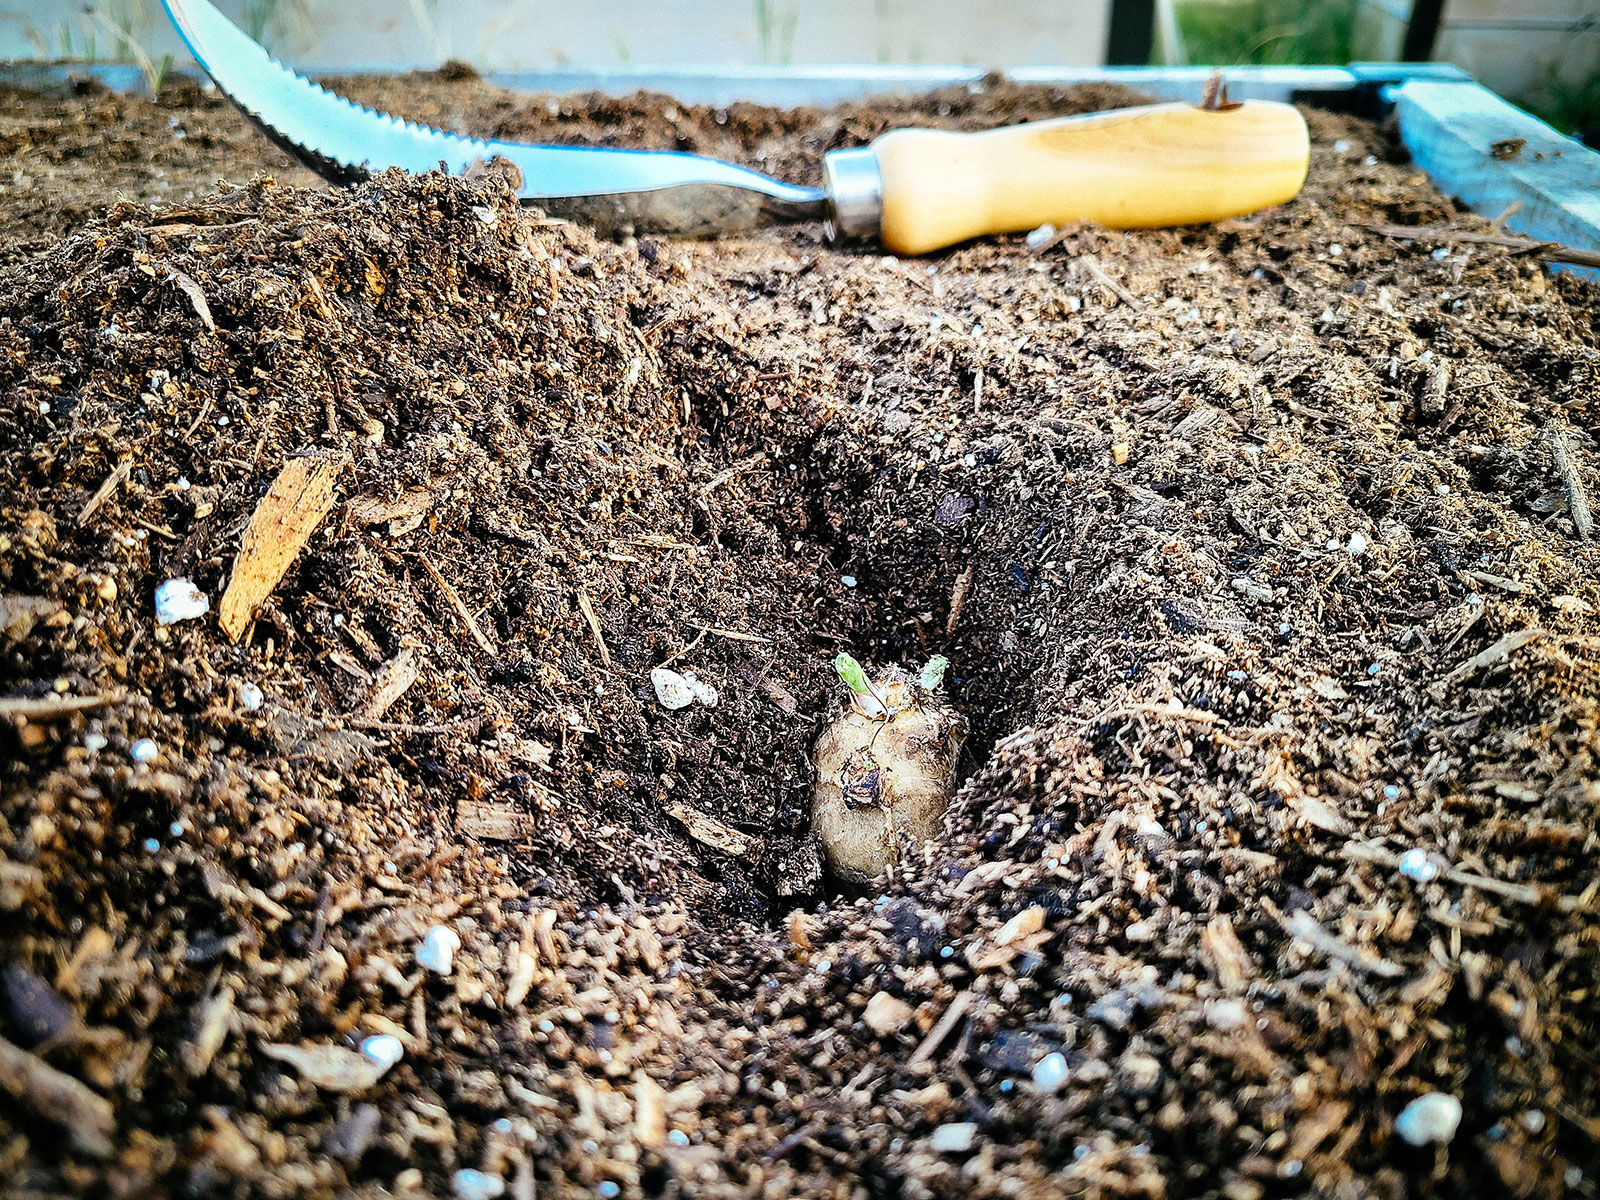
- Tubers should sprout in 7 to 14 days, as long as the soil temperature is between 65°F and 90°F.
The most important thing to remember is that Jerusalem artichokes need space. While the plants above ground don’t spread that wide, they do grow very tall (anywhere from 6 to 10 feet) and can shade neighboring plants. On the flip side, their towering height can act as a natural windbreak for sensitive plants.
You also need room to maneuver a garden fork and dig up the tubers in fall/winter, so if you can’t give these plants their own dedicated bed, keep them at least 3 feet away from other perennials.
I rotate my own Jerusalem artichokes between the rhubarb bed—which works great since both plants need ample space—and cover-cropped beds that I let “rest” for a season.
It sounds contradictory to plant in a bed that’s resting, but sunchoke tubers do an excellent job of punching through compacted soil. I just plant them along the edge (a single of row of three to five tubers is plenty).
What to do once the plants sprout
Jerusalem artichokes don’t like to be in waterlogged soil, so keep the moisture level moderate and consistent as they grow.
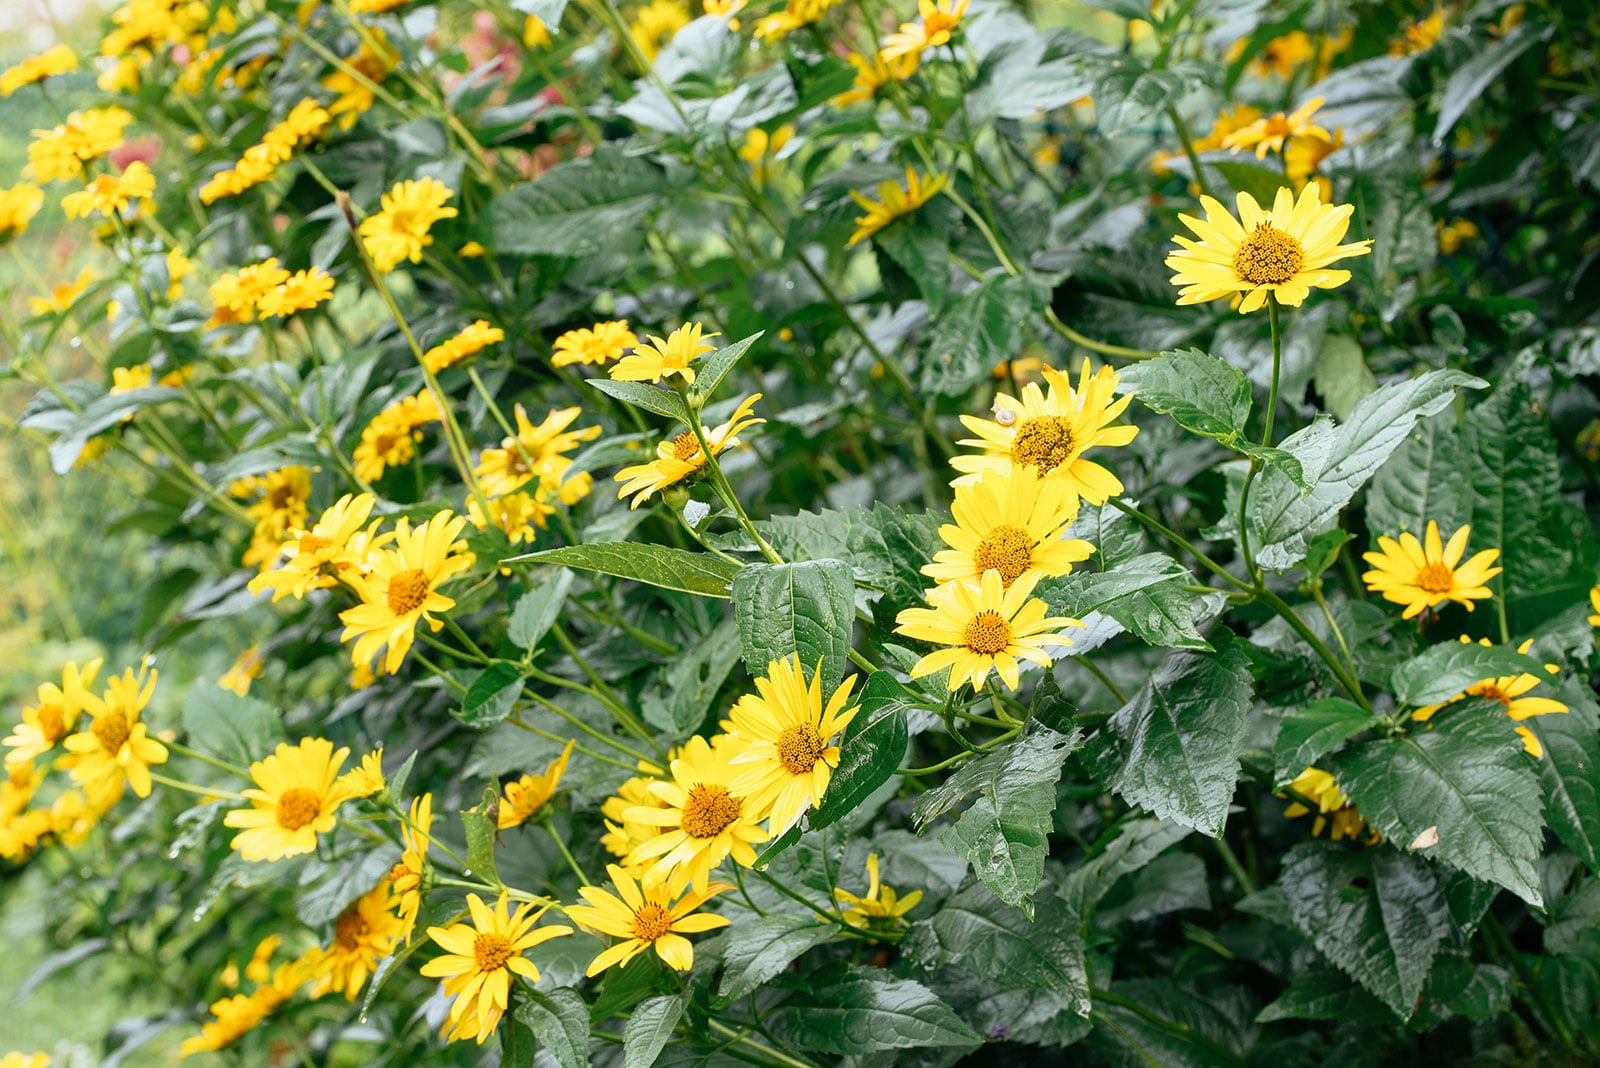
The plants are late bloomers, with flowers that open in August and September. It’s not unusual for some plants to bloom irregularly or not at all. But don’t worry—even without flowers, they’ll still produce delicious tubers.
As I mentioned previously, my own sunchoke plants rarely flower by the time I harvest them in late fall. I suspect it’s because of our late frost (typically in June), which results in the plants not sprouting until early summer. Once the first sprouts appear though, they really get going!
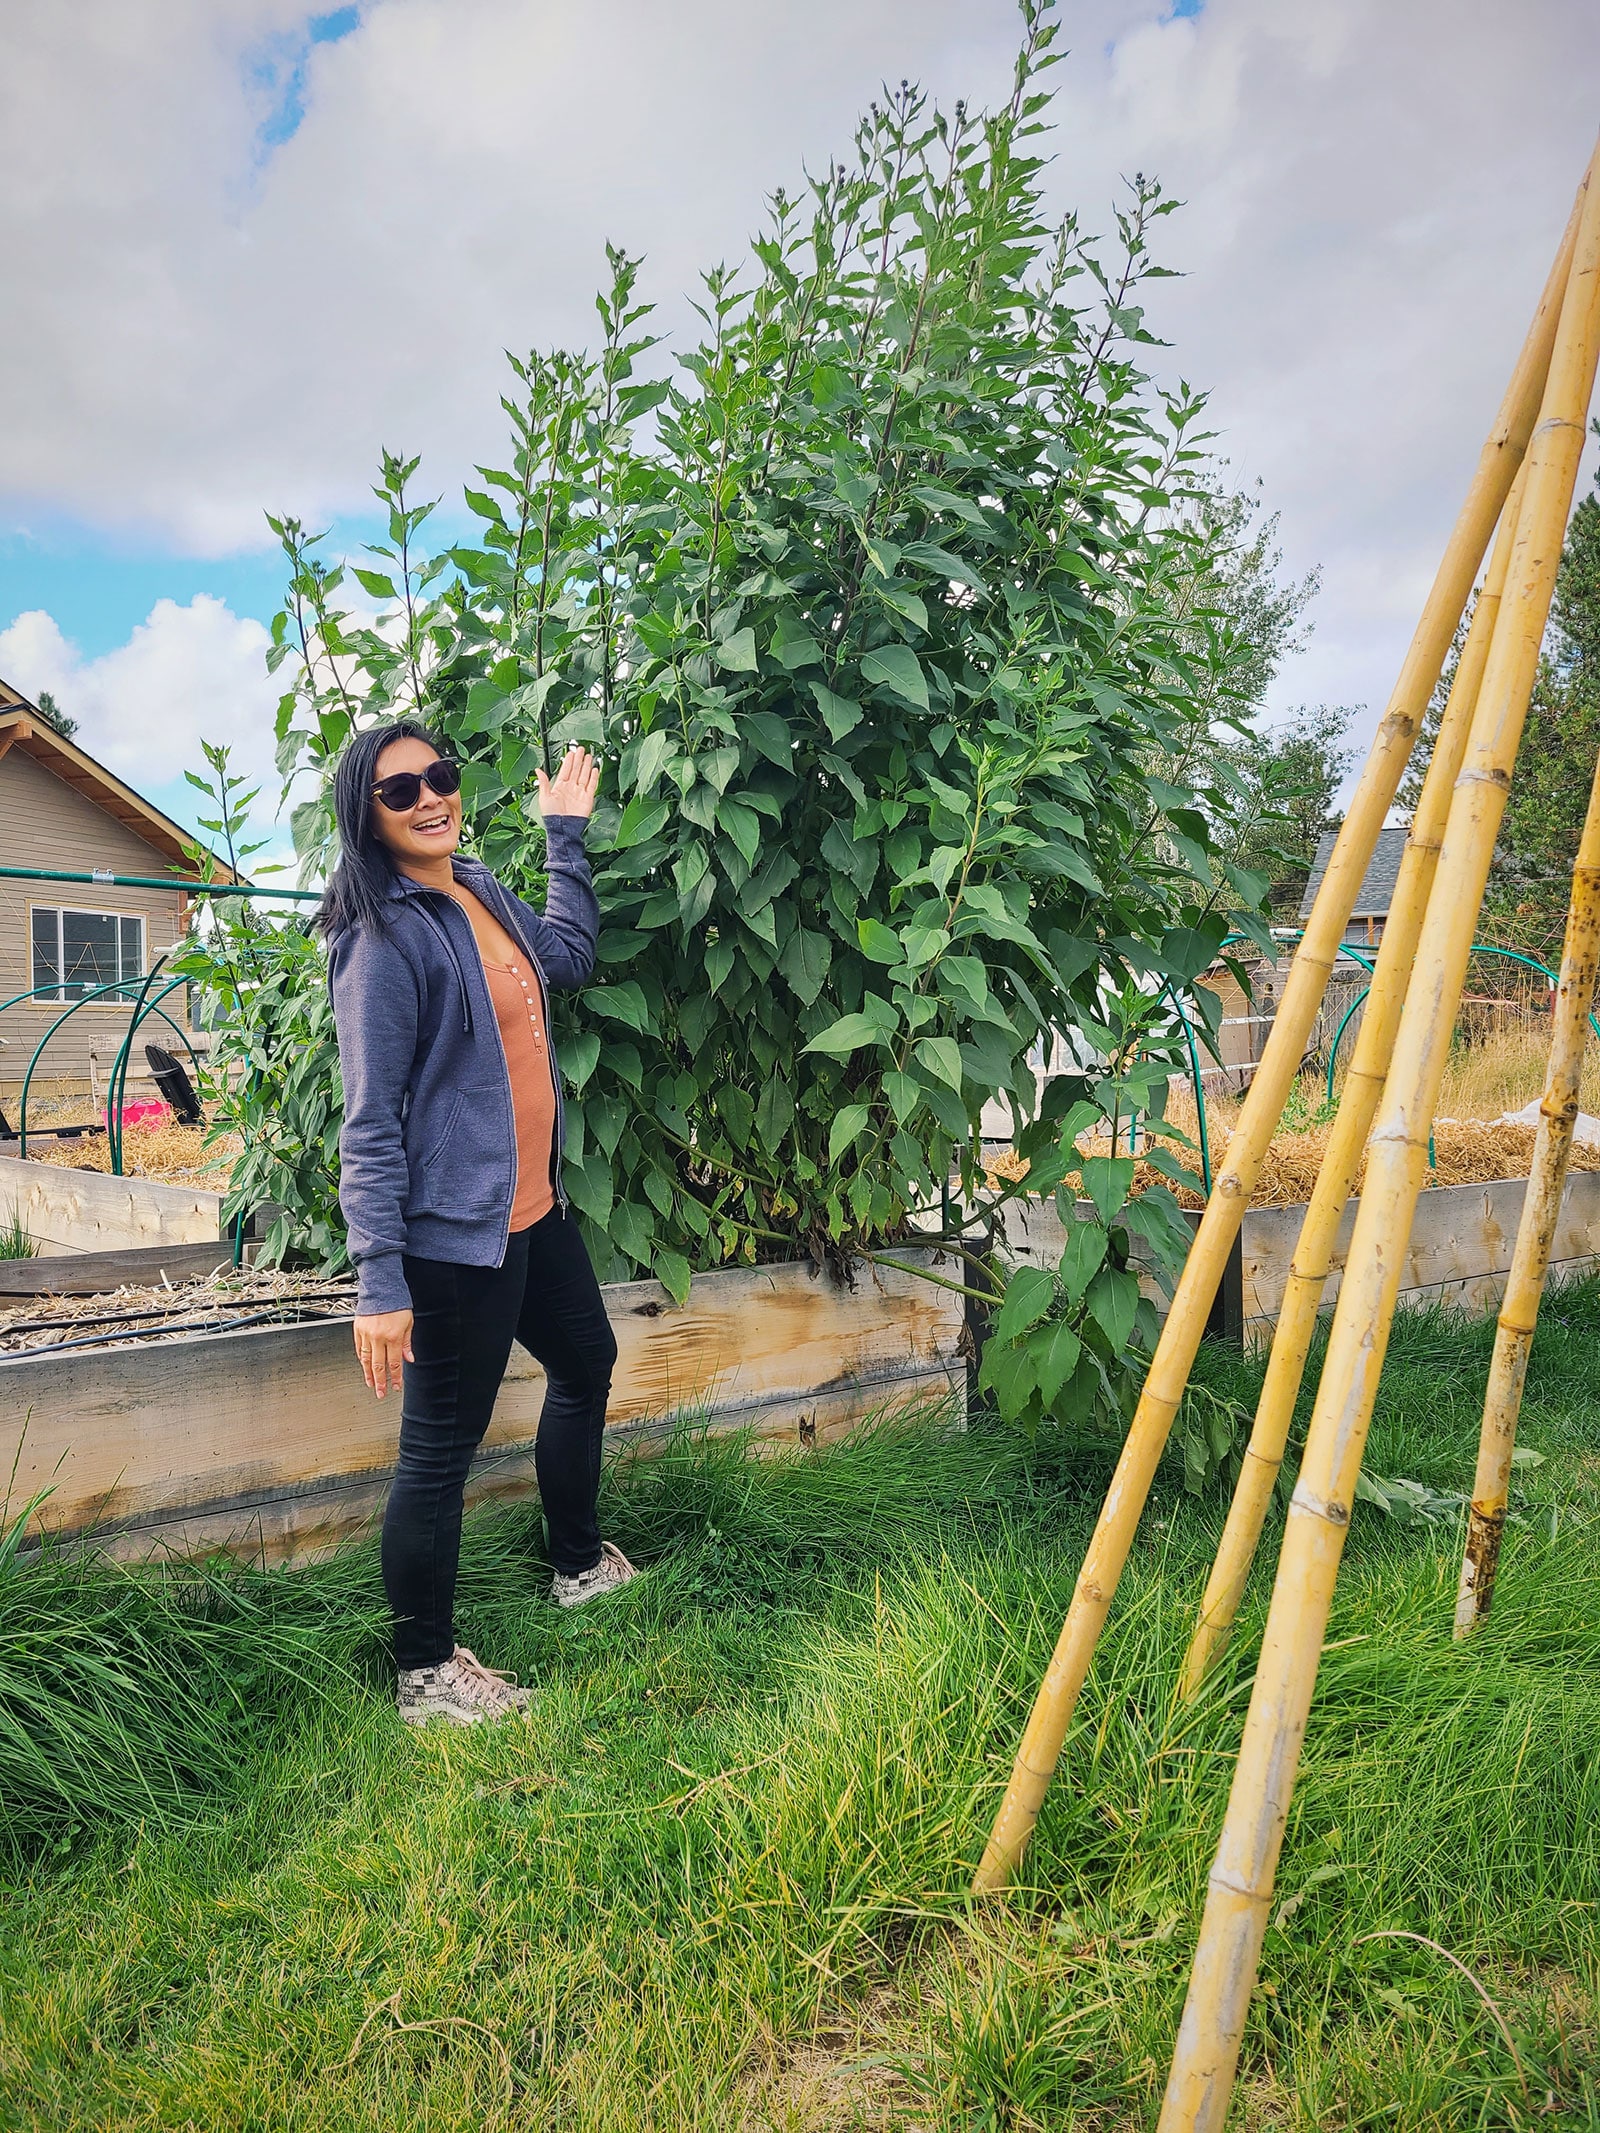
All summer long, sunchokes grow vigorously into 6- to 10-foot-tall plants (not unlike their sunflower cousins).
While the tall stalks usually stay fairly upright on their own, adding stakes or other supports is a good idea if you live in a windy area.
Or, try growing pole beans on the sunny side of your sunchokes. The vines will climb the sturdy stalks like a living trellis (similar to beans trained on corn stalks in a Three Sisters Garden).
You can harvest the flowers for cut flower arrangements before they go to seed. A benefit of this (besides making beautiful bouquets) is that without flowers, the plant can focus all of its energy into developing more and larger tubers.
Fertilize your sunchoke plants throughout the growing season, as needed, with an organic granular vegetable fertilizer or all-purpose fertilizer.
Harvesting Jerusalem artichokes
The flowers and stalks will naturally die back in fall. Wait until the stalks are mostly dried and harvest your Jerusalem artichokes after a few frosts, when the tubers are at least 3 inches long. (A good winter chill actually improves the flavor by concentrating the sugars in the tubers.)
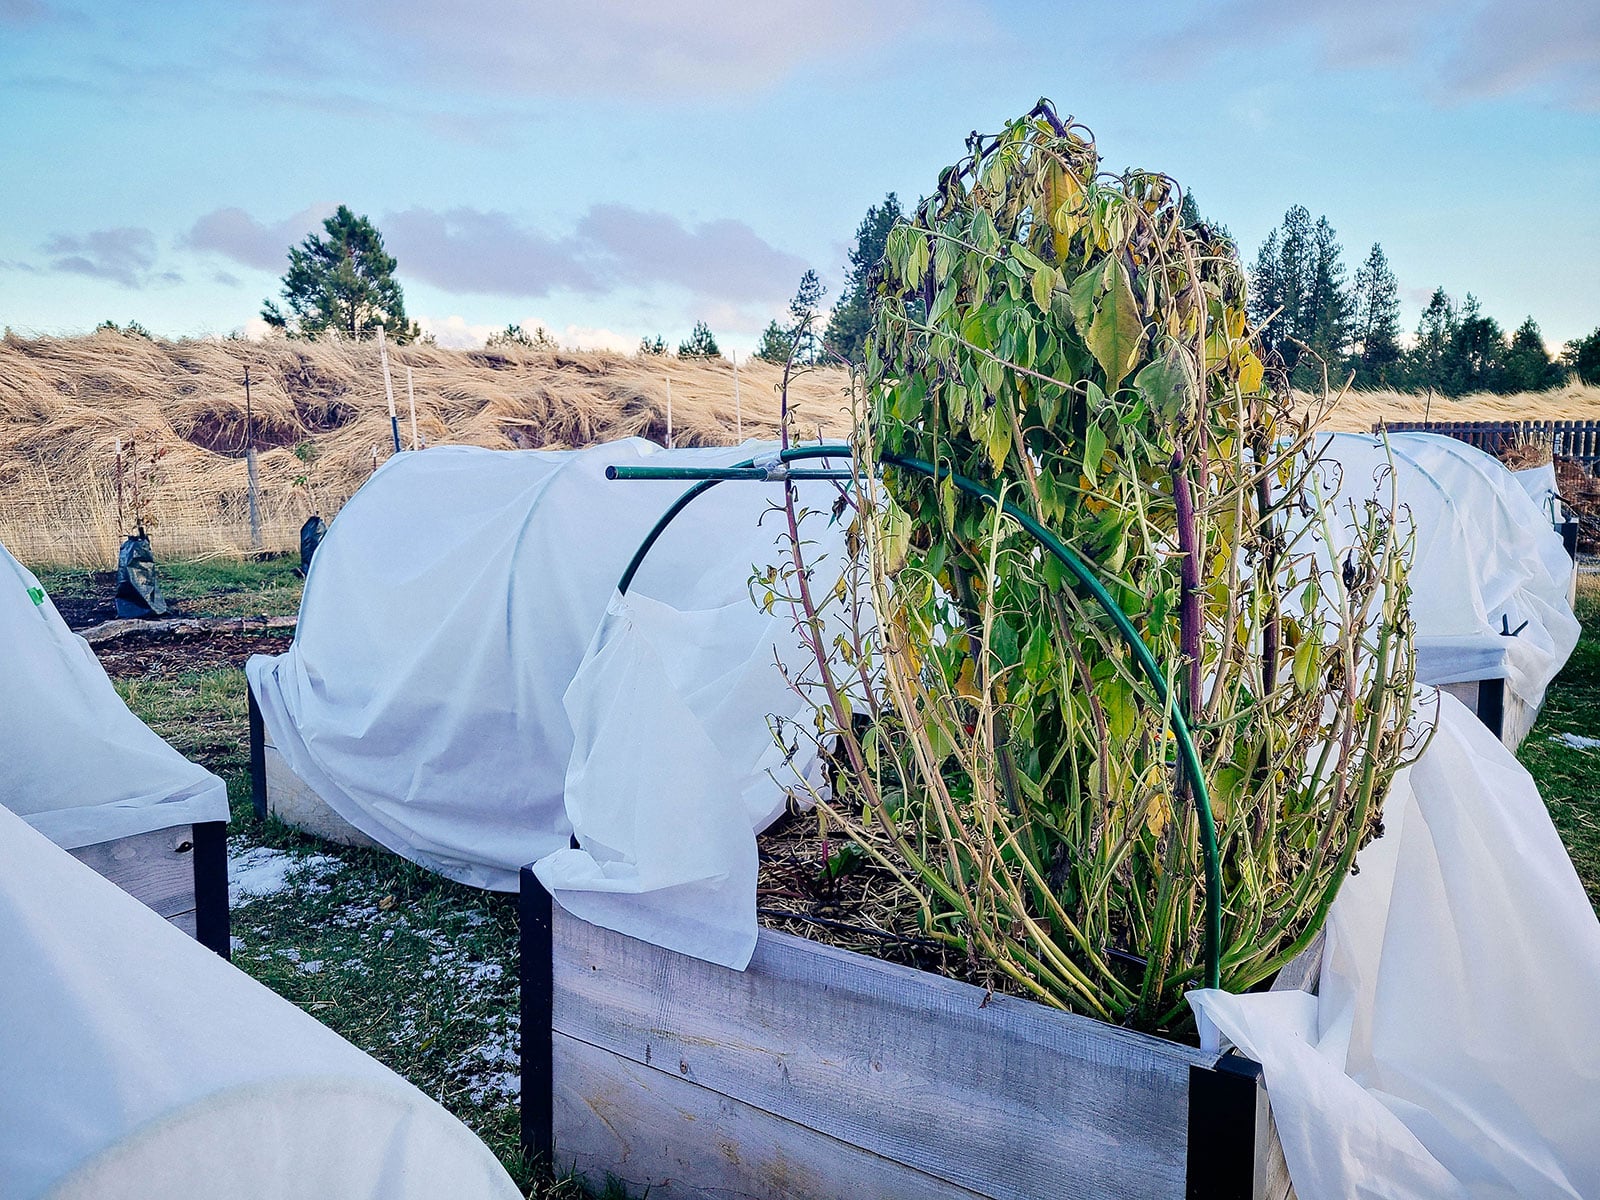
This is usually November in the northern hemisphere, but will depend on how severe your climate is. (Milder regions should aim to harvest in mid-winter.) Generally anytime between late autumn and late winter, you can dig up the tubers to eat.
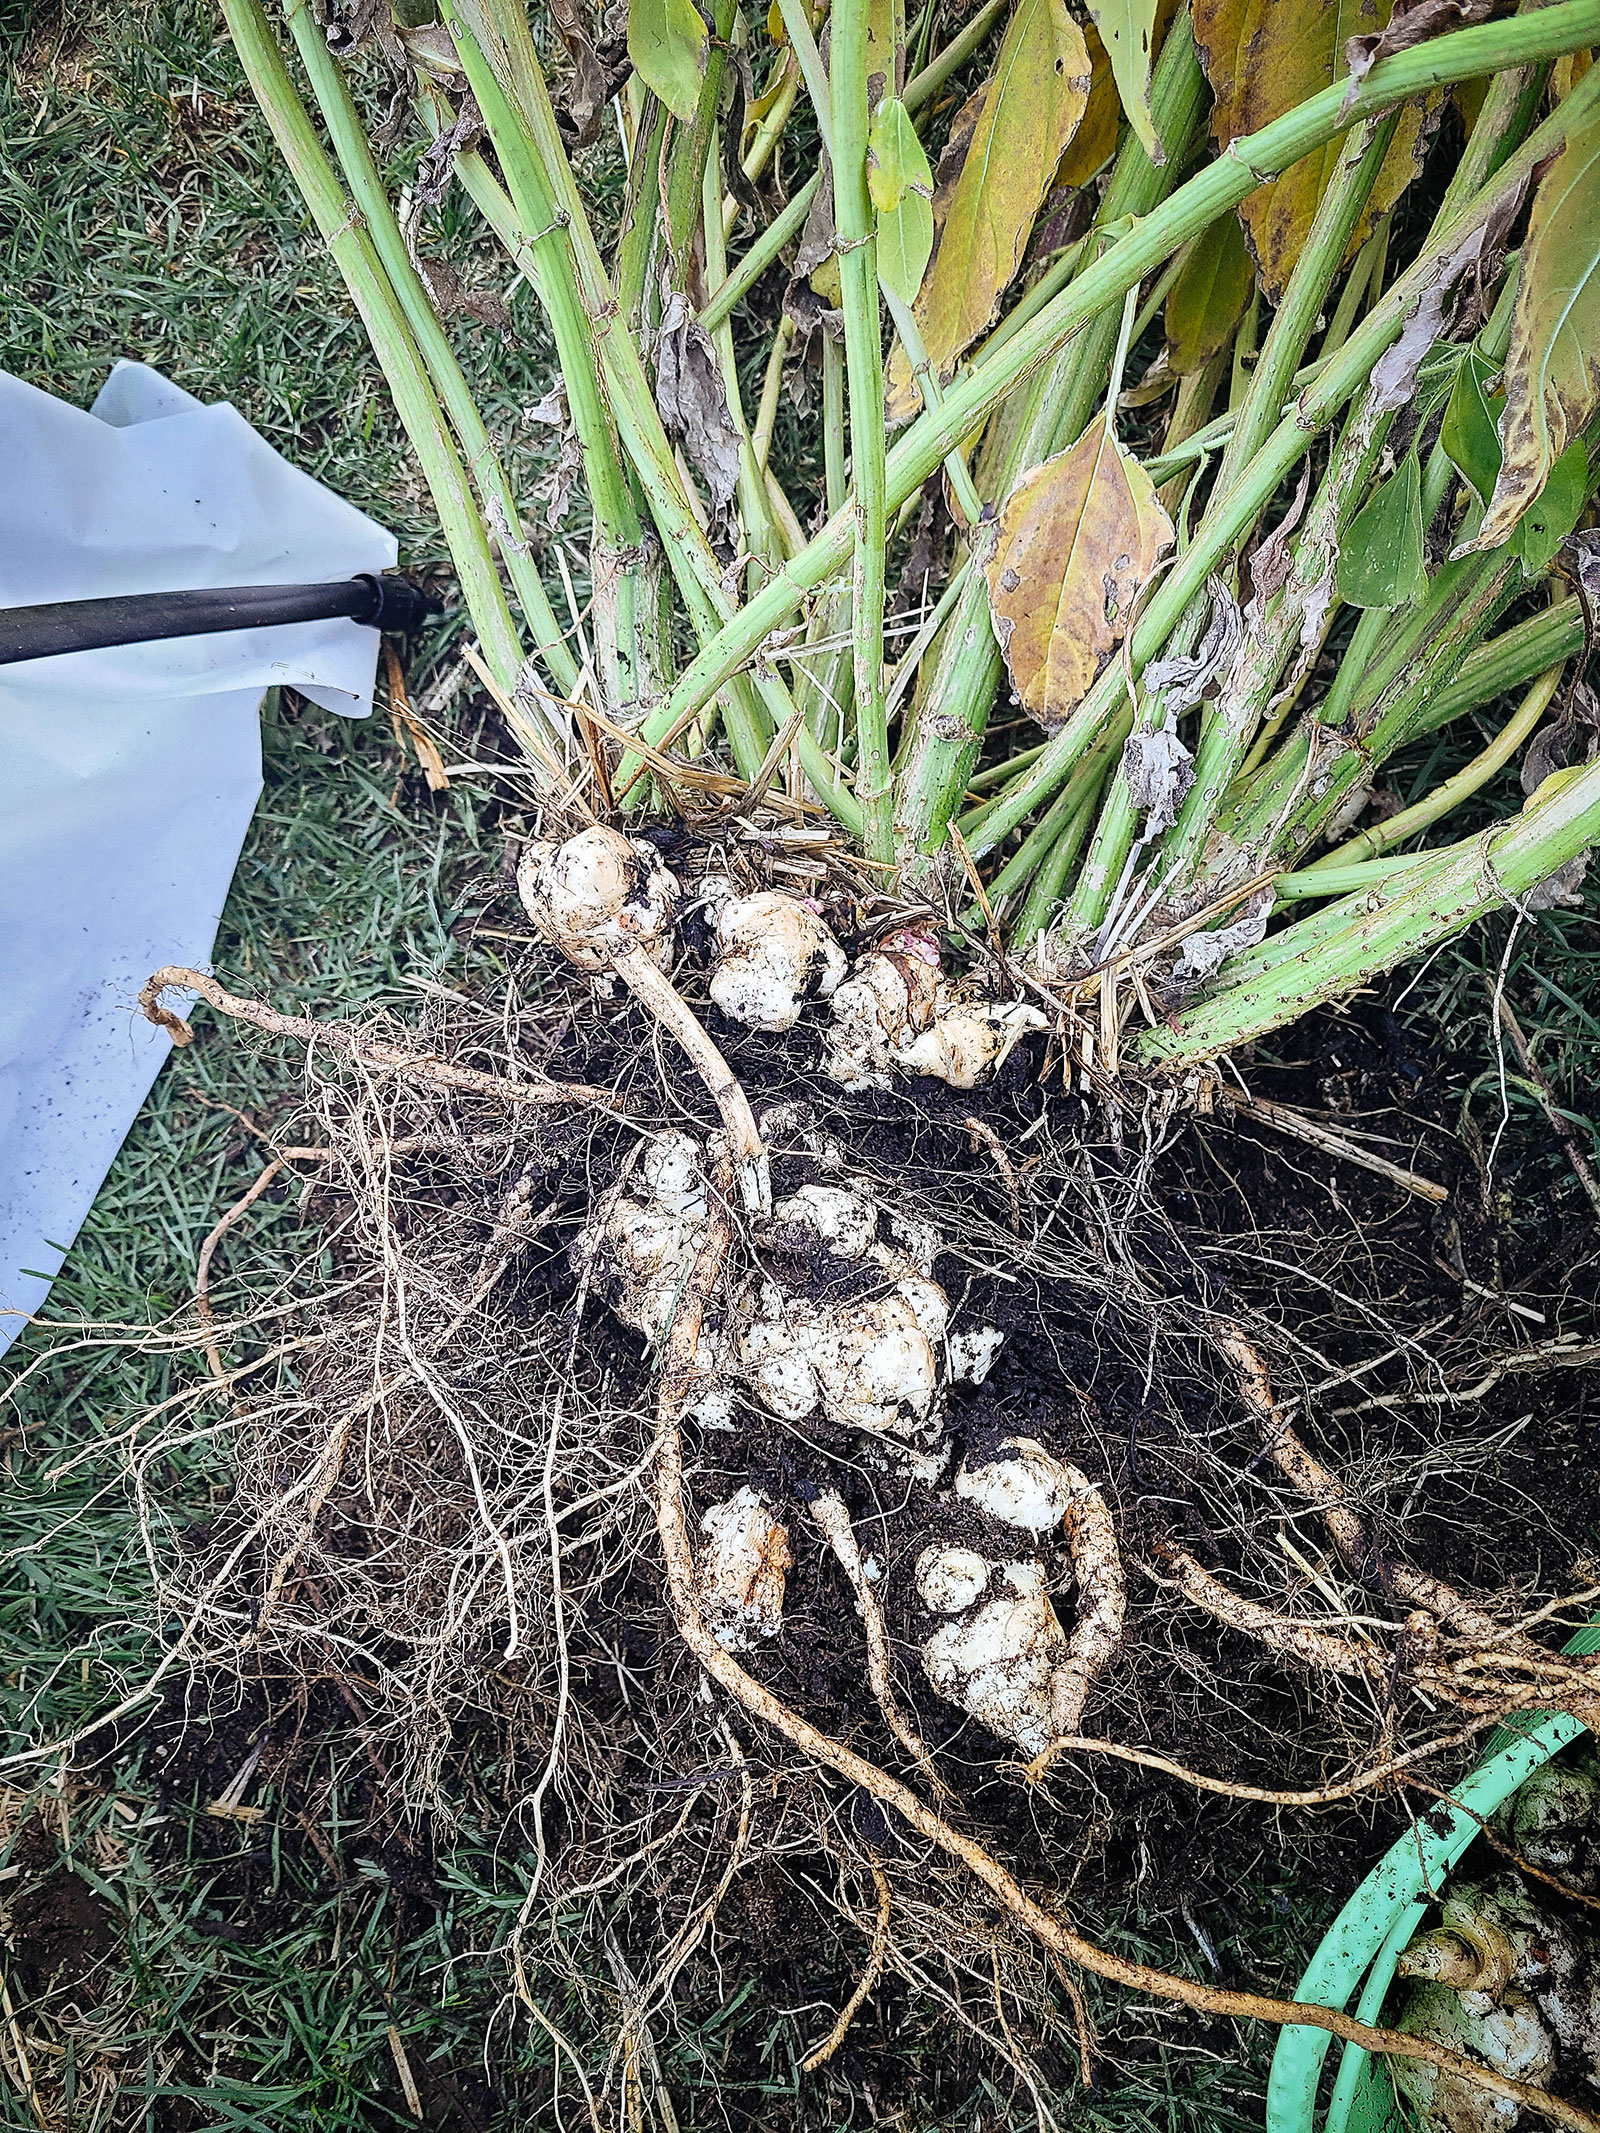
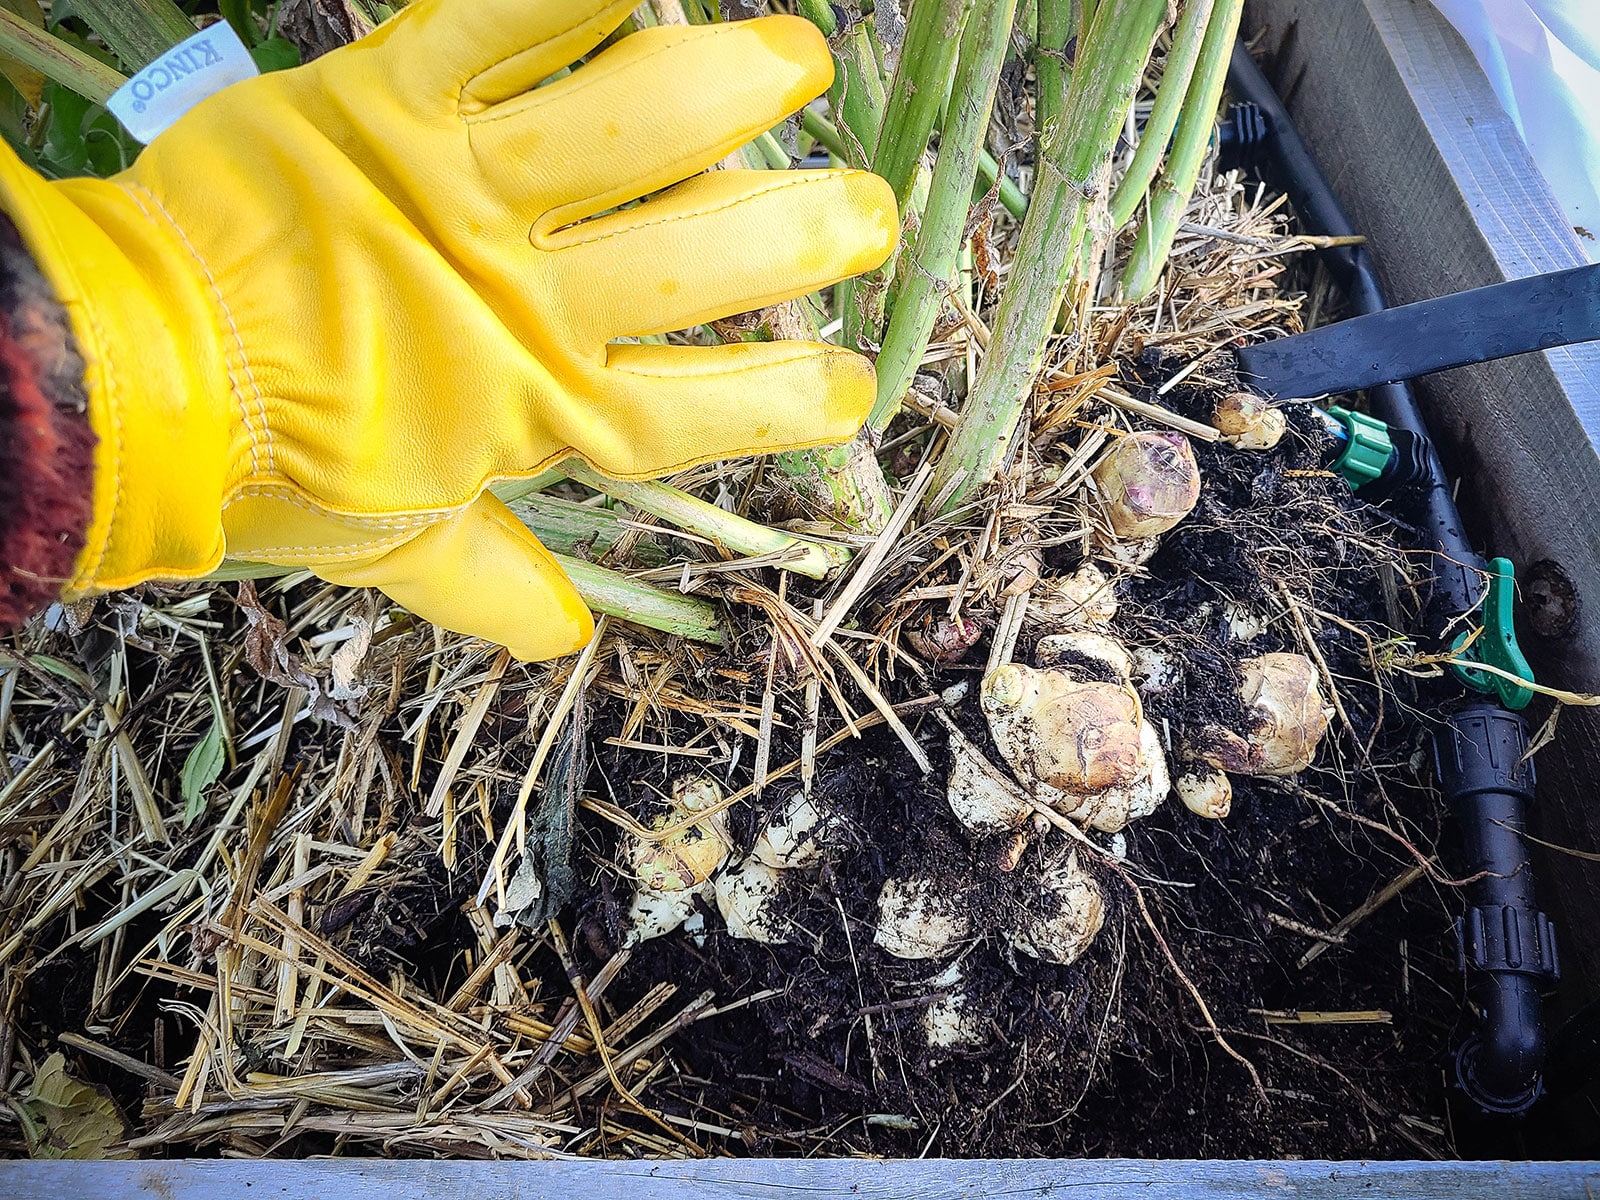
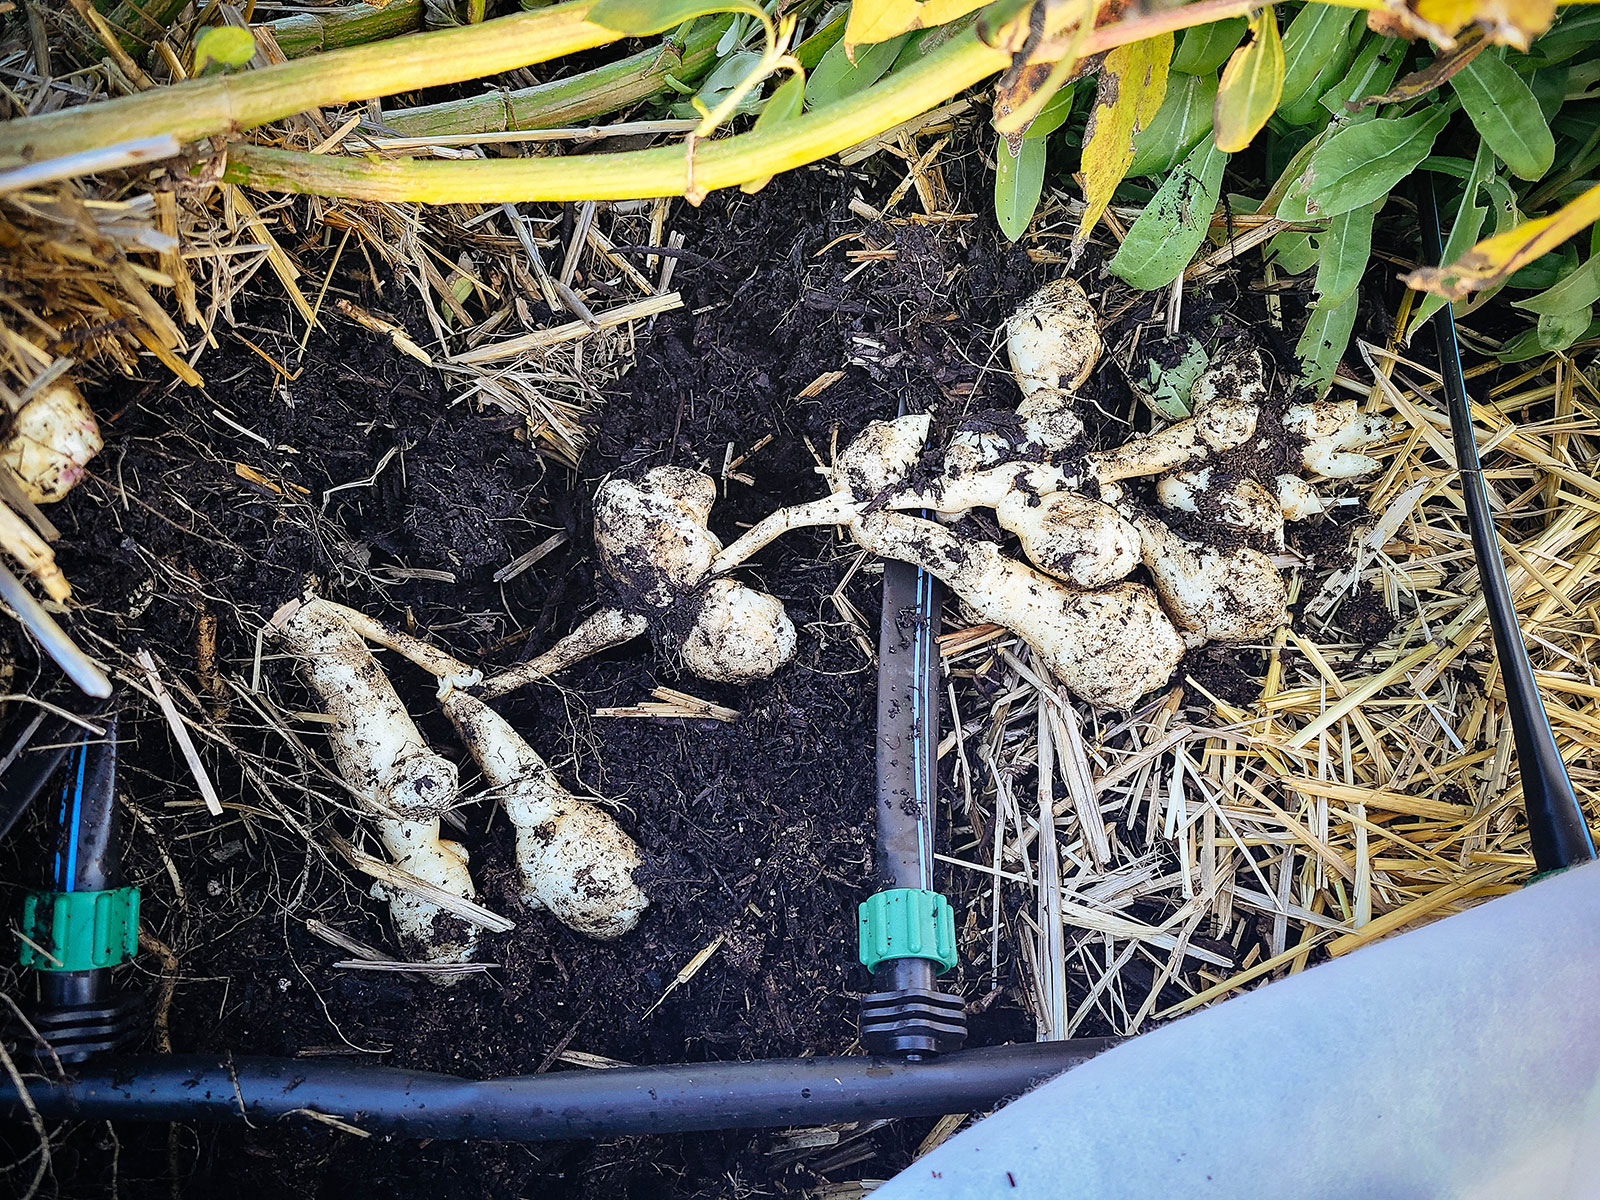
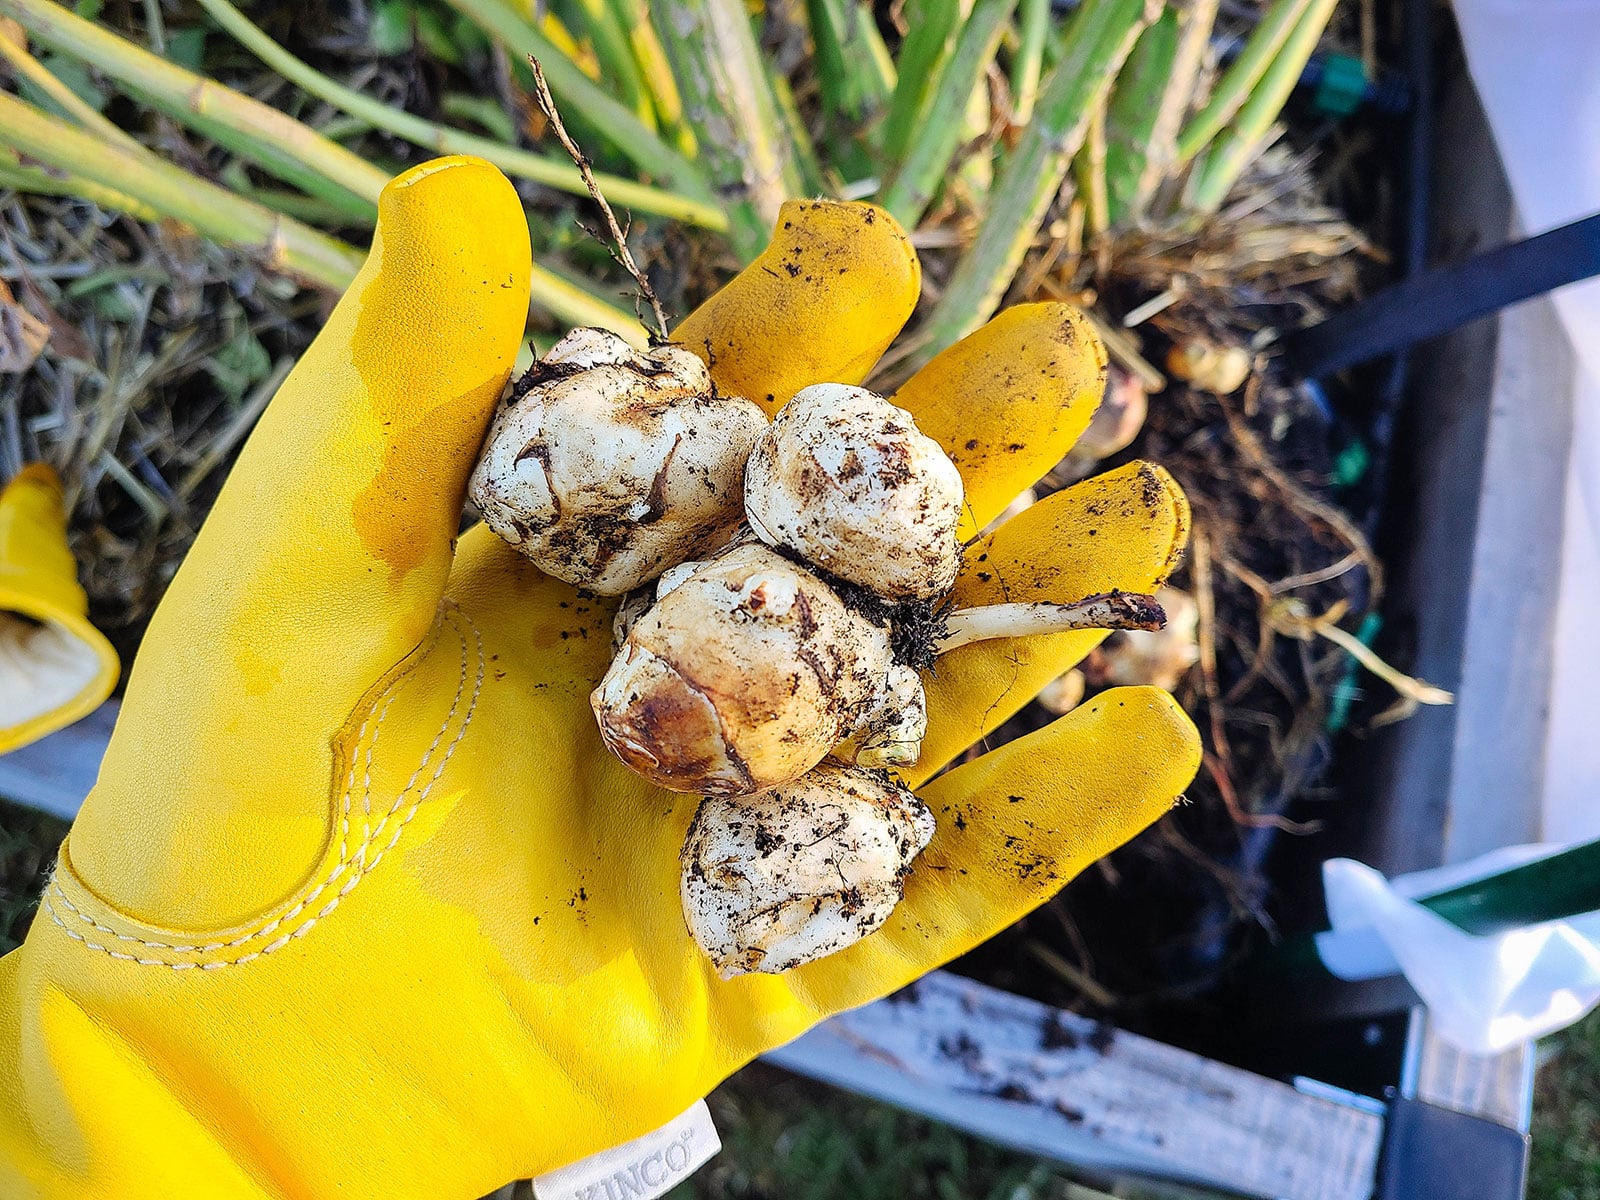
To harvest, I use one of two methods: The first is to lightly dig up some of the soil around the base of the stems until I see the tubers. This is pretty easy with Dwarf Sunray and similar varieties since the tubers stay close to the surface.
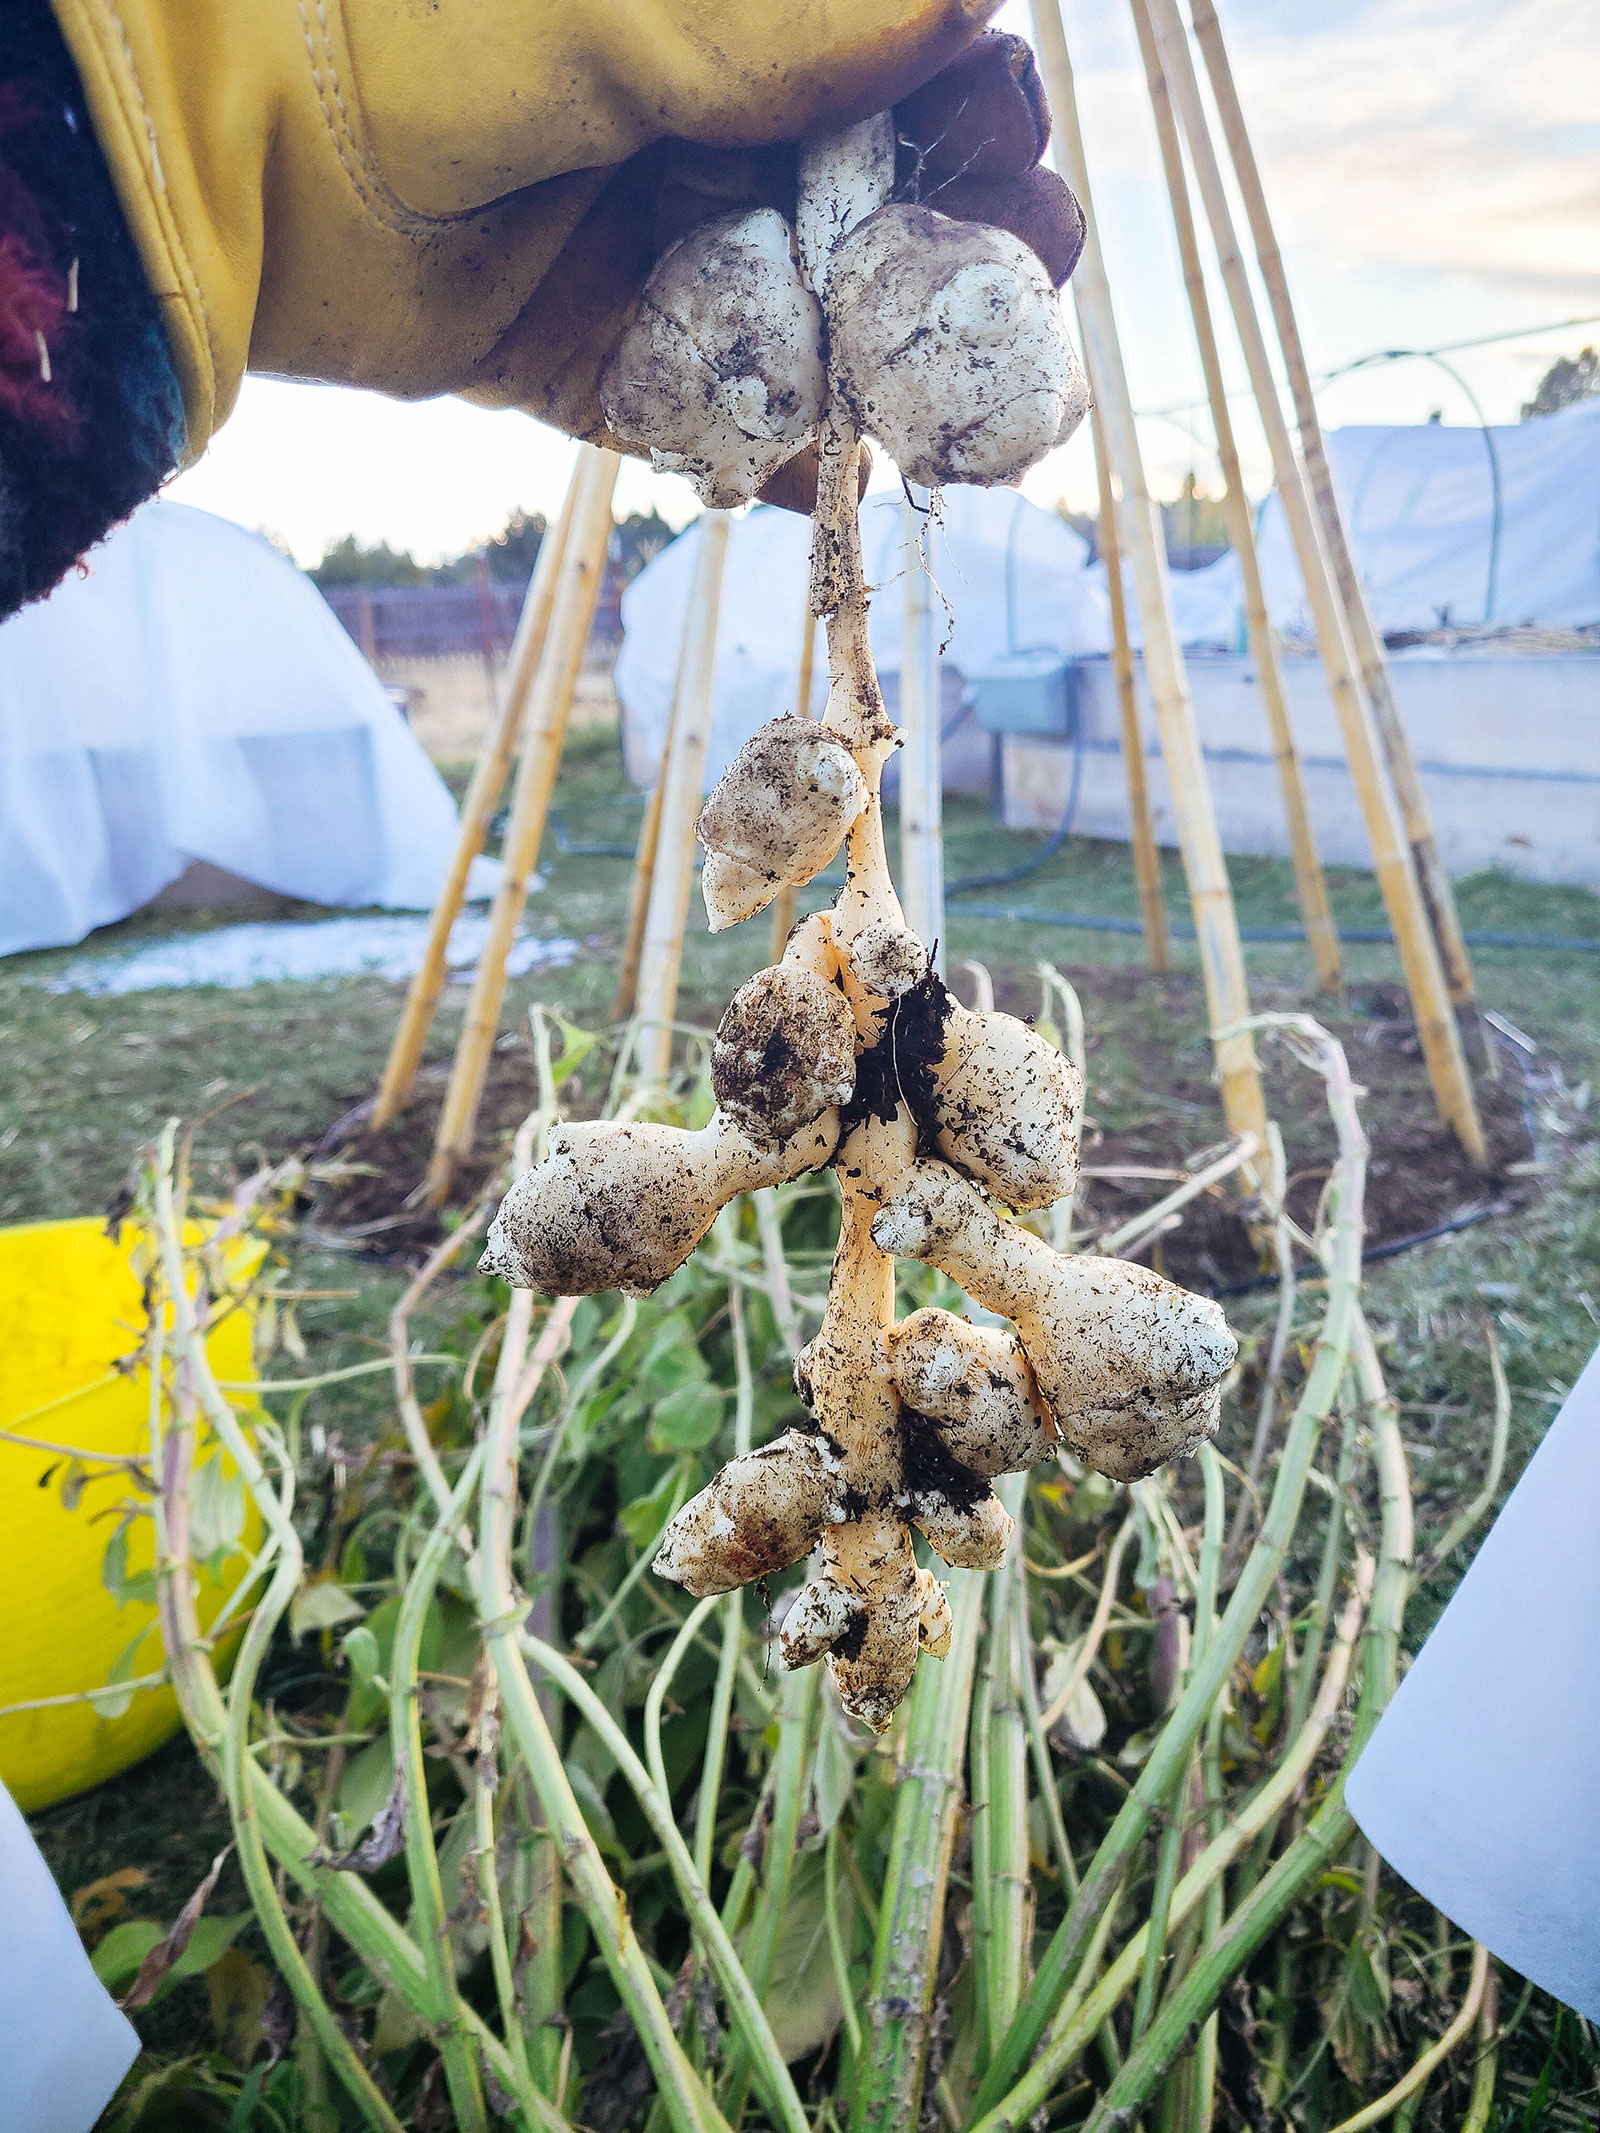
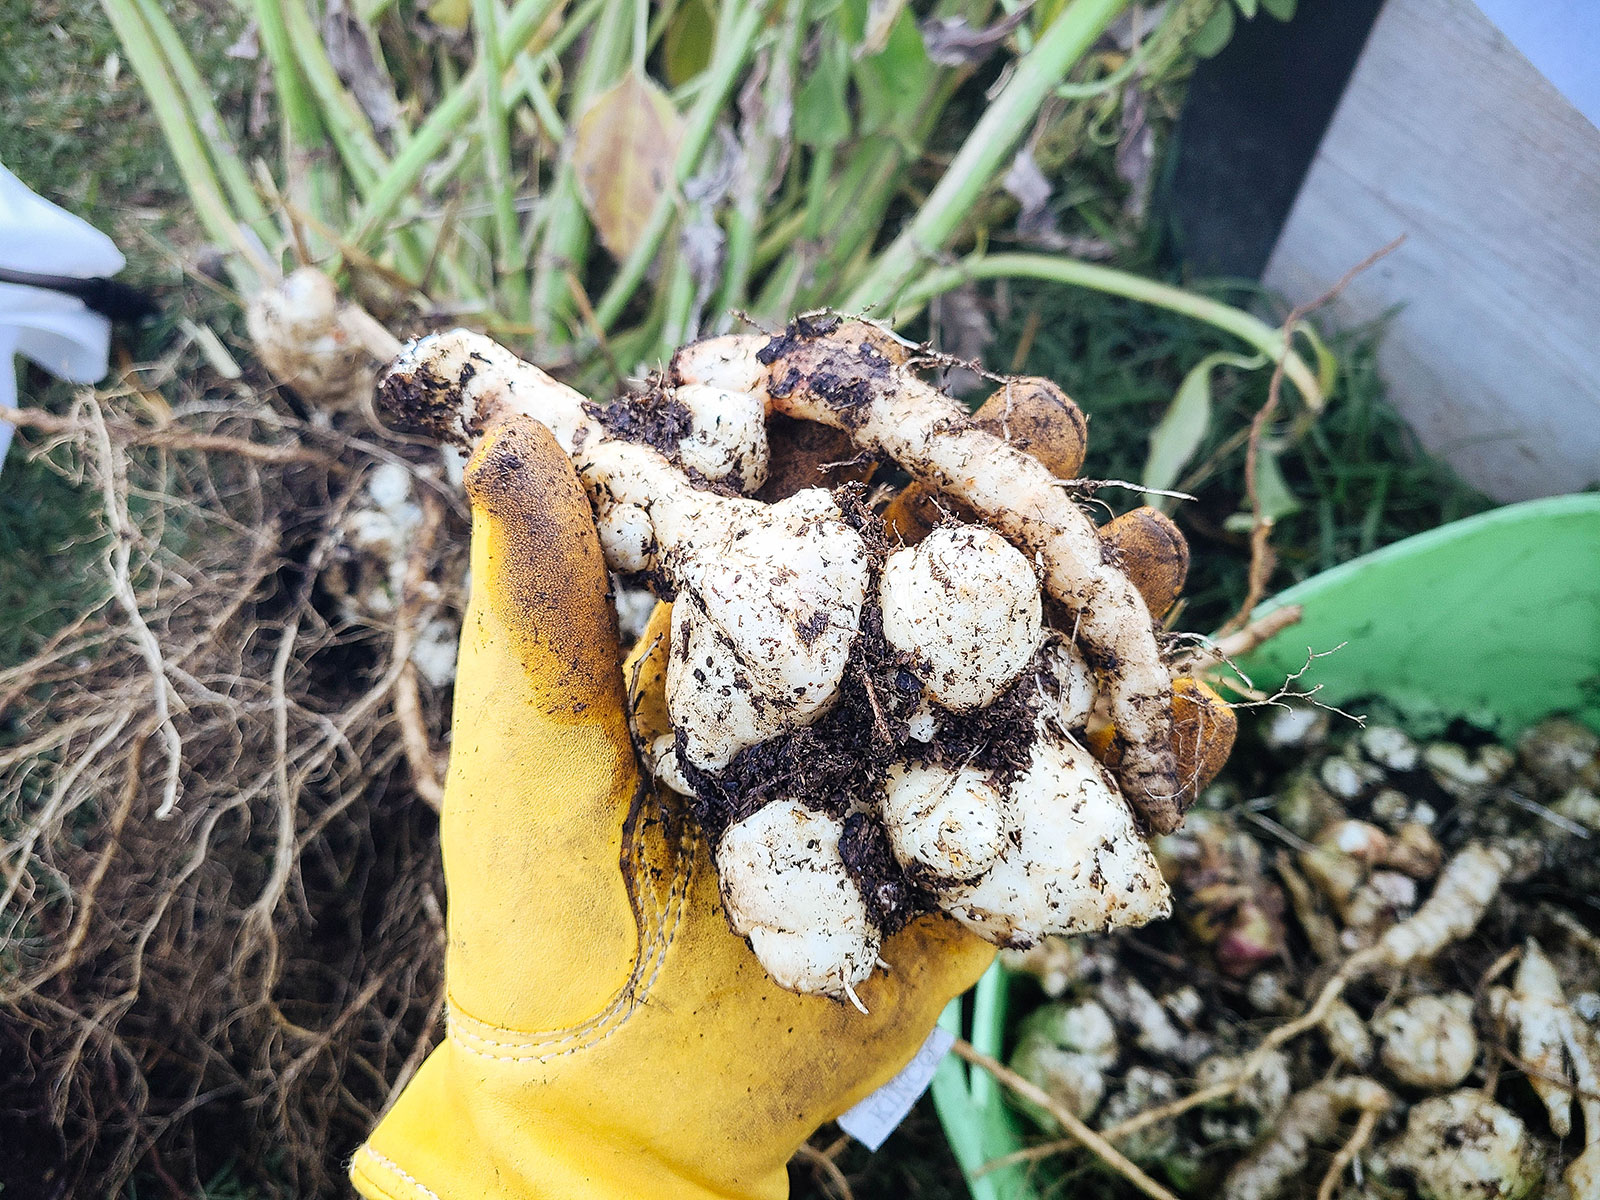
Once you’ve exposed the cluster of tubers, you can lift the entire plant out of the soil with your hands.
Jerusalem artichokes grow tall, wide, and heavy, so it might take a little strength to pull out all the stems at once. In the image below, I’m holding just one full-grown plant!
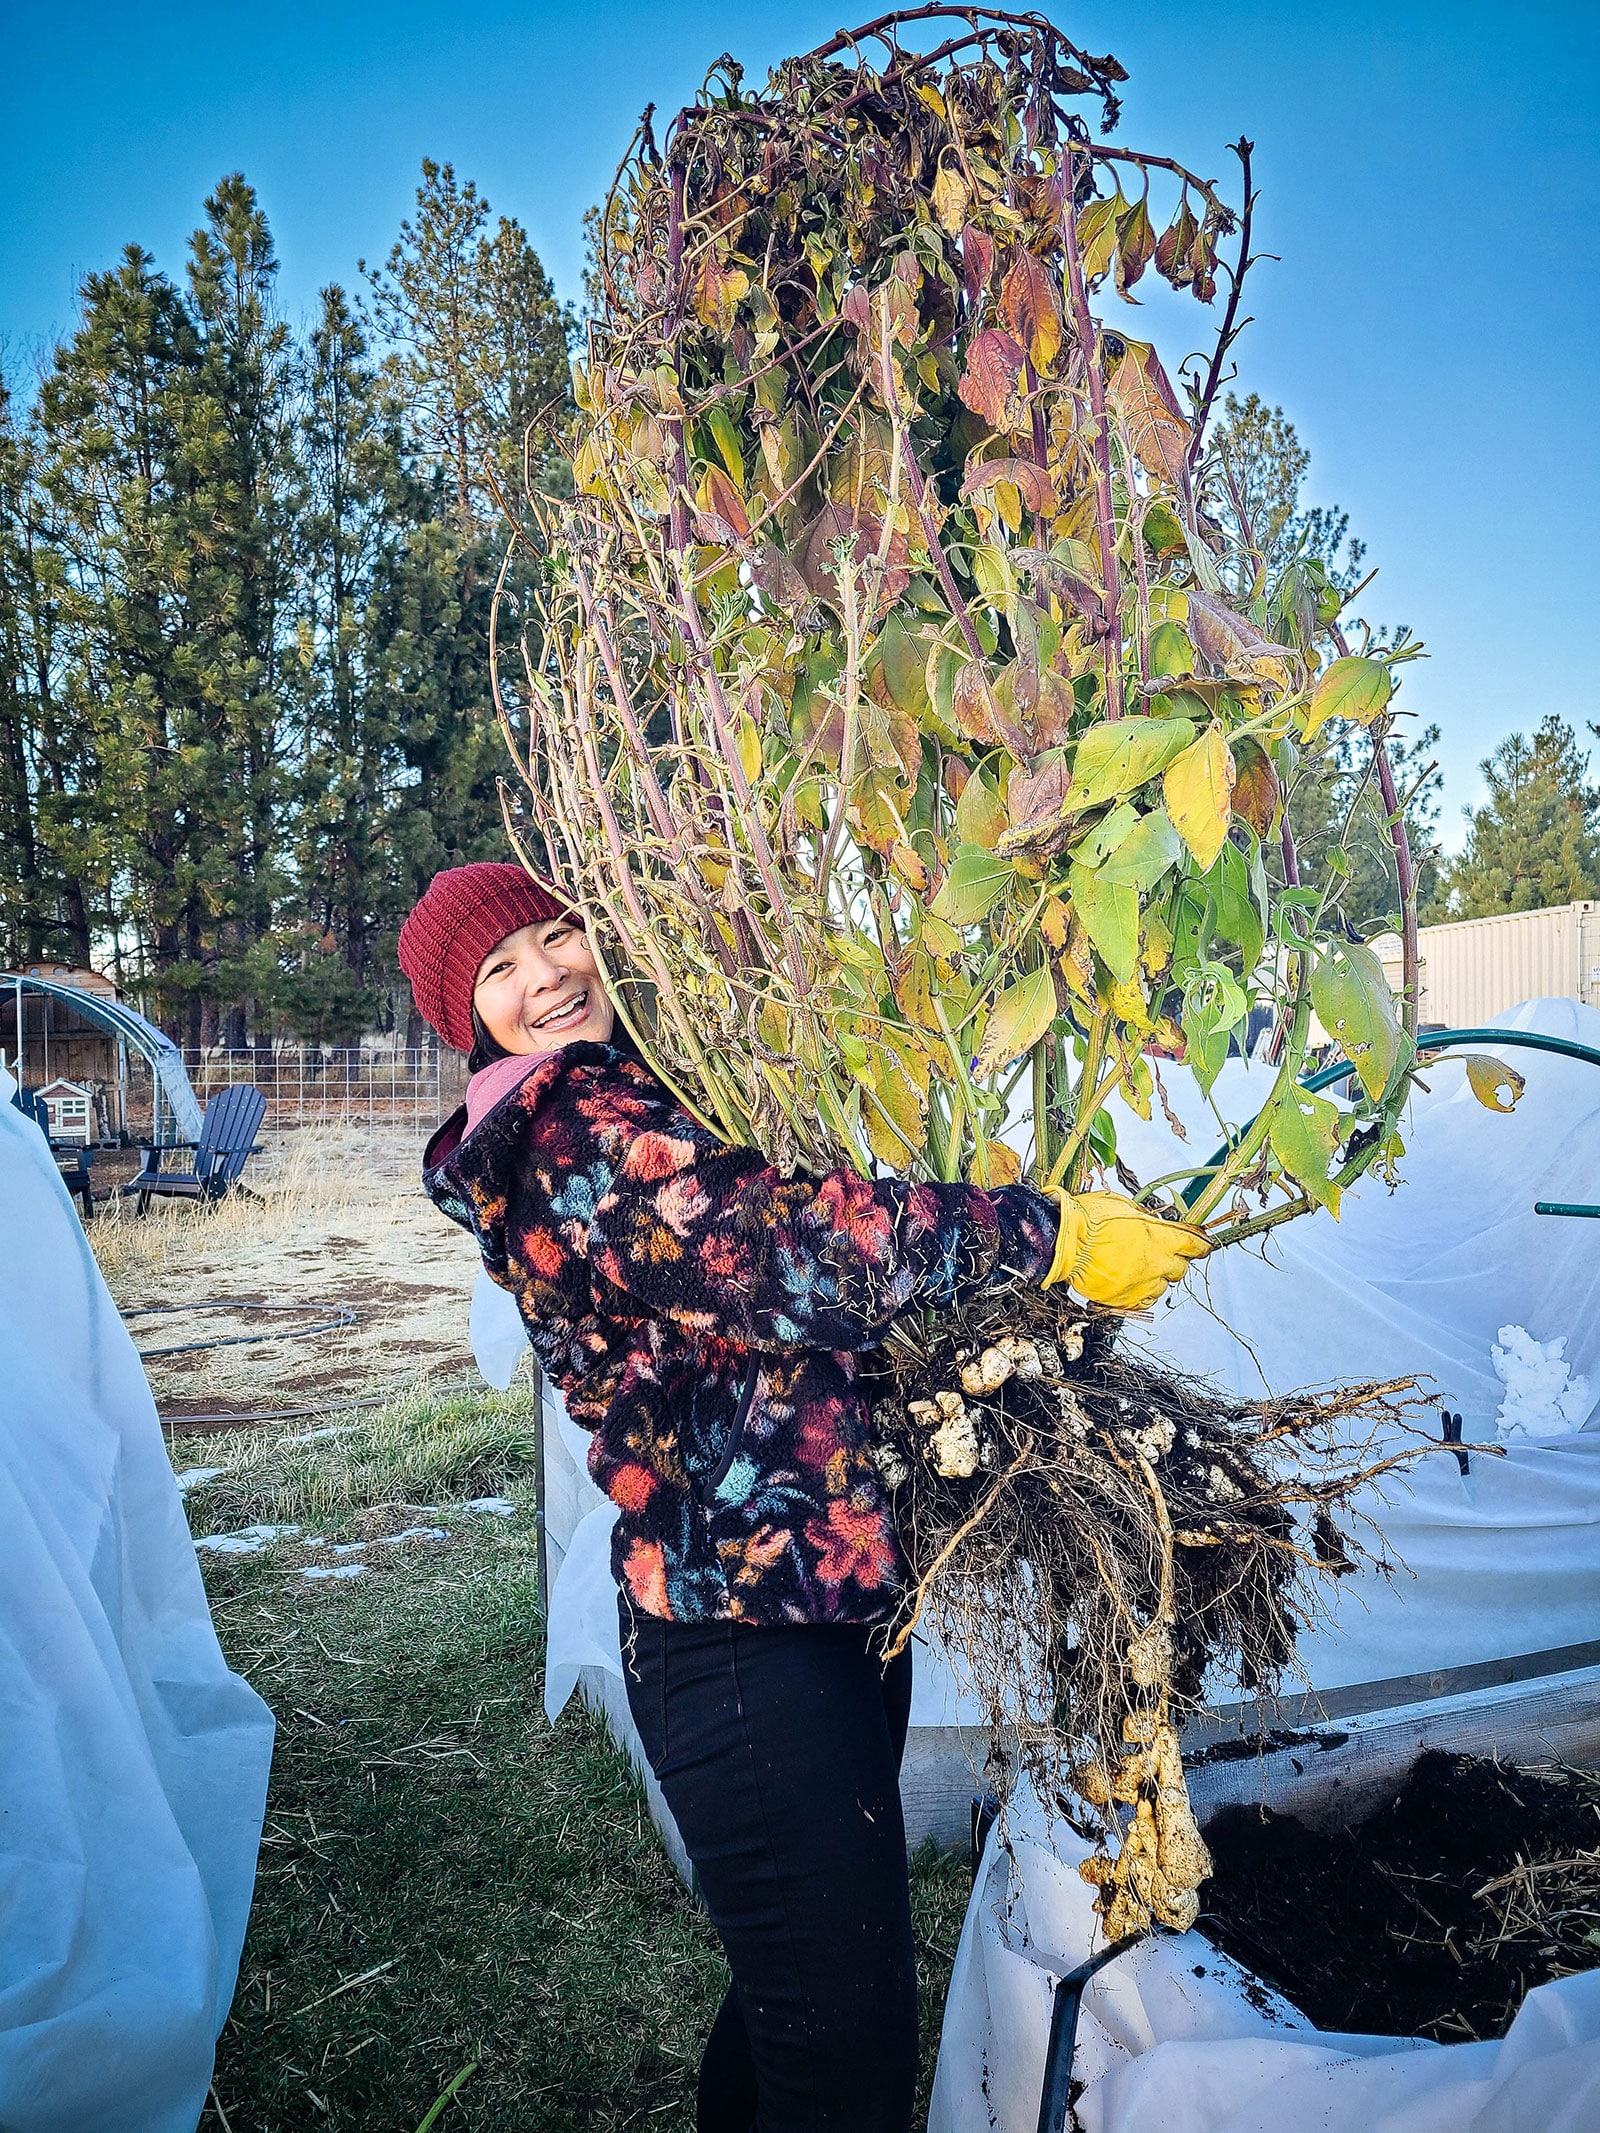
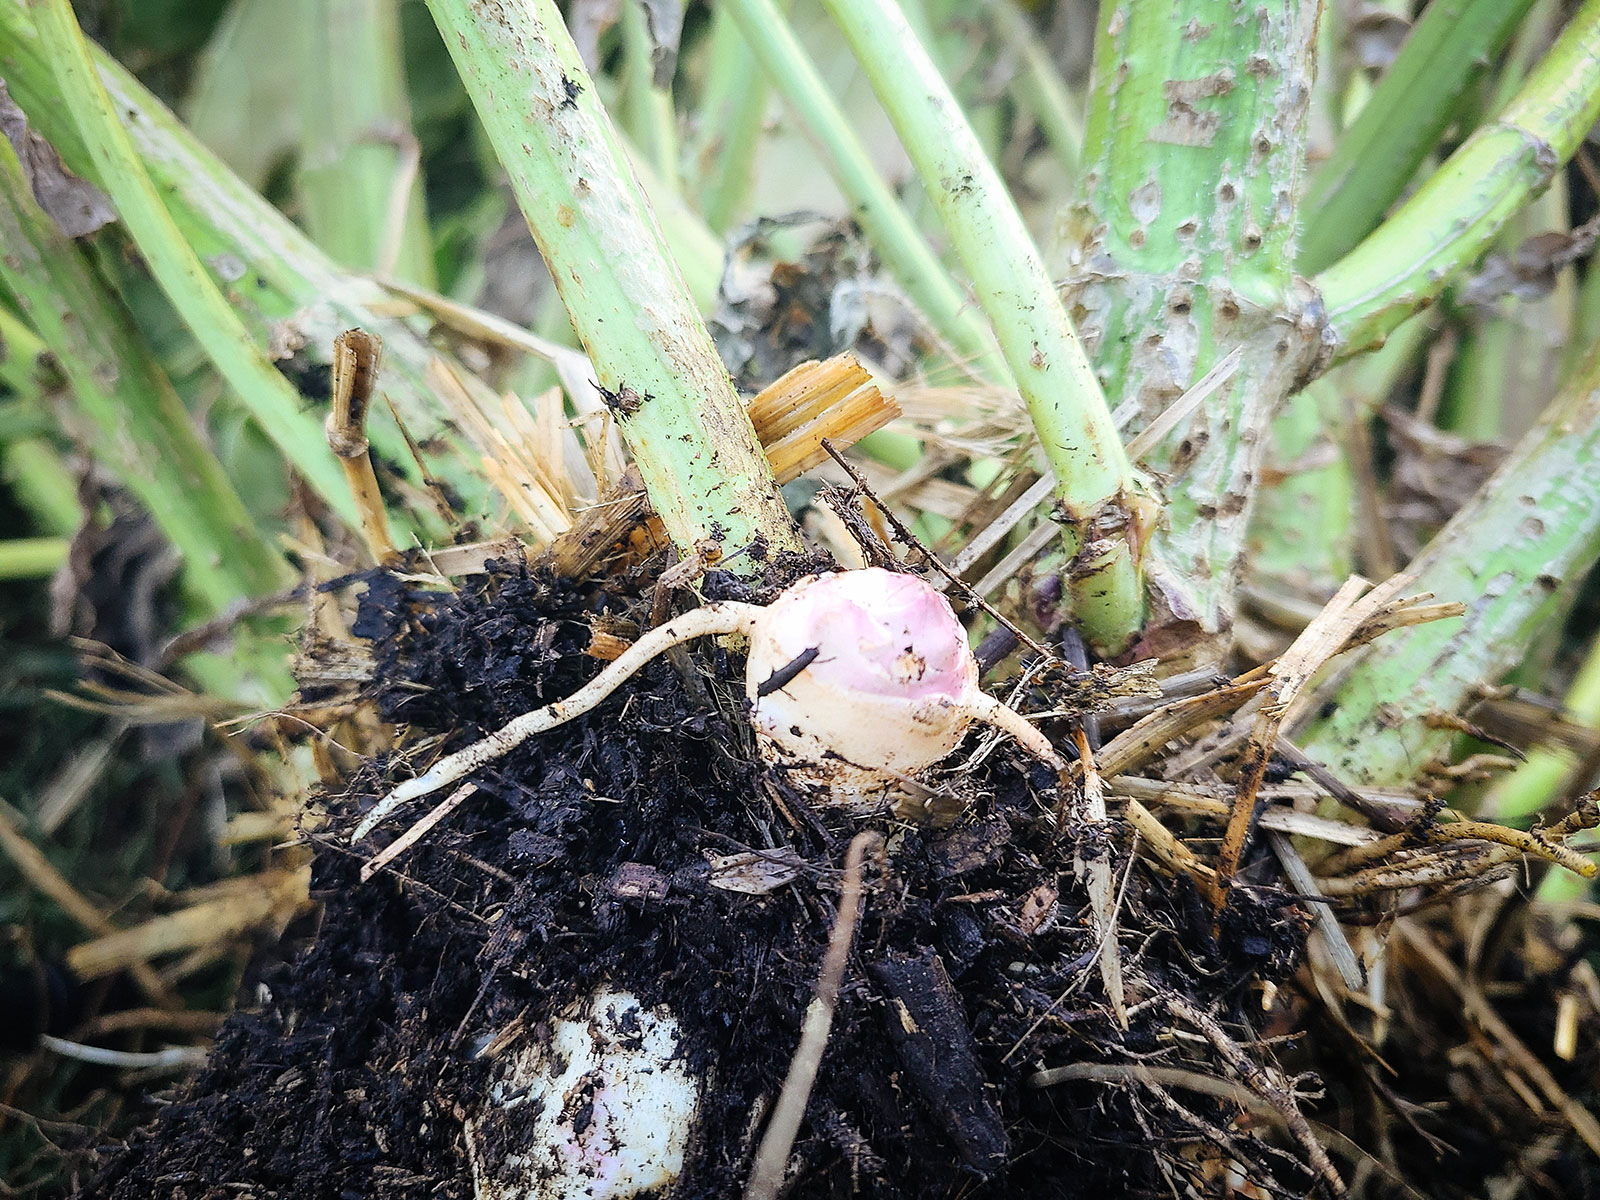
Most of the tubers should come out with the plant this way. If the plant has long stolons, be sure to feel around under the soil to check for any tubers left behind. (You can see below how one of my Dwarf Sunray plants had developed one random long stolon. This occasionally happens, even with short-stolon varieties.)
Alternatively, you can use a garden fork or shovel to lift the tubers, taking care not to damage them.
Once the plant is out of the soil, the tubers should easily separate on their own or with a gentle tug. Any tubers still clinging to the base of the stems can be cut off with a knife. (I like my hori hori for this task.)

If you have several plants, the tubers don’t have to be harvested all at once. In fact, if you can’t use them all within a couple weeks, you can leave the rest in the ground, where they’ll keep all winter.
In extremely cold climates, be sure to cover the bed with an organic mulch (like straw, shredded leaves, or wood chips) and/or a low tunnel to keep the tubers from freezing. You can harvest Jerusalem artichokes continually until the weather warms up again and the tubers begin to sprout.
Frequently asked questions
Replanting for the following season
Like potatoes and other tubers, Jerusalem artichokes are persistent and will regrow from any tubers (or parts of tubers) left in the soil. So if you don’t want them coming back the following year, make sure you remove every last tuber when you harvest.
But, these plants are best grown as perennials, so you can replant some of your own tubers that you’ve harvested to get a new crop the following year.
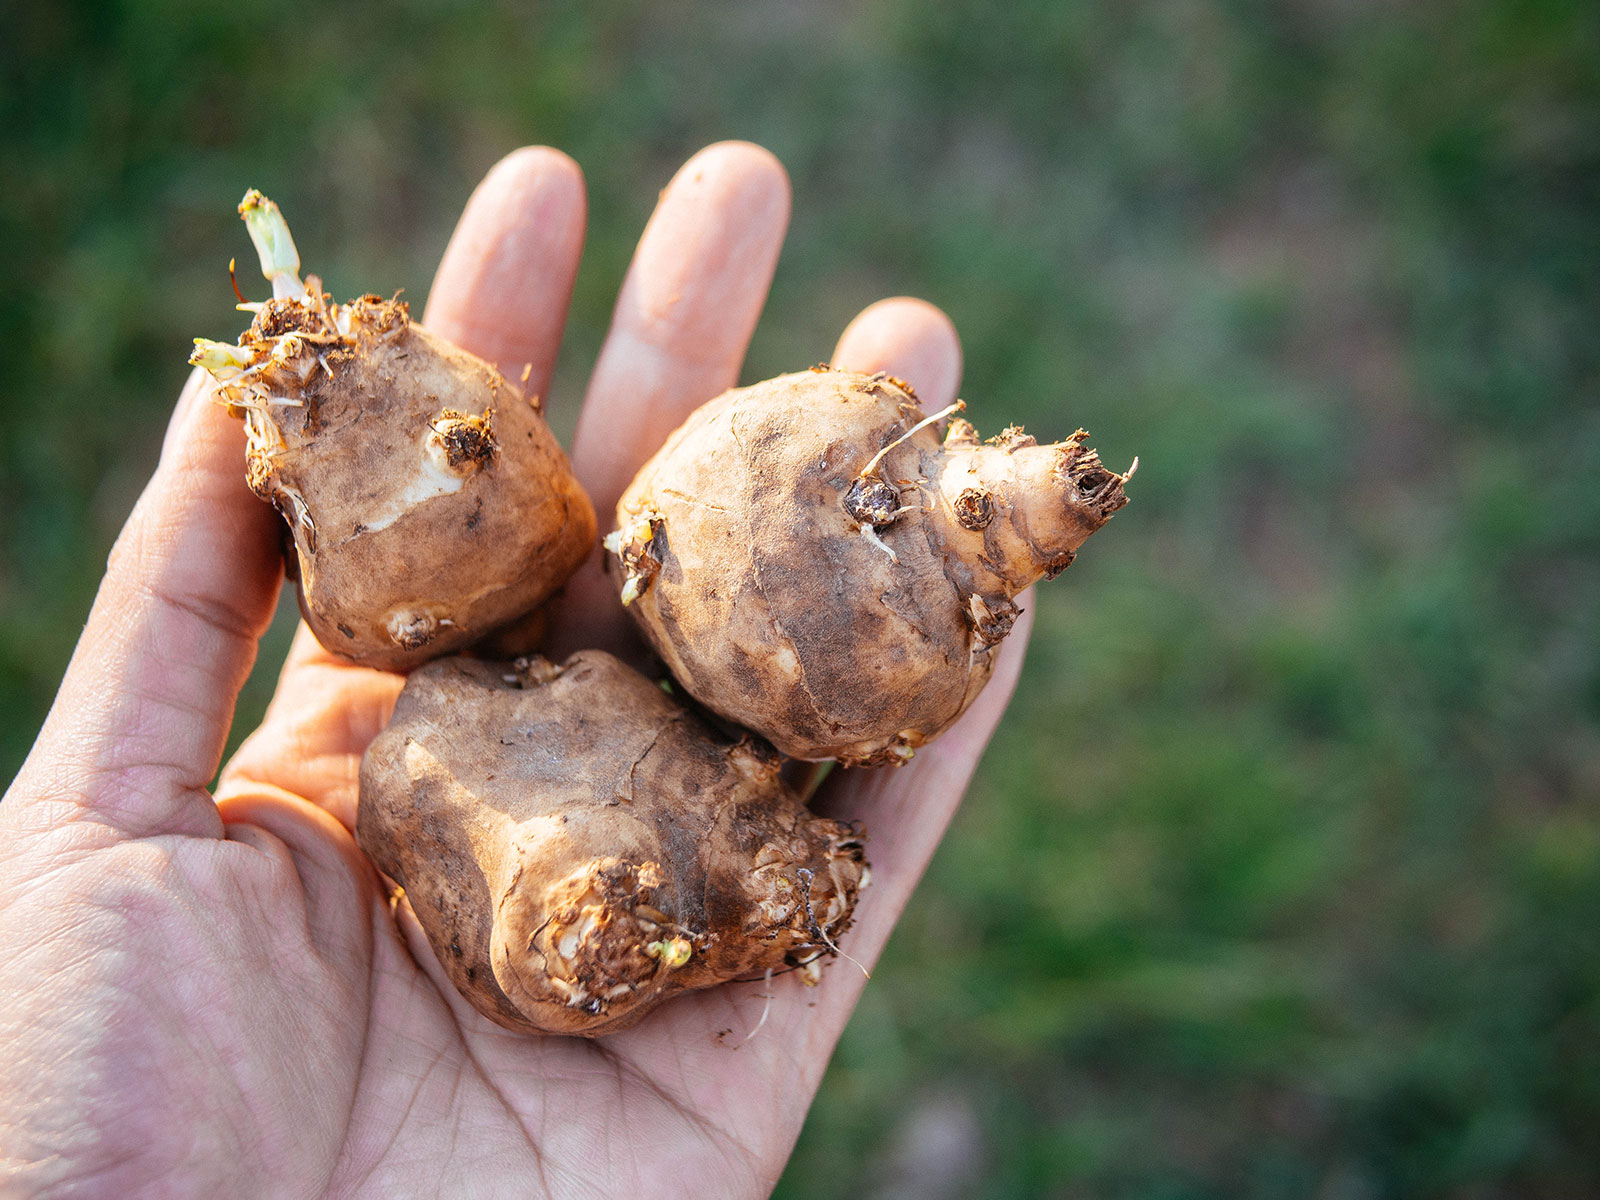
Choose the largest, smoothest tubers from your harvest, those with the fewest knobs and bumps. This will help you get larger and smoother tubers in the next harvest. If the tubers already have roots forming, even better! I’ve found that with each subsequent harvest, my tubers actually become larger and smoother (and easier to prep and eat).
Plant them in fall right after you cut down the stalks, add a thick layer of mulch to help them overwinter nicely, and wait for the shoots to emerge in spring.
The tubers don’t store well once they’re out of the ground. If you can’t plant them right away, you can just leave them where they are underground, then lift and harvest the tubers in early spring.
How to store and prep
After harvest, Jerusalem artichokes will keep in the fridge in a plastic bag for up to two weeks. If you have a cold basement or unheated garage that stays around 32°F, you can actually store the tubers in a container of damp sand for several months. (This latter method simulates them being outside in the earth.)
No more moldy produce
Don’t let good food go to waste!
Download my Fruit & Vegetable Storage Guide for printable charts, helpful tips, and secret tricks for keeping your produce super fresh for as long as possible.
But my preferred way to store them is much easier—just use the ground as your own outdoor root cellar! They’re perfectly happy where they are for the whole winter, and can be harvested as needed.
Only wash your sunchokes right before you’re ready to use them, and make sure you give them a good scrub beforehand, as soil likes to hide in all the crevices.
The skin on all sunchokes is edible, but vary in thickness and roughness depending on the variety. So, peeling (or not) is personal preference.
Remove any bumps and nodes that make cleaning or cutting difficult, then slice, dice, or cut into chunks for cooking. You can prepare sunchokes like you’d prepare a potato or parsnip.
These are a few of the ways I like to eat sunchokes: pickled, sliced very thinly for a salad, pureed for soup, diced and added to a hearty stew, or roasted with other root vegetables (you can parboil them first before roasting in the oven, as this gives the sunchokes crispier skin).
When using raw, sprinkle a little lemon juice on the cut slices to keep them from discoloring.
If you have enough sunchokes, you can make a baked gratin with leeks, cream, and cheese. Or, try slicing them thinly and frying them up as chips with your favorite seasonings. Sunchokes also pair well with citrus, balsamic, vinaigrettes, and other sharp, acidic flavors.
Can you eat the leaves?
Technically, yes, you can eat Jerusalem artichoke leaves. But as the plant matures, the leaves take on a sort of sandpapery texture and aren’t really appealing. (I suspect the rough hairy texture would disappear with boiling, though I haven’t personally tried this.)
However, you can harvest the young stems and the topmost layer of small leaves (when the plant is under 3 feet tall), as they’re most tender at this stage.
Cook them like you would most other greens—sauteed in oil and garlic or added to soups. When cooked, Jerusalem artichoke leaves taste like squash to me. I suggest not making an entire stir-fry with the leaves, but using and eating them in moderation.
Do Jerusalem artichokes cause flatulence?
I’m convinced that one of the reasons more people don’t plant (or eat) Jerusalem artichokes is because of its notorious reputation as a fart-inducing food.
Yes, Jerusalem artichokes can make you fart—I certainly wouldn’t recommend serving it with beans if you’re prone to being gassy!
In fact, the tuber has such potent flatulence powers that some gardeners and chefs have even nicknamed it “fartichoke.” (Good one, right?)
This is because Jerusalem artichokes contain very high levels of inulin, a non-digestible carbohydrate that’s fermented by gut bacteria. Eating the tubers raw can exacerbate the problem in people with sensitive stomachs, so try cooking the tubers first to help alleviate gas.
This is partly the reason you should wait until the tubers are fully ripe in late fall before you harvest. The longer they remain in the ground, the less inulin they contain.
The good thing is, you’re not likely to eat so many sunchokes in one sitting to cause excess wind, but this is something to keep in mind. Stick to moderation, and you should be good at any dinner party.
This post updated from an article that originally appeared on September 22, 2021.


Thank you for your extremely helpful work in writing all this, so I have a solid chance at being successful in my first attempt at planting them. I read everything except the part about where to get the tubers, as mine came in the mail today from Amazon. I appreciate your time, expertise, experience, and clear prose.
Fantastic article and so thorough.
After reading, I immediately purchased the Drwaf Sunray Sunchokes from the Etsy seller you mentioned. Thank you!
Your article as always is well thought out. I find that when I use small amounts of inulin based sunchokes in a fresh salad regularly very little gas is produced because specific micro organisms in the large intestine increase in population and consume inulin along with other prebiotics and resistant starches to produce Butyrate and other short chain chemicals that are extremely important for the health of the gut, brain and more. We need to consume a variety of plants regularly to feed the important garden in our body. I love a roasted chicken but my gut critically needs to be fed a variety of vegetation some of which can only be digested by micro organisms to produce 70% or more of the immune system, and other important chemistry. There is a pharmaceutical factory in you that needs what you grow in your garden and more.
I am currently fermenting a gallon of Sunchokes cut in 1 and/1/2 pieces using a brine of a generous Tablespoon of salt per two cups of water. Spices are in the middle of the jar. The ferment must always be covered by brine. The suggested wait time is around six weeks. The brine becomes cloudy and I understand it is also useful after the ferment. It is an experiment to find a use for an ample crop. Check out articles on how to ferment plants.
I like to ferment cabbage and mustard greens (recipes are on my blog if you do a search) and have also fermented carrots, cucumbers, radishes, and several other vegetables. It’s one of my favorite ways to preserve food and I love a good pickle. I’ve never tried fermenting sunchokes but that sounds interesting. Let me know how they turn out!
Hi, Do you happen to sell your Jerusalem artichoke bulbs or suggest a good place to purchase them?
I was gifted a large bag of small tubers this spring … over 50 ! Planted them pretty close (around 6 inches) in a 2×8 foot bed as I wasn’t sure they would all take. They grew really tall and flowered. Will be harvesting some soon, first light frost has happened already. I’m expecting smaller tubers since they are so close.
I’m curious about replanting the larger smooth tubers VS just harvesting by section and letting the smaller “forgotten” tubers regrow. Makes sense to get a better crop every year but if I harvest till spring, wouldn’t I be removing them? What’s the best strategy to contiue harvest till spring without compromising next year’s crop?
Very good and informative!
I had a whole wall of Jerusalem root growing along the edge of my yard for years. I’ve never done much with them, just enjoyed the flowers and privacy wall they created. Last year, none of them came up and nothing again this year. Thoughts of what might have happened to the whole lot?
Cooking them with lemon juice or vinegar first is reported to make a major improvement in the gassiness. Also, fermenting them (sunchoke kimchi/sauerkraut?) is supposed to eliminate it altogether!
Hi Linda, thanks for such an amazing post 🙂 do you know if the foliage and flowers of Jerusalem artichokes are edible also?
Many thanks
kelly
A friend just gave me some jerusalem artichokes to plant (Nov). I want to plant to get them started. Should I winter them in the basement until I get my bed ready to plant? I am in SC.
To me, the pink ones are ‘farty’, especially when raw. Cooking them eases the pain. Good tip about removing all of them in the Fall and immediately replanting the better, smoother ones. The one yr. old root is also the smoothest one, the least knobby. I grow them on the same schedule as my garlic: Harvest, sort, replant, usually in November. The white ones, especially cooked should not give you flatulence.
I grow mine in a high raised bed [12″high]. This helps contain them if you have a “wanderer” cultivar.
In central Wisconsin, the soil is very sandy, so the roots can wander a lot easier. In a high bed, the roots grow until they encounter an obstacle, like the side of the raised bed. That is when they stop and the energy that is in the plant causes a tuber to form right there. Every once in a while, they slip under the edge of the bed. I can lift my beds out of the ground for that purpose. the tubers seem to congregate close to the mother and right under the edge of the bed.
Oikos.com had a very nice selection: they selected for size and color but also for taste and short or long stolons.
Even in zone 4b, your best bet is to winter them in the ground: You can pick them whenever the ground is not frozen. Since I would not want to eat them every week, it works very well. In November-December, they are great. since the ground freezes solid here, I have to wait until the end of March, beginning of April to have some again.
I think my plants are sunchokes, but the tubers are small, smooth and pink finger like. Are they edible., can’t find a photo to verify.
Sunchokes are just the edible tubers of Helianthus tuberosus (a native sunflower) so if that’s what you planted, then you have sunchokes. If this is a wild or random sunflower patch in your yard and you happened to dig up the roots to check, they might be immature sunchoke tubers (if you dug them up early) or just regular sunflower roots. Hard to know unless you know the sunflower variety.
My dad accidentally cut the stalk of our Jerusalem artichoke yesterday. Will it survive the summer if I water and fertilize it, overwinter it, and come back next spring? Thanks for your article, it was very helpful. ^~^
Yes, just leave the tuber in the ground and continue watering. It might even resprout this summer.
I have ben growing sunchokes in the last 5 years and
Some of the info did help me cultivate better for the next year.Exciting story with practical and valuable tips.
My first season with the chokes. I live in south Mississippi where av temps are 50-60 with occasional freezes. Harvested one plant this week. Delicious! Afraid with so much rain/warm temps they may sprout!! Help!!
Been growing sun chokes for years, knew I could eat the root(I’m a Chef) but a great wealth of information that I didn’t know! Thankyou!
You’re welcome!
Your story is amazingly detailed. Yes they are fast but I’ve tried to introduce friends to sunshades only for friends to turn thier noses up at them for thier bitter flavor from harvest after frost. I’ve since learned that cutting down the stocks before frost removed the bitter flavor. Never removed the flowers though so don’t know the advantage. Thanks again.
You’re welcome, I’ll have to try that both ways (cutting down the stalks before and after frost) and see if that makes a difference with my Dwarf Sunray variety. Sometimes, bitterness is related to weather conditions too (especially hot weather/drought while the tubers are maturing).
I live on the sout Coast of England and got 3 of them Plants growing higher and higher now 10 foot bu5 no Flowers it# now September will they still bloom?
Great post! I appreciate your in-depth coverage!
I’m glad you found this post helpful!